How to create double exposures on film
Everything you need to know to capture the world in a brand new way.
You pick out a roll of film and load it into your camera. You advance by a few frames. You line up your shot and…*CLICK.* The shutter opens for just an instant, light hits the film, and the moment is captured. All that’s left is to advance to the next frame…Or not?
Shooting double exposures is a classic technique that involves exposing the same section of film twice to overlay two scenes within a single frame. This can be repeated any number of times to create multiple exposures of any amount, but in the interest of keeping this article a bit simpler, I’ll be sticking to just double exposures.
Related: Best 35mm film
Why try double exposure photography
Everyone goes through periods of feeling uninspired, and shooting a roll of double exposures is a great way to get the creative juices flowing again. Personally, I shoot a lot of film and I often revisit familiar locations. There’s certainly no lack of pictures to be taken, but it can be hard to get excited about shooting somewhere you’ve been to countless times before. For me, shooting double exposures is a way to breathe new life into a place; it gets me excited to go out and shoot again.

Another great thing about shooting double exposures is that they’re super simple to try out, but very challenging to master. Double exposures can be done with any film camera and often lead to cool results even without any real planning.
Related: Everything you need to know to get started with Super 8 film
If you do decide to plan though, there are many factors that go into creating that “perfect” image. The type of film, how scenes are metered, and the framing of shots are all essential when trying to create more intentional double exposures. Experimenting is key, and even though there can be a lot of disappointments, it’s worth it when one comes out exactly as you’d hoped.

The science behind double exposures
The way this works is pretty straightforward but requires a basic understanding of how film functions. Film consists of a strip of celluloid coated with chemicals that react to light when exposed (i.e., they are photosensitive). This reaction permanently alters the film such that the specific pattern of light (the photo) can be seen once the film is developed.
With that in mind, there’s no reason why the same strip of film can’t be exposed to light a second time to re-trigger this reaction, thereby layering two photos into a single frame. Now, this is an extremely simplified explanation, but hopefully it helps give a bit of background to what’s going on when you take double exposures.
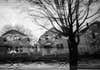
A final thing to remember is that the shadows of the first photo will show in the second photo more prominently, and vice versa. This is because the shadows of a photo haven’t been exposed to as much light as the highlights, so they still have the ability to retain an image. For example, consider the following photo:
In this double exposure, the shadows of the first image (the road) show the statue most clearly. Simultaneously, the shadows of the second image (the statue and its base) show the cars and the power lines best.
To plan or not to plan?
Related: Film photography is driving increased silver demand
There are three approaches I like to take when creating double exposures. These are just meant to give you some ideas of where to start and to hopefully get your creativity flowing. The approaches are: Shooting completely random/unrelated images for each photo, shooting with a very loose overall goal (e.g. contrasting city and nature), and precisely planning out frames to achieve a specific vision.
Before showing you some examples, I’d like to mention that it can be easy to overexpose the film unless you have a good idea of what you’re doing. For that reason, I’d recommend starting out by underexposing each individual shot by one stop, then experimenting a bit once you see how that turns out. One easy way to do this is by setting your camera’s ISO to double the film’s ISO. That way you can just meter as you normally would without needing to remember to underexpose when shooting.

With that out of the way, here are a few examples:
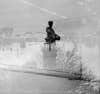
Leave it to chance

This double exposure was taken with no plan in mind. I enjoy the unexpected composition here, with the right of the frame being extremely crowded and the left being fairly empty. It’s not something I would have thought to do intentionally.
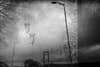
Keeping in theme
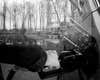
For this double exposure, I shot through the entire roll at separate times with the goal of photographing city scenes on the first pass and nature scenes on the second pass.
Planning the shot
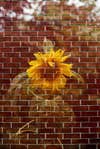
For this frame, I had a specific plan in mind. I wanted to create some ‘artificial street art’ by first taking a photo of a brick wall, then a photo of a sunflower. For metering here, I underexposed both scenes by about a stop, but ensured the sunflower was against a mostly dark background.
How to photograph a double exposure on film
Method 1: Shoot the same roll twice
If you saw my guide on redscaling film, you’ll be happy to learn that creating double exposures is even easier. Depending on your camera, there are a few ways to achieve this effect.
The first way to take double exposures is to shoot through a roll fully, rewind it, then shoot through the whole thing again. The upside to this approach is that you can do it with any camera, but there are a number of downsides that make it a bit less desirable than the other methods. However, there are workarounds.
With this method, it can be a bit challenging to line up the frames perfectly on top of one another. Doing so involves taking a lot of notes and is very prone to error. You’re also locked into shooting a full roll of double exposures, whereas you can just shoot one here and there when using the other techniques.
If you are taking this route, the simplest way to align the frames is by marking the film before your first pass, then moving the marking to the same position before the second pass.
Additionally, try to avoid rewinding the leader all the way into the canister after shooting through your roll the first time. Rewind slowly, and wait for a “click” that happens when the film fully separates from the take-up spool. Then you can safely open the camera and prepare for the next set of exposures. If you accidentally do wind it all the way in, there are ways to get the leader back out, but it can be a bit frustrating unless you have a special tool.
Method 2: Shoot the same frame twice
The second method is to manually prevent the film from advancing, while still pushing the advance lever to reset the shutter. This approach is definitely preferable to the first, since it allows you to just do a few double exposures, and ensures that the frames stay lined up. Unfortunately, it is only possible on certain film cameras. To know if your specific camera can do this, you’ll want to start by checking the manual for info related to double exposures (most can be found online here). If there’s nothing in the manual, you may need to search around or try it yourself to see if it’s possible.
Assuming that your camera can do this, all you’ll likely need to do is press down the “rewind button” located on the bottom of the camera before advancing the film. (Depending on your camera, you may need to fully hold the button down while advancing).
Method 3: Use your camera’s double exposure feature
The final, most convenient method is to use a camera’s built-in “multiple exposure” mode. This essentially works the same way as method two, pressing/holding the button advances the frame count but keeps the actual frame in place. Not many older cameras have this functionality, but plenty of cameras from the 1980s and beyond offer it. If yours does, you’ll want to check the manual for info on how to use it.

Ready to try your hand?
Shooting double exposures is probably one of the all-time classic film experiments and for good reason! It can be done by just about anyone with a camera, and really makes you see the world differently. Whether you randomly shoot through a roll twice or create extremely calculated images, the results can be spectacular! It’s truly a technique with endless possibilities.
Hopefully, this overview of double exposure on film has inspired you to try it out for yourself.
Be sure to use the hashtag #popphotofilm if you do, so we can see your results. If you’re interested in learning about other experimental film techniques, check out more of my work on Instagram and TikTok.
