Mastering the Five-Second Exposure
Take full advantage of photography's five second rule

Okay, relax, take a deep breath, and read carefully: This isn’t really a rule. It’s more like a fun formula. Exposures of about 5 seconds (that means 4 to 8, give or take a few) put you in a zone of unique effects. Crowds turn into swirling abstracts, night-time traffic stretches out in neon ribbons, and moving water turns to mysterious ground-hugging mist.
What’s so special about 5 seconds? Shorter, fractional exposures such as 1/8 sec can be annoyingly blurred. In longer exposures (a minute or more), moving subjects can disappear outright, and skies turn a bland, pale blue.
The beauty of the 5-sec rule is that it’s simple to follow with just about any camera, other than the most basic. Here’s how to optimize your images.
Hold it steady. Obvious. What makes multi-second exposures cool is the blur painted onto a sharp canvas. A tripod or other solid support is mandatory.
That’s often easier said than done. “The main drawbacks are wind and rain,” says Roger Coleman, whose beach view appears on page 63. “Hoping the tripod stays still near the coast for many seconds is often wishful thinking.” The only advice here is to shoot a lot of pictures.
And sometimes a tripod is inappropriate. “I almost never use a tripod; it’s just too bulky to carry around and is often prohibited,” says Guy Flâneur, who took the streaky image of the Washington Metro train on the next page. “The Metro permits unlimited photography, but does not allow tripods because of the obstructions they can cause.” His solution: Brace the camera on a bench.
Or you can ask for special permission to use a tripod. That’s what pro photographer Kerrick James did for his view of New York’s Grand Central Terminal (previous page), made on assignment for this story.
Regardless of your camera support, fire the shutter with hands off. You can use mirror lockup and the self-timer (no additional equipment necessary), or trigger the shutter using a remote (if you need to be more precise on the release).
Keep the noise down. Take advantage of very low ISO-even when you’re not looking for blur effects. “I use long exposures in very dark environments when I want a high-resolution photo that is as noiseless as I can make it,” Flâneur says.
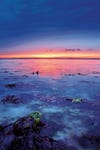
Nonetheless, noise can still creep into long exposures, particularly those with deep shadows. Several of our shooters recommend setting your camera’s long-exposure noise reduction (you’ll find it in the menus). If noise still gets out of hand, use software to tackle it in postproduction. Pop Photo editors have had good experience with nik Dfine; Marek Lambert, whose shoreline scenic appears on the right, recommends Noise Ninja.
“I also shoot in RAW,” he says, “slightly clipping some highlights if need be-exposing to the right of the histogram-so that I can then dial the exposure back down during postprocessing to reduce noise.”
Add darkness. This may sound funny in a magazine that keeps urging you to add light (Fill flash! Reflectors!). But even in fairly dim light, with ISO set very low, you may not be able to get a multi-second exposure.
The common solution: Use neutral-density filters. Lambert likes the Hoya ND400, which knocks down exposure by 9 stops (this will take you to 8 sec from 1/60 sec). Too extreme? You can find ND filters in any strength, and the Singh-Ray Vari-ND (www.singh-ray.com/varind.html) can be rotated to get from 2 to 8 stops of light reduction.
Polarizers will also give you up to 2 stops of neutral density. ND filters and polarizers can be stacked, although you should take care not to stack so many that the picture corners darken.
Beware of stopping down. Why not stop the lens all the way down every time you want a multi-second exposure? There are reasons not to. First, you may not want too much depth of field, preferring to focus on a single element in the composition.
And you can actually lose sharpness at the smallest apertures, such as f/22. It’s paradoxical-although the image may look sharper overall due to the depth of field, the detail, when viewed closely, will be softer. Look at any Pop Photo lens test to see how the SQF drops off at the smaller apertures, f/11 through f/22. For this reason, several of our slow shooters avoid those smaller apertures.
Of course, scenic shooters may accept this to maximize scene depth. “I could have stopped the lens down one more stop to f/11, but after that the image becomes softer,” notes Lambert. “From f/8 to f/11 is really the sweet spot.”

001

002

003
004

005