Tips from a Pro: Lynn Saville’s Tips For Photographing After Dark
This pro shares her experience and insights on the night

“I love the way cities look at night,” says photographer Lynn Saville. “I can wander and see the city with less interruption. Pedestrians don’t get in my way, and I don’t get in theirs. I can work slowly and look closely.” A fine-art photographer who teaches workshops on night photography, Saville has published three monographs of urban scenes captured between sundown and sun up. Her latest book, Dark City, from Damiani, hits stores next month. We spoke to her to learn what makes night shooting different, and what you need to know before you head out.
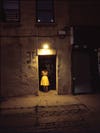
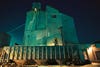
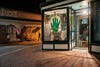
Night’s Light After dark, architecture’s character and shape is more apparent thanks to the almost spot-lit nature of street lighting. The light falls off more quickly and thus emphasizes dimension. “The chiaroscuro effect of light and shadow can give this sculpted quality to buildings and objects. More so than in broad daylight,” says the photographer.
For Saville, night photography comes in two varieties. “You can shoot in the dead of night or during the half-light of dusk and dawn,” she says. “Shooting at dusk is exhilarating because you sense how the lighting is quickly fading, and you feel compelled to locate and capture your subjects in good light. It can become like a race.”
Another advantage to shooting during twilight is the shadow detail it offers. “A little ambient light can reveal texture and detail in dark areas,” says Saville. Without it, nighttime scenes are often very contrasty, with bright, blown out highlights against shadowed areas that lack detail.
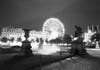
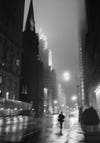
Night scenes can take on very different moods depending on whether you capture them in black-and-white or color. When shooting late at night, Saville prefers b&w. “When natural light leaves the skies, scenes can often become monochromatic. The Paris and Fifth Avenue shots in this story illustrate that,” she says. On the other hand, if you’re shooting at dawn or dusk, and there’s light in the sky, shooting in color can reveal interesting temperature contrasts between artificially lit structures and naturally lit skies. “Putting a little color up there adds interest,” says Saville.
Gathering the Gear What’s the best camera for shooting after dark? When she plans to make large, gallery-sized prints, Saville uses a Mamiya 645 body and Phase One IQ 180 digital back for higher resolution images. Otherwise one of her favorite cameras is the Nikon D800E. “It has the uncanny ability to work at high ISOs with a minimum of noise while maintaining the look of city light. It’s really kind of stunning. I try to keep to ISO 200 or 400, but if I have to, I’ll go higher with the D800E. I’ve gone up to ISO 2500, even ISO 5000.” Also, a good tripod is essential, says Saville. “Look for a tripod that you’re willing to spend a lot of time with and become good friends. Go to a reputable dealer who will let you return a tripod, no questions asked,” she says. Tripod heads are just as important; you need a good fit. She prefers ballheads for the freedom of movement, but realizes that many photographers prefer pan-and-tilt heads for a more methodical style. Either way, you don’t necessarily have to buy a head from the same company that made your tripod. Once you’ve got your camera support, become intimately familiar with it in daylight before taking it out at night.
You will also need a flashlight or camping headlamp. It can be helpful while you’re setting up in the dark, and give you the ability to see camera and lens settings. You can even use it to brighten up dark areas of a scene. “Don’t forget to bring extra batteries,” Saville advises. If you have a cell phone with a camera, use it to make instant test images. “Walk around taking a quick set of cell phone pictures. Change camera angle and camera placement, composing the scene in a number of quick-and-dirty test shots. Look them over to quickly assess what is working. You can also zoom into a cell phone photo to see if a longer focal length is called for. Flip between horizontals and verticals, too,” she suggests.
Shots in the Dark The greatest challenges of photographing at night? Metering and focusing. Light meters are designed to reproduce scenes in medium gray tones, which isn’t what you want when shooting something inherently dark. Even more confusing to a meter: bright lights. Saville advises to set exposure yourself. “I recommend shooting in manual exposure mode. Find an area or object within the scene that you want rendered as a medium gray. Spot meter that and then use those exposure settings.”
As for focusing, manual wins as well. “Autofocus mechanisms often look for contrast,” she says. “At night, it’s hard for cameras to find focus. Hard for people, too!” So get out that flashlight, and use it to light up an area so that you can focus on it. You can also use it to light up your lens’s subject scale, allowing you to scale focus. Saville says, “If you’re shooting with a [parfocal] zoom, first zoom in to check focus, then zoom back out to make your picture.”
On the subject of focus, after-dark shooting can be very forgiving of blur. For example, Saville finds herself attracted to energy and movement. “When I see it, I bracket my shutter speeds, starting down at about 1/30 sec. I then work my way up to faster and faster shutter speeds. It gives me the option later of choosing a specific degree of blur that I want for a scene, if any.” Blur can emphasize movement, but it can also impart a romantic, dreamy, or (as in the shot of New York’s Fifth Avenue at left), an edgy feel.
Another important consideration for night photography is the weather. “Rain can be really beautiful at night,” says Saville. “Low-hanging storm clouds can also add drama.” The way wet streets glisten and gleam at night can add spark to a scene. “Just be careful to wrap your camera in plastic and have an umbrella along to keep yourself and your camera dry,” she adds.
If Saville’s photos and advice have inspired you to try photography after dark in the city, remember to shoot safely. “I always carry my tripod in a bag. Often people think I’m carrying a yoga matt or a musical instrument. I think it’s much safer if thieves don’t suspect that you’re carrying a camera. I also try to conceal my camera. I carry it on a neck strap underneath my sweater or jacket,” says Saville. Don’t go out alone. Take someone with you, at least on your first urban outings.
You’re not limited to urban scenes for night shooting. “You can work in your garden, for example. Bring your lights out with you. Or shoot with the light of outdoor lanterns,” Saville recommends. Amusement parks, highway overpasses, bridges, farm structures, and lamp-lit rural streets all offer after-dark possibilities. As this dedicated night photographer puts it: “Light penetrating darkness has a visual appeal no matter where you find it.”