How to print and frame a photo that deserves more than Instagram
Get those IRL likes.
A good framed photo hanging on your wall is worth 50,000 shots sitting in the cloud doing nothing. They can remind you of your friends and family members, great times, and who you used to be in the good ol’ days, while digital photos just bit-rot away on a hard drive. But if you haven’t printed and framed a photo in a while—or ever—you might have forgotten how to get it right.
That photo you like so much and looks great on your screen might be dull, lifeless, and even blurry on paper. There are a lot of variables to juggle if you want to make it pop and look as good as it does on screen, so let us help you get them all right.
Consider your printer
A harsh truth: not all printers can print photos, and even those that can might not do a good job. That laser printer sitting in your home office sure is great for churning out black and white tax forms, but it just won’t cut it for high-quality color photos.
Basic home inkjets can print good-looking photos, but they won’t be perfect. These printers only use four ink colors—cyan, magenta, yellow, and black—so they can’t produce particularly photorealistic prints. You’ll lose details in the shadows and highlights, and get some banding or inaccuracies in the gradual transitions between colors.
Inkjet printers designed specifically for printing photos, on the other hand, have somewhere between six and nine inks. For example, the Epson SureColor P600 adds light cyan, vivid magenta, vivid light magenta, photo black, matte black, light black, and light light black to the basic four inkjet colors. This means it can accurately print realistic photos that are good enough to sell or hang on a gallery wall.
How much this all matters is up to you. If you just want to print out some nice family photos you shot on your iPhone, then your all-in-one, four-color inkjet will likely be well up to the task. But if you have aspirations of making a living off your vivid landscape prints, or you just want to have your best shots featured in your living room, you’ll need something that will do a more accurate and detailed job.
Stock up on photo paper
Standard letter paper, like you’d find in an office, is only good for documents. For great photos, you’ll need great paper.
The photo you want to print will determine the kind of paper you’ll use. There are three broad categories of photo paper available: gloss, semi-gloss, and matte. Gloss paper is the standard, shiny photo paper—it’s great for vibrant, colorful images. Semi-gloss paper is slightly less glossy and is excellent for portraits, family photos, and images where you don’t want super-saturated colors. Matte paper has no shine, so it’s best for black and white photos and other high-contrast, moody works.
Once you know what kind of paper you’ll use, you’ll need to decide what size your prints will be and get the right sized paper for the job. Most home inkjet printers can print photos at 4 by 6 inches, 5 by 7 inches, and 8 by 10 inches (all standard photo sizes), as well as 8.5 by 11 inches (which is U.S. Letter size).
Also, paper quality is measured in weight per ream of 500 sheets—the thicker the paper, the heavier it is. That also means it’s better quality, and therefore, more expensive. Good photo paper is normally somewhere between 50 and 80 pounds per ream, so if you’re experimenting, the lower end of the range is a good place to start.
Grab the right ICC profiles
Different printers and papers interact in different ways you’ll need to use ICC profiles to get the best results. Developed by the International Color Consortium, these are downloadable files that tell your computer what proportion of ink to use to get your printout as close to the image on your screen as possible. High-quality paper manufacturers release these files so users can get consistent results with their individual papers and all major printer brands.
Here’s how to find the ICC profiles for the paper you’re using:
- Check the packaging your photo paper came in for a URL or instructions on how to download ICC profiles.
- Visit the paper manufacturer’s website and look around for an ICC profiles section.
- Search for the name of the paper manufacturer and “ICC profiles” to go straight to the page.
- If you’re using paper from the same manufacturer as your printer (say, Canon paper with a Canon printer), they might already be installed. Check to see if any of the print presets match the paper you’re using. If they’re there, you’ll also see them when you go to select one later on.
Once you’ve found the ICC profiles, download the correct one for the paper and printer you’re using—there are different profiles for each paper and printer combination. To install an ICC profile on Windows, right-click on the downloaded file (the extension will be ICC) and choose Install Profile. On a Mac, either run the PKG file or copy the downloaded ICC file to Macintosh HD > Library > ColorSync > Profiles.
To print with an ICC profile, you’ll need to use Photoshop, Lightroom, or an equivalent photo editing app that supports them. In Photoshop, when you print, under Color Management, select Photoshop Manages Colors for Color Handling and choose the correct ICC profile. In Lightroom, in the Print module, select the appropriate ICC profile for Profile from the Print Job options in the right-hand sidebar.
Ready your photo
What looks good on screen doesn’t always translate to a great print, so there are some preliminary edits you should make to get the best results. I recommend using Lightroom Classic, but Photoshop or any other image editor will do.
First, check the resolution of the file you want to print. For high-quality photos, you’ll want to print at 300 dots per inch (DPI) or higher. For a 6-by-4-inch print, this means you’ll need a minimum image resolution of 1,800 by 1,200 pixels; and for an 11-by-8.5-inch print, it’s 3,300 by 2,550 pixels.
Photos from any smartphone with a 12 megapixel camera (like recent iPhones and Google Pixel phones) will be 4,032 by 3,024 pixels by default, which is more than enough resolution to get great prints. However, photos downloaded from Facebook or Instagram won’t, since they’re automatically compressed when uploaded. If you want good results, you’ll need to work with the original files.
In Lightroom, you can find the image resolution in the Metadata tab of the Library Module. In Photoshop, go to File and then File Info.
Once you’ve made sure you have a high-quality file, follow these steps:
- Increase the brightness of the photo. Images look brighter on a screen than on paper because of the backlight. If you’re using Lightroom or Photoshop, start by increasing exposure by about one stop. In Photoshop, you can adjust exposure by clicking on Image in the main menu, and going to Adjustments and Exposure. In the emerging pop-up window, move the dial from 0.000 (it will be there by default) to 1.000. If all this means nothing to you, just increase the brightness of your image a little to start with. You can do so by going to Image, choosing Adjustments, and then clicking on Brightness/Contrast.
- Crop your image so it matches the size you’re planning to print. Images sized at 4 by 6 inches and 8.5 by 11 inches have different aspect ratios, for example, and you’ll want to have control over how they’re cropped rather than letting the printer do it. In Photoshop, grab the Crop tool from the sidebar (the keyboard shortcut is C) and either select the appropriate preset or enter your own aspect ratio in the Settings bar.
After making your adjustments, use the proper paper to create a test print. This is an important part of the process, since you rarely get everything right the first time. It’s a great opportunity to see if you need to make any further edits to your image, and make sure you’ve got the correct size, paper option, and quality selected.
Check for things like:
- The overall brightness of the image.
- The contrast between shadows and highlights.
- Whether the colors are saturated enough (or too saturated).
- If there is a color cast (an unwanted tint to the whole photo) or any other problems with the colors.
- That the details are sharp.
If there are any issues—and there almost always is something—go back, fix it, and make another test print. Repeat the process until you’re satisfied.
Print the final version
With everything dialed in, print the final version of your photo and let it sit for an entire day. This may sound exaggerated, but there’s a good reason for it: You risk smudging even quick-drying inks if you touch your photo too soon. Also, solvents in the ink can take up to 24 hours to completely evaporate, so unless you want gasses leaving a haze on the glass of the frame, be patient and put off the next steps for tomorrow.
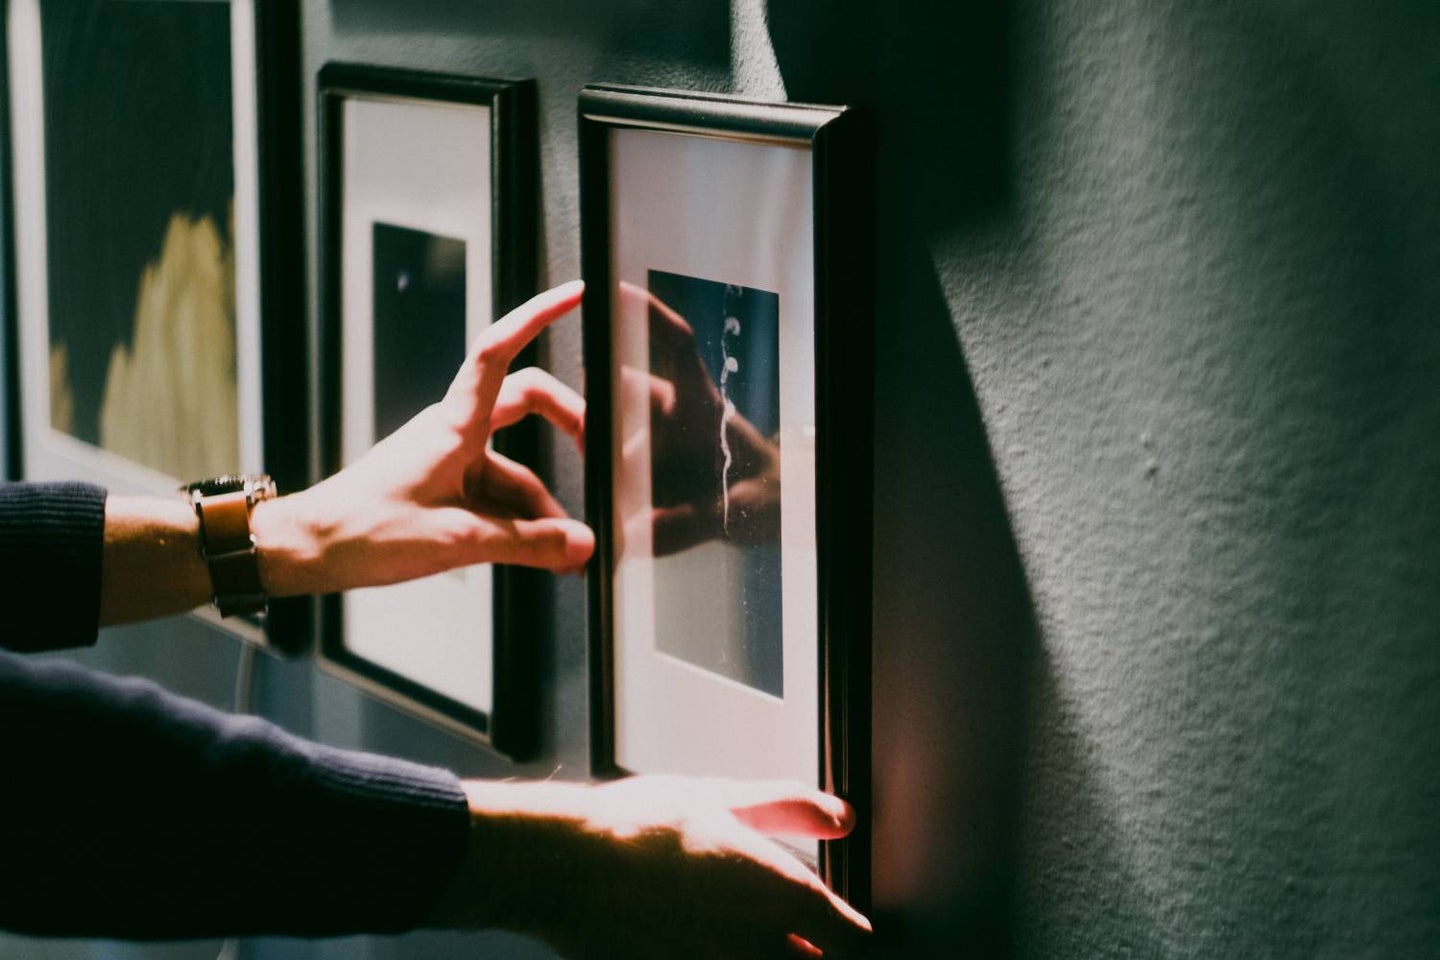
Frame your photo

Frames not only protect photos but make them look better on the wall. If you’ve gone through all this trouble and effort to print a photo, don’t just stick it to your fridge with a magnet—frame it properly.
While you can easily buy new frames, a good way to get great ones on the cheap is to visit charity shops or thrift stores. Ignore whatever artwork is in it and focus on searching for a frame that will look good in your home and fit the photo you’re printing. You can get higher-quality frames for a lot less secondhand than you would buying them new.
If you want your photos to look like works of art, look for a frame with a “mat.” This is the (usually white) cardboard that surrounds photos and separates them from the border of the frame in most artistic prints. A mat will make all your photos look super classy and stand out on the wall.
Finally, when framing your photo, be careful with handling the print and the frame glass. Pick them up by touching only the edges—you don’t want oily fingerprints or hair to stick to either.
Once you’re done, hang your photo on the wall and enjoy your guests’ admiring stares.
Other tips for getting great results
As with everything, practice makes perfect, so the more photos you print, the better you’ll get at it. While you learn, here are a three extra tips to keep in mind:
- While trial and error go a long way, consider investing in a monitor calibration tool if you’re printing professionally and want to ensure consistent results. It’ll make it easier for you to predict exactly how prints will look.
- Just in case you may want to print the same photo again, save the print file with any edits you made. The image probably won’t look right on screen, so don’t post it to social media—just keep it around.
- Inkjet printers work best when they’re used regularly, so don’t let your printer sit dormant for months and then expect great results. Print something once every week or two. This will also help you keep the printheads working perfectly.
