Canadian photographer and visual artist Renee Robyn has always built Adobe Photoshop brushes from scratch to create her ethereal images. But with Corel’s new ParticleShop plugin added to her digital toolbox, Robyn now has far more to play with. ParticleShop “makes it easier and gives me tools that I wouldn’t have thought to use. These brush shapes, and the way some of the brushes behave aren’t things I would have considered before.”
This image was captured on location in the rain. Robyn shot tethered and lit the model with a beauty dish and a reflector; a large white garbage bag protected her gear while serving as a diffuser.
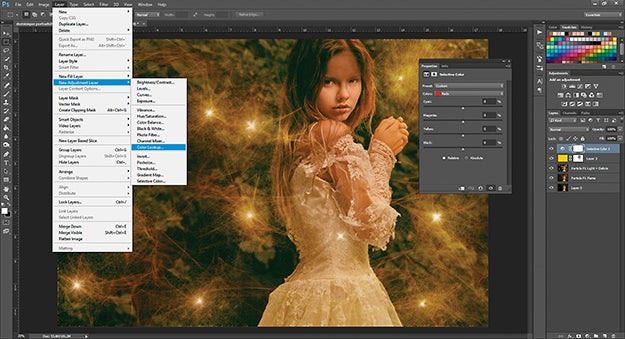
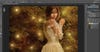
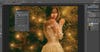
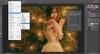
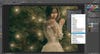
Here’s how Robyn used a combination of Photoshop and ParticleShop to create her final, magical image. Note that the new plugin works best with pressure-sensitive tablets and pens and is compatible with Lightroom as well.Step 1 Prepare your image in Photoshop. Robyn used the Healing Brush to clean up the water drops from the rain. Then open the ParticleShop plugin. Go to Filter > Painter > ParticleShop.Step 2 Robyn used the expansion pack of Flame brushes for the initial streaks of light; choose Flame 1 to start (or experiment with one of the included brushes). Adjust the size slider to 750 and opacity to 100%. Click on the Pen icon to the right of opacity to enable pressure sensitivity; a red outline will appear when it’s on. Select the brush tool [B]; click on the color wheel or use the eye dropper to choose a color. For this image, pick a yellow-red tone and draw lines at various pressures to guide the viewer’s eye through the image. Use the Undo button at the top of the window if needed. John Moore/Getty ImagesStep 3 Now that you’ve got your fire, add points of light. From the Starter Pack, select the Light brush. Use the color wheel to make it white. With the brush set to a range of sizes from 100 to 222, place light dots at some of the places where the lines made by the Flame brush intersect. To soften these new dots of light, choose the Debris brush from the Starter Pack and set it to 750. Draw small circles on the light dots, then click Save to return to Photoshop.Step 4 To warm up the image and make it softer, add a layer of yellow. Create a new blank layer by going to Layer > New > Layer. Change the blending mode to Soft Light, click OK, and dial down the new layer’s opacity to about 36%. Then choose the Paint Bucket tool from the toolbar (it may be hidden under the Gradient tool). Use the color picker to choose a yellow and click on the image to fill the blank layer. In the Layers panel, click on the Mask icon. Finally, use a black brush to paint out the yellow overlay on the model’s face.Step 5 To reduce contrast and add even more of a fairy-tale look, continue to tweak the color. Go to Layer > New Adjustment Layer > Selective Color and click OK. In the Properties panel, use the Colors pulldown menu to select Blacks. Set Cyan to 0, Magenta to –11, Yellow to +4, and Blacks to 0. Make sure Relative is selected. Use the visibility toggle to view before and after; adjust as necessary.Final Step For the final color adjustment, Robyn added a color LUT preset layer (she loved the way the green looked by adding this layer over the yellow fill layer). Go to Layer > New Adjustment Layer > Color Lookup and click OK. In the Properties panel, select 3DLUT File and choose Futuristic Bleak from the pulldown menu. Then add a quick vignette. Create a new merged layer (Cmd + Opt + Shift + E or Ctrl + Alt + Shift + E), set its blending mode to Multiply and its opacity to 70%. Mask out the center to let the corners go dark.Quick Tip ParticleShop 1.0 works only with 8-bit images. If you’re using layers in 16-bit mode, you’ll get a warning from Photoshop that you need to flatten and go to 8-bit before using the plugin. To avoid this issue, merge and copy the current layers to a new layer (Cmd + Opt + Shift + E on a Mac or Ctrl + Alt + Shift + E on a PC) before you open ParticleShop. Then go to Image > Mode > 8 Bits and you’ll be ready to get started—without losing your layers.