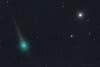
Comet Lulin and Saturn
Comet Lulin (C2007 / N3), at approximately 6th magnitude, passes just 2 degrees away from Saturn (upper right), shining brilliantly at magnitude 0.6. The spikes on Saturn are diffraction effects from the aperture blades in the camera lens. Lulin’s bright anti-tail points to the upper left, and it’s faint blue ion tail points to the lower right. North is to the right in this image. Sigma Leonis, a 4th magnitude star, is the other bright star in the frame, below and to the left of Saturn. Exposure Data
* Lens: 300mm Nikkor ED F/4.5
* F/stop: F/5.6
* Exposure: 8 x 120 sec exposures
* Mount: Losmandy GM100-EQ
* Camera: Canon EOS 20Da DSLR
* Mode: JPEG
* ISO: 1600
* Filter: None
* White Balance: Custom
* In-Camera Noise Reduction: None
* Temp: 24F
* Date: February 23, 2009
* Time: Start 9:24 p.m. est
* Location: Scott’s Pit, NJ
* Calibration: None
* Processing: Normal adjustments, corrections and enhancements in Photoshop
What Is Astrophotography?
Astronomical photography of the night sky—the stars, planets, comets, clusters, nebulae, and galaxies. It can reveal things that are too faint for the human eye to see, even through a powerful telescope.
How does it differ from other night work? For long exposures, you have to compensate for the Earth’s rotation to avoid trailing. I use an equatorial mount to do this. When the focal length gets longer than about 400mm, you need to add a guidescope with a special CCD autoguider to precisely guide the main scope with camera.
What Gear Do You Use?
I shoot with a Canon EOS Rebel XS and an EOS 20Da, a DSLR made for astrophotography. For short focal lengths, I use the 18–55mm kit lens and old manual-focus Nikon lenses with a Fotodiox adapter. My main imaging telescope is an Astro-Physics 130EDT StarFire refractor with a 1040mm focal length at f/8. I also have a Stellarvue SV70ED with a focal length of 420mm at f/6. Sometimes I use a telecompressor to reduce the focal length on both scopes for a wider view and faster f-stop. I use a Losmandy GM100EQ German-equatorial mount on a special tripod.
How Long Are Exposures?
For deep-sky objects, usually one to several hours. You need longer exposures to gather more photons from these faint objects to improve the signal-to-noise ratio. But you can’t usually shoot a single long exposure because of the thermal signal. You have to shoot a series of short ones and stack them. I’ll shoot twelve 5-minute exposures and stack them in Images Plus, an astrophotography program.
Then What?
I use Images Plus to automatically subtract a master dark frame from each light frame to remove the thermal signal, and then align and stack the images. In Adobe Photoshop, I adjust color and contrast, and enhance faint details.
Where Do You Escape Light Pollution?
There are a few dark places in the New Jersey Pine Barrens. I also shoot in a dark-sky preserve in Cherry Springs, PA.
Any Advice For Newbies?
You can take beautiful photos of the night sky with any DSLR on a tripod. Twilight is good for the crescent moon or setting constellations. Use a wide-angle lens, focus on infinity, set ISO to 1600, and use the self-timer. Include a foreground element and take test exposures while experimenting with white balance to correct for light pollution.
New Jersey based Jerry Lodriguss (www.astropix.com), 56, turned his fascination with the cosmos and photojournalism skills into a career teaching others how to take out-of- this-world pictures.
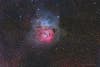
The Trifid Nebula
M20, The Trifid Nebula, in the constellation of Sagittarius, is a remarkable object – large, bright and beautiful. It is a complex of red emission, blue reflection, and dark nebulae about the size of the full moon, intersected by three dark lanes, from which the Trifid gets its name. Exposure Data
* Lens: Astro-Physics 130EDT F/8 triplet apochromatic refractor
* F/stop: F/8
* Exposure: 12 x 6 min
* Mount: Losmandy GM-100EQ polar-aligned equatorial mount
* Camera: Canon EOS 20Da DSLR
* Mode: Raw
* ISO: 1600
* Filter: No filter
* White Balance: Custom
* In-Camera Noise Reduction: Off
* Temp: 54F
* Date: September 2, 2008
* Time: 9:54 p.m.
* Location: Cherry Springs, PA
* Calibration: Darks, Bias
* Processing: Color and contrast enhanced in Photoshop.
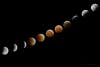
Total Lunar Eclipse
The phases of a total lunar eclipse are seen here in a composite image. Normally, the Moon is illuminated by the Sun, just as the Earth is. But during a Lunar Eclipse, the Moon moves into the shadow of the Earth. Although no direct sunlight hits the moon during the total phase of a total lunar eclipse, the moon is visible from sunlight refracted through the Earth’s atmosphere during the eclipse. The moon gets its burnt orange color from scattering of blue light from the sun’s spectrum in the atmosphere, the same reason the sun appears red at sunset, and the sky is blue. Exposure Data
* Lens: Astro-Physics 130EDT f/8 Triplet Apochromatic Refractor
* F/stop: f/6 with 0.75x matched Telecompressor
* Exposure: 1/1600th sec for partial phases, to 4 seconds for mid-totality
* Mount: Polar-aligned tracking equatorial mount, unguided
* Camera: Canon EOS 1D Mark II DSLR
* Mode: JPEG
* ISO: 400
* White Balance: Daylight
* In-Camera Noise Reduction: Off
* Filter: None
* Temp: NR
* Time 8:25 PM to 11:43 PM EDT
* Date October 27, 2004
* Location: Batsto, NJ
* Calibration: None
* Processing: Standard in-camera JPEG processing. Images composited together in Photoshop CS1.
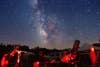
Milky Way Star Gazers
The Milky Way sets over observers and telescopes at the Black Forest Star Party in 2005. Exposure Data
* Lens: Canon 16 – 35mm F/2.8 L USM zoom lens at working at 16mm focal length
* F/stop: f/2.8
* Exposure: Single 55 second exposure
* Mount: Fixed tripod
* Camera: Canon EOS 20Da DSLR
* Mode: JPEG
* ISO: 3200
* White Balance: Daylight
* In-Camera Noise Reduction: Off
* Filter: None
* Temp: 55F
* Time 21:31:06 PM EDT
* Date September 3, 2005
* Location: Black Forest Star Party
* Calibration: None
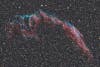
The Veil Nebula
The Veil Nebula, also known as the Cygnus Loop or Cirrus Nebula, is the remnant of a supernova explosion that occurred about 10,000 years ago. It is located 1,400 light years away in the constellation of Cygnus. It is very large at about 3 degrees in diameter. NGC 6992/95 is the brighter eastern half of the nebula. Exposure Data
* Lens: Astro-Physics 130EDT f/8 Triplet Apochromatic Refractor
* F/stop: f/6 with 0.75x matched Telecompressor
* Exposure: composite of 25 individual frames, 175 minutes total exposure:
4 frames at 10 min each at ISO 400
3 frames at 10 min each at ISO 800
3 frames at 10 min each at ISO 1600
9 frames at 5 min each at ISO 1600
6 frames at 5 min each at ISO 1600
* Mount: Polar-aligned tracking equatorial mount, auto-guided
* Camera: Canon EOS 20Da DSLR
* Mode: RAW
* ISO: 400, 800, 1600
* Filter: None
* White Balance: Daylight
* In-Camera Noise Reduction: Off
* Filter: None
* Temp: 55F
* Time 03:41 to 04:57 AM EDT
* Date September 2, 2005
* Location: Black Forest Star Party
* Calibration: Each 16-bit linear TIFF file raw light frame was calibrated with a master dark before Bayer interpolation. Darks: (9 x 600sec at ISO800) + (9x300sec at ISO1600), auto dark matching in Images Plus 2.75 beta. No flats, no bias.
* Processing: The calibrated light frames were registered in RegiStar, and then normalized, weighted and averaged together in Images Plus to create a master 16-bit linear TIFF light frame. The sky background was neutralized in levels in Photoshop. A slightly uneven background and some slight amp glow in the lower right corner of the full frame image were then removed with GradientXTerminator. The contrast of the image was then increased with a levels adjustment. The color in the image was then enhanced by a slight increase in the saturation of the cyan and red color components, and an SMI enhancement applied. Finally, Noise Ninja was applied, and the filter faded to 50 percent.
Comet Lulin and Saturn
Comet Lulin (C2007 / N3), at approximately 6th magnitude, passes just 2 degrees away from Saturn (upper right), shining brilliantly at magnitude 0.6. The spikes on Saturn are diffraction effects from the aperture blades in the camera lens. Lulin’s bright anti-tail points to the upper left, and it’s faint blue ion tail points to the lower right. North is to the right in this image. Sigma Leonis, a 4th magnitude star, is the other bright star in the frame, below and to the left of Saturn. Exposure Data
* Lens: 300mm Nikkor ED F/4.5
* F/stop: F/5.6
* Exposure: 8 x 120 sec exposures
* Mount: Losmandy GM100-EQ
* Camera: Canon EOS 20Da DSLR
* Mode: JPEG
* ISO: 1600
* Filter: None
* White Balance: Custom
* In-Camera Noise Reduction: None
* Temp: 24F
* Date: February 23, 2009
* Time: Start 9:24 p.m. est
* Location: Scott’s Pit, NJ
* Calibration: None
* Processing: Normal adjustments, corrections and enhancements in Photoshop
ISS Solar Transit
The International Space Station (ISS), with its new solar arrays, transits across the face of the Sun. Sunspot group 963 is also visible on the eastern limb of the Sun, just rotating on. According to CalSky, the ISS, with a size of 73.0 x 44.5 x 27.5 meters, had an angular diameter of 48.9 arc seconds at a distance of 379 kilometers and was moving at an angular velocity of 66.5 arc minutes per second. It took only 0.47 seconds to cross the face of the Sun. I was using a Canon EOS 1D Mark IIn with an 8.5 frame per second drive rate, and started the exposure a couple of seconds before the predicted transit time, and still I only got one single frame with the ISS in it. The two biggest hurdles in taking a successful image like this are timing and focusing. I thought the hardest thing would be figuring out how to time the ISS in front of the Sun since the duration was less than 1/2 of a second. I planned to shoot at f/11 with a 1.4x teleconverter to give me more image scale. Focusing was accomplished by using the Canon right-angle finder at 2.5x magnification and focusing on the Sunspot group. This actually ended up being my biggest worry because it was extremely difficult to focus on the groundglass at f/11. There weren’t really any other options though because you can’t use any kind of software metric assisted focusing because that requires a star, as does a method like the Stiletto. I considered using the live focus on my Canon 20Da, but I couldn’t see the screen well enough to judge the focus on the Sunspots because of the brilliant sunshine, even with a Hoodman on the laptop. Thankfully the seeing was decent or I would never have been able to focus on the Sunspot group. As for timing, I considered trying to monitor the transit visually with a remote release in my hand and just firing it when I saw the ISS in my guidescope. Then I worked out the numbers. I know that my reaction time is 0.19 seconds (you can test your reaction time online). This is actually quite good, but I made my living shooting sports where this is critical, so I needed to be good at it. I also know that the Canon 1D Mark IIn has a shutter lag of 55 milliseconds. Adding these together, plus a little bit of a fudge factor, the best I could hope for was about 1/4 of a second from when I saw it to when the shutter opened. Since the entire duration of the transit was only 1/2 of a second, in theory, I could capture the ISS at about the center of the disk if I fired as soon as I saw it start to cross. This was not much of a margin for error. I could easily blink and miss the whole thing. I did some research and found that for Thierry Legault’s great picture of the ISS and Shuttle transiting, he had used a Canon 5D with a 3 frame per second framing rate and had started his sequence 2 seconds before the predicted pass. Since my 1D Mark IIn had a framing rate of 8.5 fps, I thought I would have a higher probability of success using Legault’s method. Shooting Raw file format, I could only get 20 Raw frames before the camera’s buffer filled up though. 20 frames at 8.5 frames per second would only allow me to shoot for 2.35 seconds. Starting 2 seconds before the transit would only allow for 0.35 seconds with the ISS in front of the Sun. Since it was predicted to be there for 0.47 seconds, this was not going to work. Starting just 1 second before was an option, but that was cutting it really close if the predicted time was off. Using JPEG file format in the camera with no Raw files was the other option. I could get 40 JPEG frames before the buffer filled. This would give me 4.7 seconds of shooting at 8.5 frames per second. I could start 2 seconds before and still have some insurance on the other end of the predicted time also, in case the ISS was a little late. I definitely would have preferred to shoot Raw file format, but setting the quality to 10/10 for the JPEG files was a compromise I could live with. The next problem was how to determine the time accurately at the remote observing site. This was solved easily with a hand held GPS device. So we had accuracy to about 1 second on the timing of the transit. The ISS was only going to be about 48.9 arc seconds in apparent size for this transit. To get a larger image scale, I had planned on using a Canon 1.4x teleconverter. This would have given me about 1,400mm of focal length at f/11. But with the TC14 on the camera and scope, the camera was locking up and would not fire. It would only fire with a Canon lens attached to the teleconverter. I even tried taping over the electronic contacts between the camera body and teleconverter, but even that didn’t work. So much for that idea. Back to prime focus with the Astro-Physics 130EDT at f/8. The CalSky prediction said that the “Satellite apparently moves to clock-face direction 9:36 o’clock.” The question was, did this mean in relation to the horizon or to the Sun’s north pole? Well, it ended up not mattering because we incorrectly assumed it meant the ISS would start the transit at the 9:36 o’clock position, but it didn’t. That is where it ended. I was closely watching that edge of the Sun when the ISS suddenly, and surprisingly, appeared on the opposite side from where I thought it would appear! By the time I picked it up visually, it was half-way across the face of the Sun. I could definitely see some detail in it… probably the large solar panels. Out of 49 frames that the Mark IIn recorded, the ISS is visible in exactly one frame. At 8.5 fps and a 0.47 second long transit, I should have had at least 4 frames with the ISS in it. Looking back at the time stamps on the files, here is what I think happened… According to the time stamp on the first image file, I started the motor drive firing at 2:49:21, about 2 seconds before the predicted transit time. But, because you can only set the camera’s time to 1 second accuracy, the time stamp is not exact. I ran it for 3 seconds and 27 frames, but must have stopped when I did not see the ISS. I must have thought if the ISS was any more than a second later, the buffer would fill up, and then, when it finally did appear, the camera wouldn’t fire because the buffer was full, so I stopped firing to save some space in the buffer. Frame 27 in the initial sequence has a camera time stamp of 2:49:25. The next frame is about 1 second later at 2:50:22. This is the frame with the ISS in it! I shot another 20 frames with the motor drive in this sequence. It should be noted that the time stamps down to the hundredth of a second do not appear to be accurate at 8.5 fps. As best as I can figure, I pressed the shutter release again when I suddenly saw the ISS at about the center of the disk of the Sun. Figuring my reaction time, plus shutter lag, that would put the ISS towards the limb where it egressed. In the next frame, just 0.117 seconds later, the ISS has already egressed and is not visible. So, it turns out that I used the visual reaction-time method anyway! Phew. Talk about luck! One frame of the ISS transiting the Sun, in focus. I’ll take it. Thank you very much! Exposure Data
* Lens: Astro-Physics 130EDT f/8 Triplet Apochromatic Refractor
* F/stop: 8
* Exposure: Single 1/4000th of a second
* Mount: Astro-Physics 600E
* Camera: Canon EOS 1D Mark IIn
* Mode: JPEG
* ISO: 200
* White Balance: Daylight
* In-Camera Noise Reduction: Off
* Filter: Baader Solar Filter
* Temp: 92F
* Date 14h 49m 54.40s edt July 8, 2007
* Location: near Vincentown, NJ
* Calibration: None
* Processing: Contrast increased, false color added, sharpened.
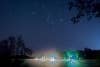
Orion Rising over the Mullica River
The constellation of Orion rises over a light fog on the Mullica River in the Pine Barrens of New Jersey. Driving back from an observing session I ran across this scene. It was spectacular, but I kept driving. I thought “Orion is a little bit too high, I’ll come back tomorrow night when it’s lower and shoot it. It will be perfect then.” And besides, I didn’t really have a proper tripod, all I had is a six inch high mini-tripod buried somewhere under all of my packed equipment stuffed into the back of the Jeep. And there wasn’t really anyplace to park along the side of the road so I could put the mini-tripod on the hood of the Jeep to shoot Orion lined up just right above the house that was lit up on the other side of the river. And I was tired. And I’m lazy. But I’ve learned that when you see a picture like this, you better stop and take it, because it’s never there when you go back, or something is different and it’s not as good. So a couple of miles later, I turned around. I had to park a ways down the road because at this particular vantage point the river was right next to the road, so I couldn’t put the mini-tripod on the hood of the Jeep. This meant I had to put it on the ground for the time exposure which I knew would be 15 or 30 seconds. There was a guard rail on the side of the road, so I couldn’t lay on the asphalt to frame it, and although I’m crazy and it was 3:30 in the morning, I probably wouldn’t have laid in the road anyway. So I had to climb over the guard rail and lay down in the weeds on a 3-foot wide embankment that went down to the river. That was a lot of fun. I didn’t know what I was laying in, but I hoped it wasn’t ants, and I hoped I wouldn’t be covered with ticks (nasty little insects that carry Lyme disease here) when I got up. I knew that the dynamic range of the scene, the range of brightness between the sky and the brightly illuminated house of the river, could probably not be captured in a single exposure. So I made a series of exposures at f/2.8 starting at 1 second, and then increasing by one stop until I got to 30 seconds, the longest shutter speed on the camera. I could have used the bulb setting to go longer, but I knew that even with a wide angle lens, the stars would trail too much if I went much longer than 30 seconds. Indeed, although it is not apparent in this low resolution image, the stars are trailed quite a bit in the image. A 30 second exposure for the sky was good. It recorded a lot of stars, as well as some brightness and color in the sky, so the sky was not pitch black. It turned out that a 2 second exposure was good for the house on the river. All of the images were shot in the Canon RAW CR2 format. This allowed a manipulation of parameters such as white balance, contrast, and to a degree, exposure, to produce an optimum image. However, except for changing the white balance from Auto to Tungsten, little manipulation was done to the raw file except opening it in 16 bits of tonal depth. The JPEG images shot concurrently with the RAW files would have been perfectly fine to use since little tonal stretching was used that would have required the extra bit depth. The Tungsten white balance worked perfectly for the lights on the house on the river, as well as correcting the red/brown color of the sky. Most images taken here in New Jersey suffer from light pollution, causing the sky to be recorded as red/brown in the image. Both images were opened in Photoshop and a layer mask was used to composite the short exposure into the long exposure. Some people might question the “ethics” of compositing two different exposures together, saying that the image is a fake because it wasn’t done in a single exposure. However, this method produced a final image that was actually more faithful to the true visual appearance of the scene than a single exposure. Because the human eye is capable of handling a much larger brightness range than a film or digital camera, I could see detail in both the house on the river as well as the stars in the sky, both at the same time as I stood there and viewed the scene. A single camera exposure would not have been accurate. This image is an excellent example of astrophotography that can be done with a simple camera-on-a-tripod setup and a time exposure. You don’t need a fancy telescope or tracking mount to take astrophotos! Exposure Data
* Lens: Canon 16 -35mm F/2.8 L USM Zoom Lens working at 24mm focal length
* F/stop: f/2.8
* Exposure: Composite of a single 2 second exposure and a single 30 second exposure
* Mount: Fixed tripod
* Camera: Canon EOS 1D Mark II DSLR
* Mode: JPEG
* ISO: 800
* White Balance: Tungsten
* In-Camera Noise Reduction: Off
* Filter: None
* Temp: NR
* Time 3:03 AM EDT
* Date September 20, 2004
* Location: Mullica River, NJ
* Calibration: None
* Processing: Composited with layer masks and color adjusted in Photoshop CS1.
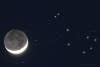
Moon and the Pleaides
The crescent Moon with Earthshine passes near the beautiful open cluster M45, The Pleiades. The crescent portion of the Moon is illuminated by direct Sunshine. The “dark” side is illuminated by Earthshine – Sunlight reflected from the daylight side of the Earth back to the Moon. Exposure Data
* Lens: Takahashi FS 102 f/8 Fluorite Doublet Apochromatic Refractor
* F/stop: f/6 with Televue Telecompressor
* Exposure: Composite of a 2 second exposure and a 16 second exposure
* Mount: Polar-aligned tracking equatorial mount, unguided
* Camera: Canon 1D Mark II
* Mode: JPEG
* ISO: 400
* White Balance: Daylight
* In-Camera Noise Reduction: Off
* Filter: None
* Temp: NR
* Time 8:54 PM EDT
* Date April 11, 2005
* Location: Carranza Field, NJ
* Calibration: None
* Processing: Standard in-camera JPEG processing. Black and white points adjusted, crescent reflection removed with the healing brush tool, images composited together with layer masks, diffuse highlights added, color corrected. All processing in Photoshop CS2.
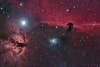
The Horsehead Nebula
The Horsehead Nebula, B33, is the dark nebula in front of the bright red emission nebula IC 434. Along with the Orion Nebula, these nebulae near the Horsehead are part of a very large complex that is a stellar nursery where stars are forming out of the dust and gas. Located about 1,500 light years away, this complex is the closest star-forming region to our own solar system. The Flame Nebula, NGC 2024, is to the lower left of Alnitak, Zeta Orionis, the easternmost star in the three distinctive stars in the Hunter’s belt of Orion, and the brightest star in this photo. To the lower left of the Horsehead is the blue reflection nebula NGC 2023. Dark Nebulae are clouds of dust in space that obscure the stars behind them. Emission nebulae are clouds of glowing ionized gas. Reflection nebulae do not shine by their own light, but are visible because they reflect the light of nearby stars. Exposure Data
* Lens: Astro-Physics 130EDT f/8 Triplet Apochromatic Refractor
* F/stop: f/6 with 0.75x matched Telecompressor
* Exposure: 4.5 hours total exposure:
RGB: 18 x 600 seconds
Ha: 9 x 600 seconds
* Mount: Polar-aligned tracking equatorial mount, auto-guided
* Camera: Canon EOS 20Da DSLR
* Mode: RAW
* ISO: RGB: 800, Ha: 1600
* White Balance: Custom
* In-Camera Noise Reduction: Off
* Filter: RGB:IDAS LPS, Ha: Lumicon Hydrogen-alpha cut filter
* Temp: RGB: 40F, Ha: 33F
* Date October 22, Oct 26, Nov 25 2006
* Location: Belleplain, NJ
* Calibration: Dark frames: RGB: 24 x 600 seconds at ISO 800 40F, Ha: 36 x 600 seconds at ISO 1600 at 40F, plus bias frames, darks auto-scaled in Images Plus v 2.8
* Processing: Automatic Image Set Processing in Images Plus v2.8 where all light CR2 raw files were converted to 16-bit linear TIFF files with No White Balance, Color Filter Array as the white balance type, then calibrated with the master darks. The light frames were then Bayer interpolated to convert them to color images. The light frames were then registered and aligned in Registar. The light frames for each exposure set were then composited together and “stacked” in Images Plus using min-max excluded as the method and saved as a 16-bit TIFF master light image. A non-linear curve was then applied to these frames. The red channel from the hydrogen-alpha image was then substituted into the RGB color image. Color balance was then adjusted with levels and curves modifications in Photoshop CS2. An SMI enhancement was applied to bring out the really faint detail. A series of masked high-pass filtered softlight layers were used to increase local contrast. Color saturation was increased in Photoshop CS2. Noise Ninja was used to reduce noise in the image. Noel Carboni’s Astronomy tools star-size reduction action was applied. The image was then resized and saved as a JPEG for web display.
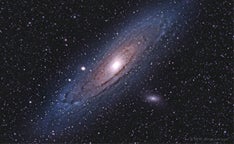
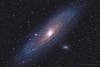
The Andromeda Galaxy
M31, The Andromeda Galaxy, is a gigantic collection of more than 300 billion stars that is located about 3 million light years from Earth. Companion dwarf elliptical galaxies M32 and M110 are also visible. M31 and its companions are part of our local group of galaxies, which includes the Milky Way and Magellanic Clouds, and M33. The Andromeda Galaxy is headed towards our Milky Way Galaxy and is expected to collide with it and possibly merge into a gigantic elliptical galaxy in about 3 billion years. Exposure Data
* Lens: Canon 300mm f/2.8 L USM IS telephoto lens
* F/stop: f/2.8
* Exposure: Composite of 57 frames, each 2 minutes long for a total of 114 minutes exposure
* Mount: Polar-aligned tracking equatorial mount, auto-guided
* Camera: Canon EOS 20Da DSLR
* Mode: Raw
* ISO: 1600
* White Balance: Daylight
* In-Camera Noise Reduction: Off
* Filter: IDAS LPS
* Temp: 52F
* Time 9:22 PM EDT
* Date September 27, 2005
* Location: Scott’s Pitt, NJ
* Calibration: Darks: 16 x 2 min dark frames averaged together as a master dark. Auto-dark calibrated each light frame in Images Plus v2.75beta. No Flats, no bias.
* Processing: Automatic Image Set Processing in Images Plus v2.75 where all light CR2 raw files were converted to 16-bit linear TIFF files with No White Balance, Color Filter Array as the white balance type, then calibrated with the master dark. The light frames were then Bayer interpolated to convert them to color images. The light frames were then registered and aligned in Images Plus. The light frames were then composited together and “stacked” in Images Plus using min-max excluded as the method. Digital Development was then applied to this 16-bit linear master light file. The image was corrected for vignetting with GradientXTerminator. Color balance was then adjusted with levels and curves modifications. Color saturation was increased. A high-pass filtered copy of the background layer was blended via lighten mode in Photoshop CS2. Noise Ninja was used to reduce noise in the image.