Make your own Instagram filter
Doggy ears are so 2018.

Ah, Instagram—my life, my love, my doom. Lusting over other people’s vacations and brunch outings is an official hobby of mine, but as much as I love scrolling endlessly through the beautiful lives of people I mostly don’t know, I love Stories more. They’re quick, they’re easy, and their limited lifespan allows me to be as silly as I want without ruining my whole grid aesthetic.
Plus, Stories allow you to add a filter to your photos—one of the most versatile features on social media nowadays. Want to horse around looking like a cute rodent? There’s a filter for that. Want to have silky smooth skin and try on lipsticks you can’t afford? There’s a filter for that. Want to look like the cover of a Pink Floyd album? Well, you get the gist.
For years, Instagram filters were only made by the platform itself or by a handful of studios and creators with access to Spark AR Studio, a tool Facebook designed specifically to create filters for their platforms. But that changed in early August, when Spark AR’s closed beta version ended and the software became available to anyone dreaming of making their own filters.
So, as the Instagram addict I am, I volunteered as tribute and set about learning how to make my own filters—and then write about it so you can do it, too.
But before we start, there are some things you need to know:
It’s not that hard (if you don’t want it to be)
Building a filter can be complicated, but the difficulty depends on how elaborate your idea is. If you want to stick to something easy, you can create a lot of 2D effects in Spark AR that won’t require you to animate anything or spend hours on end trying to figure things out.
Experience is not required, but it makes things easier
If you’re already familiar with graphic editing programs such as Cinema 3D or even Adobe Photoshop, you may find it easier to navigate Spark AR. If this is your first encounter with such a tool, make sure to explore and experiment with the platform first. It’ll help you get to know it a little bit better.
Spark AR already did most of the work for you
When Facebook opened Spark AR to the public, it created a community of creators to help, inform, and inspire its members on the new art of filter-making. There’s also a rich platform of content, materials, and tutorials to educate people on all things filter. In fact, when you download Spark AR, the first thing you’ll see is a menu with preset projects such as an animated bunny face mask, a light streak, and floating particles. These will give you a pretty good idea of how the main types of filters work behind the scenes, but you’ll also be able to play around with them until you’ve achieved something completely new and yours.
If you’re more adventurous and want to try animating 3D objects, there’s an entire library of preset elements for you to put in your filters, including all sorts of skulls, Pokeballs, anime characters, and even a realistic dancing crab, for whatever reason.
Since I have absolutely no animation experience and prefer minimalist effects anyway, I’ll build a simple 2D filter. Doing so is easy enough and a perfect initiation to making filters. You can combine 2D elements, use them separately, or even multiply them within a single project to create a richer effect.
Lesson No. 1—Know thy surroundings

Start by downloading Spark AR Studio. It’s free, easy to install, and available for Windows 10 and macOS Mojave 10.14 and higher. Once it’s installed, you can choose to work with various presets or start your own filter from scratch by clicking on the Create Project button in the bottom right.
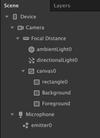
Spark AR will open to the default workspace, which is divided into four areas. In the top left, there’s the “Scene” panel, which will show the basic structure of the objects in your filter. By default, you’ll see “ambientLight0” and “directionalLight0,” which are lighting elements.
Below the Scene panel is the “Assets” panel, which will contain all the materials that describe the objects in the Scene panel. For example, if you add a red rectangle to the Scene panel, the color element will show up in the Assets panel.
The space in the middle is the viewport. This will be your main workspace, offering two perspectives of your project. The bigger one in the center shows all the objects in your filter within the range of your device’s camera. This will help you create effects in camera space—which move with the camera—or world space—which stay put regardless of where the camera moves.
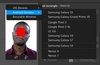
In the top right of the viewport, there’s another viewer called “the simulator” that shows how your filter will look as a final product. By default, you’ll see your work as it would appear on an iPhone 8, but if you hover over the viewer and click on the name of the device, you can change it. Options span a number of iOS devices (including the iPad) and Android smartphones (including some versions of the Samsung Galaxy, the Google Pixel, and the Google Nexus).
Finally, on the far right of your workspace, there’s the “Inspector” panel, which will show the properties of the elements in your scene and allow you to edit color, texture, position, rotation, and other details.
Spark AR includes several test faces for you to try your filters on. You’ll be able to see how they look on people of different genders and ethnicities, a blank canvas, and even yourself. You can play with your options by clicking on the camera icon to the left of the Scene panel and choosing the face you want to use from the pop-up menu. If you want to try it on yourself, choose Facetime HD Camera and you’ll be able to build a filter on your own face.

At any point in the process, you can test your work on the Instagram app. Just click on the Send to Device button (second to the left of the Assets panel) and choose Send to App. You can test it on both Facebook and Instagram by clicking the Send button next to each one.
If you’ve never ventured beyond Microsoft Office, you may find this a little nerve-wracking, but don’t worry—it’ll all start making sense once you’re actually working. If you’d like a little extra help, check out Spark AR’s interface walk through.
Lesson No. 2—Teleport by changing the background
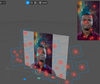
Let’s start with something simple. Swapping your background is technically called “segmentation” and is a basic, but fun, effect that offers tons of possibilities.
1. Choose an image to use as your background. You can select a proper photograph or create something new by playing with colors and effects in Photoshop or any other image-editing software. I chose one of the Hubble Space Telescope’s pictures of the Bubble Nebula in the constellation Cassiopeia. Look how cool it is—of course you’d want to teleport there. Even its name is rad.
2. Add two rectangles. One will be the background (like a green screen) and the other one will display your face while erasing your real-world background. Head to the bottom right of the Scene panel, click on Add Object, scroll down the pop-up menu, and choose Rectangle. Do this twice. By default, your rectangles will appear as “Rectangle0” and “Rectangle1”, but it’s a good idea to change the names so you don’t get lost. I changed “Rectangle0” to “Background” and “Rectangle1” to “Foreground, for example.” To do so, double-click the name and a field will appear. Make sure both rectangles are nested under canvas0. This means both will be “children” of that element and will be subjected to any changes you make to their “parent.”
3. Set the rectangles’ sizes. Click on the Background rectangle (formerly known as “Rectangle0”) and you’ll see its properties in the Inspector panel on the right. Click on the Size fields and then the Fill Width and Fill Height drop-downs that appear. This will make the rectangle change size no matter which device a person uses it with. Do this for the second rectangle as well. Your viewport will be completely covered by the rectangles, which will be displayed as a checkered pattern called “alpha.” This means they’re transparent, but they’re still there.
4. Separate the layers. By default, any object you add will join the layer you last worked in. If you don’t want it there, you’ll have to move it to a different layer. For the segmentation effect to work, you’ll need the rectangles in different layers so the background renders after the foreground. To do this, click on the Background rectangle in the Scene panel. On the Inspector panel to the right, click on the Layer field and choose Create New Layer. If you want to, you can rename the layers by clicking the Layers tab in the top right of the Scene panel, and double-clicking the name each layer in turn.
5. Create new materials. Time to give those transparent rectangles a solid form. That’s what “Materials” are for. You’ll assign each rectangle its own material by selecting each one in the Scene panel and then, in the Inspector panel on the right, clicking the plus sign next to Materials. When you do it for the second time, you’ll see a drop-down menu offering existing materials or the option to create a new one. Choose the latter.
Once you’ve chosen your materials, they’ll show up in the Assets panel and it’s also a good idea to rename them to keep track. When you select your materials in the Assets panel, you’ll see a bunch of new options in the Inspector panel. You can change color, texture, opacity, blend, etc. If you want to experiment with your filters, play around with these options and see what you can come up with.
6. Create a segmentation texture. This will turn any video captured by your camera into a texture, which means it’ll separate you (or whoever you’re pointing your camera at) from the background. In the Scene panel, click on Camera, and in the Inspector panel, click the plus sign next to Segmentation. A new asset will appear in the Assets panel called, by default, “personSegmentationMaskTexture0”.
7. Add “texture extraction” to the foreground material. First, click on Camera in the Scene panel, and in the Inspector panel, click the plus sign next to Texture Extraction. Another asset will appear in the Assets panel, named “cameraTexture0.”
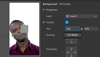
To use it as a new texture, click on the foreground material in the Assets panel. In the Inspector panel, change the Shader Type (first item on top) to Flat, which will give this material the properties of a flat, 2D element. If you want to give it a volume effect (ideal for 3D), the Physically-Based option is a good choice. You can also play around with these to see what types of effects you can come up with on your own.
Under Diffuse (the second item in the Inspector panel), find Texture and choose cameraTexture0 from the drop-down menu. Lower, check the box next to Alpha (it will look like it’s “off” but clicking the box to the right will make it appear) and in the Texture field, open the drop-down menu and choose personSegmentationMaskTexture0.
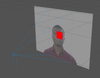
8. Change the background. It might look like nothing happened, but you’re almost there. You’ve set the foundation for your filter and now all you have to do is change the background. Click on the Background_Material and on the Inspector panel, under Diffuse, change the color to something that contrasts with the subject in the camera. This will help you adjust the edges of the segmentation by changing the Mask Size and the Edge Softness. You’ll find these options in the Inspector panel when you click personSegmentationMaskTexture0.
If you like blocks of colors, you can stop there and play around with different background colors. But why do that when you can get a constellation? Let’s change that background.
Select your Background_material, and under Diffuse, reset the color to white. Lower, under Texture, click on Choose file from computer and upload the picture you want to use as a background. Keep in mind that large photo files may be too big for Instagram or Facebook to process seamlessly, so keep it as light as you can. I used a 720-by-734-pixel image weighing around 86KB, and the program was a little sluggish.
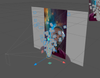
9. Add a little sparkle. As cool as teleporting yourself to Cassiopeia may seem, it’s not cool enough. Not unless you have some shiny bits of flair floating around you. This is known as the floating particle effect, and it’s a common feature in Instagram filters. Applying one to your filter will be quite easy and highly customizable.
First, in the Scene panel, click on Add Object and scroll all the way down to the end of the list to choose a Particle System. You’ll notice a new element in the viewport emitting alpha squares in the middle of your viewer. This is your emitter, and the alpha squares are the particles.
When you create your emitter, it will appear in the Scene panel under your foreground rectangle, which means it will be subjected to the Focal Distance element (second under Camera) by default. If you want to create a “world” effect, click on the name of the emitter (“emitter0,” by default), drag it down and drop it below Microphone. This will make the emitter an independent object.
You’ll notice three arrows coming out of the emitter. They represent the X (red), Y (green) and Z (blue) axis, and you can drag them around to change the emitter’s position. Also, when you click on the name of the emitter, you’ll find a list of every possible customizable option. We’ll go through a few of them.
Position, scale, and rotation: These all have X, Y and Z fields that will help you move the emitter around in relation to the camera (position), how far in each direction the particles will go (scale) and at what angle (rotation). You can play with the values of these fields (positive and negative numbers) to create the effect you want.
Emitter: You can choose what type of emitter you want to use. Since I have a fixed background—it will not move if we move the camera—I’ll use the Ring emitter, which will spray particles in a spherical radius. This will create a “world” effect that will make some particles appear closer and others further from the camera.
Customizing particles: The Birthrate determines the number of particles the emitter will release. The more particles you want, the higher this number will be. Speed, Scale and Lifespan, are self-explanatory—the first one determines how fast your particles move; the second: how big your particles are; and the third: how long your particle will last before it fades.
Force: This is like gravity. If you play with the values in the Y axis, you’ll notice your particles will appear lighter or heavier. A value of 0.05 will slow your particles down—the lower the value, the heavier particles will be.
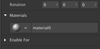
10. Add a material. Until now, you’ve only have the idea of particles; simple alpha squares floating around your filter. Now, it’s time to add a material. With the emitter selected in the Scene panel, go to the Inspection panel, scroll down, and click on the plus sign next to Materials and choose Create New. A new element will appear on the Assets panel. Double-click on it and rename it “Particle_material.”
You’ll notice your particles will have changed. Mine turned yellow, but yours might’ve turned some other color (if that is the case, don’t worry). Select Particle_material in the Assets panel, and then in the Inspector panel, click on the Shader Type drop-down and choose Flat. All this works if you’re using a 2D particle effect, but if you’re using something with a 3D effect, you can use Physically-Based, instead. Further down, under Shader properties, next to Texture, click on the Choose file from computer option. An explorer window will open and you’ll be able to select any file you like.
Whatever image you end up using for your particles will have to have a transparent background. Most of the time, you’ll find these types of files in PNG format with a simple Google Image search. I looked for “spark, filetype:.png” on Google Images and chose the one I liked the most. Once you have a particle with its own texture, you might want to readjust your emitter. I went back and made the particles bigger (from 0.01 to 0.05).
Congratulations! You made your first Instagram filter. Now what?
11. Share your new filter. To do so, you’ll have to upload it to the Spark AR hub, where it will be reviewed by Instagram’s support team. Once they’ve seen it and have determined that your filter complies with the platform’s community guidelines, your filter will be available in the Instagram gallery, on your profile, within Stories, and through a sharing link. The process takes about five business days.
Start by clicking the Export button to the left of the Assets panel (it’s an upward arrow). Once there, save your project in an arexport file, which you will have to upload to the Spark AR hub. The program will automatically direct you there once the export is done.
Spark AR is a versatile tool that’s not that user-friendly, but stands out because of the vast possibilities it offers those who want to create filters. With a little imagination and tweaking, the segmentation and particle emitter effects alone can launch a myriad of experiences. There’s a lot of content out there for you to learn and experiment with, so it’s just a matter of investing the time and playing with it.
Now, if you excuse me, I have some stories to post.