Get more screen space than you ever imagined with virtual desktops
It's free, and much easier than buying a second computer monitor.
We may earn revenue from the products available on this page and participate in affiliate programs. Learn more ›
This story originally featured on Popular Science.
More room on your computer screen means more space to spread out that spreadsheet, keeping a Netflix stream running in the background, monitoring multiple social media displays, comparing two websites, and much, much more.
To obtain this virtual real estate, you could set up a separate monitor, but there’s a cheaper solution: Create a virtual desktop—a separate screen that you can visit by pressing a single key. Windows, macOS, and Chrome OS all come with built-in tools to let you set up several virtual desktops on a single physical monitor.
Why you need a virtual desktop
Virtual desktops let you split up and space out your open programs, much like a real second screen would. But because you still rely on a single physical monitor, you still view only one screen at a time. This means a virtual desktop is best for separating and organizing certain applications, rather than viewing various windows side by side.
For example, you might designate one desktop for work and another for leisure. Your work screen could contain your inbox and word processor, while your leisure one would corral the online videos and social media apps that you don’t want to shut down. Because you can set up many virtual desktops, you might split up your work across multiple screens, one for each active project. This lets you prepare for a big presentation on one virtual screen while filling out a spreadsheet on another.
This technology also has a less honorable, but still handy, application: it can quickly hide your web browsing activity from prying eyes. If you’d like to do some personal research while you’re at work, place those windows on a separate desktop that you normally keep hidden from view. When your boss walks by, you can hit a key to switch from private business to a bland work screen. Or maybe you want to shop for a surprise gift—keeping those searches on another virtual desktop lets you hide your plans in moments.
The beauty of virtual desktops is in the variety of ways you can use them. In fact, you might not unlock the full potential of your virtual desktop until you’ve been using it for a while. Spend some time with multiple screens, and you’ll eventually come up with your own ways to take advantage of this technology.
How to set up multiple desktops on Windows
On its Windows platform, Microsoft has a feature it calls “multiple desktops.” Terminology aside, these are the same screens as those virtual desktops we’ve been discussing.
You manage these backup screens through Task View, a screen that lets you see and organize all open desktops, as well as all open applications. To get there, go to the taskbar and tap the Task View button just to the right of the search box or hit the Windows+Tab keyboard shortcut.
Once you reach Task View, pick New desktop to set up a new screen. You can also create a new desktop through another keyboard shortcut, Windows+Ctrl+D. Microsoft lets you make as many screens as you want—at least up to several hundred.
These extra desktops will look much like your original one. They will have the same wallpaper, taskbar (complete with the same pinned programs), Start menu, and desktop shortcuts. The only differences will be the open applications and windows on each one.
Once you have several desktops up and running, you can switch between them by going back to the Task View screen and hitting the thumbnails that show up at the top. Or, from the same view, click on any individual window—when you switch to that specific program, you’ll also move to the desktop where it currently is. You can also navigate backward and forward through a lineup of desktops by holding Windows+Ctrl and then tapping the Left or Right arrow key.
To close a desktop, you’ll have to go back to the Task View screen, look for that desktop’s thumbnail, and then click the X that appears above it. However, this will not shut down all of the apps that were stored on that desktop. Instead, any apps that were still open when the screen shut down will shift one desktop to the left.
These desktops can be as flexible as you want them to be. To populate a desktop with windows, go to the space in question and open a new application. In fact, you can create multiple windows of a single application—say, a web browser or File Explorer—and stash each window on a separate desktop. To move an open window from one desktop to another, head back to the Task View screen, check out the thumbnails at the top, and hover the mouse cursor over the desktop that currently holds the app in question. This should bring up a preview of the app. Click and drag the preview to any of the other desktop thumbnails in the row. Alternatively, right-click on an app thumbnail, choose Move to, and pick another desktop as the destination.
When you right-click on an app thumbnail, you’ll also get other menu options. Try experimenting with Show this window on all desktops or Show windows from this app on all desktops. These options let you mirror apps or specific windows across all your desktops. Use them for programs, such as a music player app, that you want to be able to access everywhere. If you make changes to the window, such as moving it to another location on the screen or opening a new website in a browser, those changes will appear across all desktops.
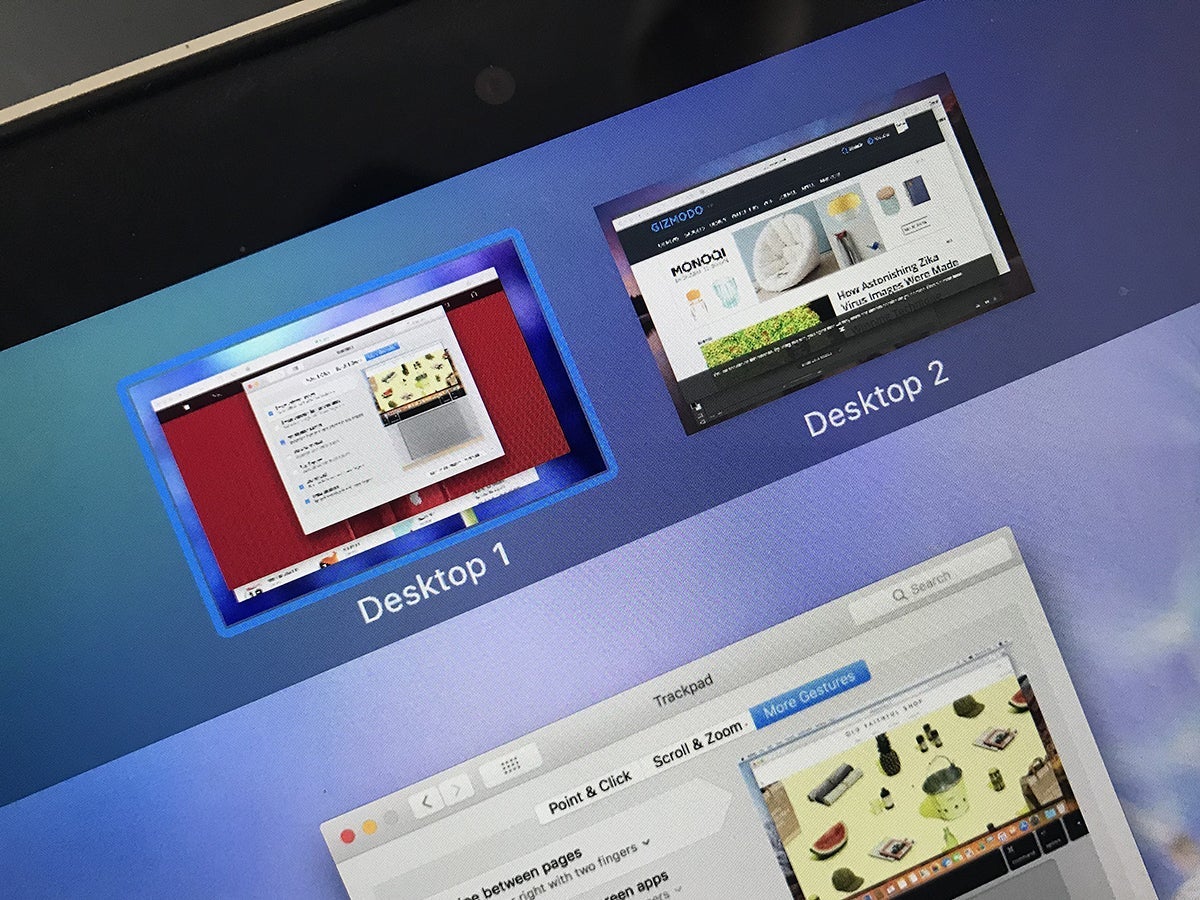
How to use multiple spaces on macOS
Your macOS computer has had the capacity for virtual desktops longer than your Windows machine has. In fact, Apple has its own terminology for the feature: “multiple spaces.”
To navigate these spaces, head to Mission Control, which you can do in a few ways: Hit the keyboard shortcuts F3 or Ctrl+Up, swipe up with three or four fingers on the trackpad (check or change the exact gesture in the Trackpad section of System Preferences), or open it from Launchpad or the Applications window of Finder. If you plan to employ virtual desktops fairly frequently, we recommend that you add Mission Control to the Dock (open Finder, go to the Applications window, and drag the icon to the Dock).
Once you arrive at Mission Control, you can create up to 16 virtual desktops by clicking the large + button in the top right corner. Each desktop will appear as a thumbnail along the top of the page.
Like the multiple desktops on Windows, the multiple spaces on macOS look the same by default. You can access the same menu bar and Dock from any one of them. However, Apple lets you customize each space to look unique—more on that later.
In Mission Control, jump to any desktop by clicking its thumbnail. You can also move between desktops by swiping left or right with three or four fingers on the trackpad (again, you can select the exact gesture in the Trackpad section of System Preferences) or holding down Ctrl and then tapping the Left or Right arrows.
To close a desktop, go back to Mission Control and hit the X button next to its thumbnail. Like on Windows, closing a virtual space will shift all of its open programs to the desktop on its left.
Once you’re on a given desktop, any application you launch will turn up in that space. For apps where you can open several windows, like Finder or Safari, you can split those windows between different desktops. Working on a macOS computer, you have more ways to move open windows between desktops. As the simplest method, click on a window and drag it to one edge of the screen. After a moment, the screen will shift to another desktop to the left or right of the current one. Alternatively, click and hold on a window’s title bar, then press Ctrl+Left or Ctrl+Right to move it to the next space in the lineup. You can also move windows via Mission Control by dragging app thumbnails from one desktop to another.
You can further lock an app window to a specific desktop by clicking and holding that app’s icon in the Dock, choosing Options, and picking This Desktop. Or you might want to have another window appear in every single space. To do so, again hold that app’s icon in the Dock and select Options, but this time, click All Desktops. Now, any changes you make to that window will be mirrored across every desktop.
That mirroring method also lets you modify the appearance of individual desktops. Start by placing System Preferences on all desktops. Now you can visit the Desktop & Screen Saver section of that app to set a different wallpaper for each space.
While you’re tinkering with System Preferences, choose the Mission Control section to adjust how multiple spaces work. For example, you can choose to make Mission Control group together all thumbnails of windows from the same application, regardless of their placement on different desktops. Play around with the settings to find the configuration that works best for you.
How to use desks on Chrome OS
On Chrome OS, the virtual desktop features is called “desks.” To get started, tap the Show windows key, which is a rectangle with a series of vertical lines next to it—it’s fifth from the left in the top row.
Click the + button to create a new desk; when you have more than one, this will change to a New desk button. Every time you get a new desk, Chrome OS will prompt you to give it a name straight away—to change the name later, just click on the label underneath the desk thumbnail. Chrome OS lets you set up a maximum of eight desks.
To switch to a desk, just click on it on the desks overview screen: Tap Show windows to see it, which will bring up all your open desks, browser windows, and apps. Any Chrome browser windows and Android apps you launch on that desk will appear only on that desk by default. To move a Chrome window or Android app to another desk, right-click on its title bar and choose Move window to desk, then pick a desk or select All desks to have it show up everywhere.
Tap Show windows, and you can drag apps and browser windows between desks too—just click and drag on the thumbnails in the main window. You can also click and drag on the desk thumbnails at the top, if you want to put them in a different order.
You can also use Alt+Tab to jump between open windows and apps across all your desks, which is another way of switching desks. If you’d rather just cycle through the windows and apps on the current desk, press Alt+Tab and then click Current desk on the pop-up window that appears.
The desktop wallpaper stays the same across all desks, and so does the shelf at the bottom—no matter what desk you’re on, you’ll see icon shortcuts for all apps and browser windows across all desks. To switch to an app, just click on it; to switch to a browser window, click and hold on the Chrome icon, then choose the window you want.
A four-finger swipe to the left or right on the trackpad, or the Search+[ and Search+] keyboard shortcuts will let you quickly switch between open desks as well. To delete a desk, tap Show windows to get to the overview, then click the X icon on the desk thumbnail at the top—any windows and apps on this deleted desk won’t disappear, they’ll shift one desk to the left.