Testing 3 popular AI-powered sky replacement tools
In this week's Smarter Image column, we're looking at sky replacement features in Adobe Photoshop, Luminar Neo, and On1 Photo RAW.
AI-assisted photo technologies mostly exist to help you save time while editing, or improve image quality using small sensors or when processing images. But sometimes they can radically change your photos, as in the case with sky replacement features.
Swapping a sky in a photo was initially a head-scratcher for me. One of the appeals of landscape photography, for instance, is to get out amid nature and experience the colors and wonder of a sunrise or sunset. Doing that takes work: planning the shoot, determining the best time to arrive and set up, checking weather estimates, picking a composition, and sometimes standing around in cold weather waiting for the show to begin.
But with AI sky replacement, you could theoretically show up at any time, hang your camera out the car window, snap a shot, and then add someone else’s spectacular sky using your computer later. It feels like cheating and reinforces the feeling of many photographers that AI technologies are marginalizing craft and hard work.
That’s an awfully traditional mindset, though, and I had to remember that photography encompasses a larger spectrum than my experience. Sky replacement is useful in real estate photography, where it’s rarely possible to wait around a house for ideal conditions, especially if you’re shooting three houses that day. Or you may need a better sky for an online advertisement.
Or you might be a landscape photographer who did put in the work, got skunked by a flat sky in a location you can’t easily return to, and want to make a creative composition anyway. We forget that most photography is art, and doesn’t need to hew to journalistic expectations of accuracy.
AI Sky Replacement
Replacing skies isn’t new. With patience, you could use software that supports layers to define a mask for the sky and put another sky image in its place. That takes time, particularly if the sky is interrupted by objects such as tree branches or a complicated skyline.
The goal of a successful sky swap is, of course, to make it appear as if the new sky was originally there all along. But that incorporates several pieces:
- The sky should have a clean edge, taking into account interruptions. This is usually the most difficult part because the software must determine which areas belong to the sky and which belong to the foreground.
- The non-sky elements of the image need to match the exposure and coloring that the new sky would cast over the scene. A sky isn’t just background—it’s the light source and filter for everything we see.
- There needs to be a way for you to fine-tune the mask and the color in areas the software didn’t catch.
- The tool should take into account reflections. Nothing ruins the illusion like a new sky with the original sky reflected in the water below.
And let’s not forget the obvious, which is the responsibility of the editor: Make sure light sources match and shadows are cast in the correct direction. After all, the goal is to present the illusion of a natural sky, and those are obvious flags that can ruin the effect.
Several photo editing apps include sky replacement features, each of them taking slightly different approaches. For this article, I’m looking at Adobe Photoshop, Skylum Luminar Neo, and ON1 Photo RAW 2022. I’m also applying sky images that are included in each app. You can add your own images to each one, too.
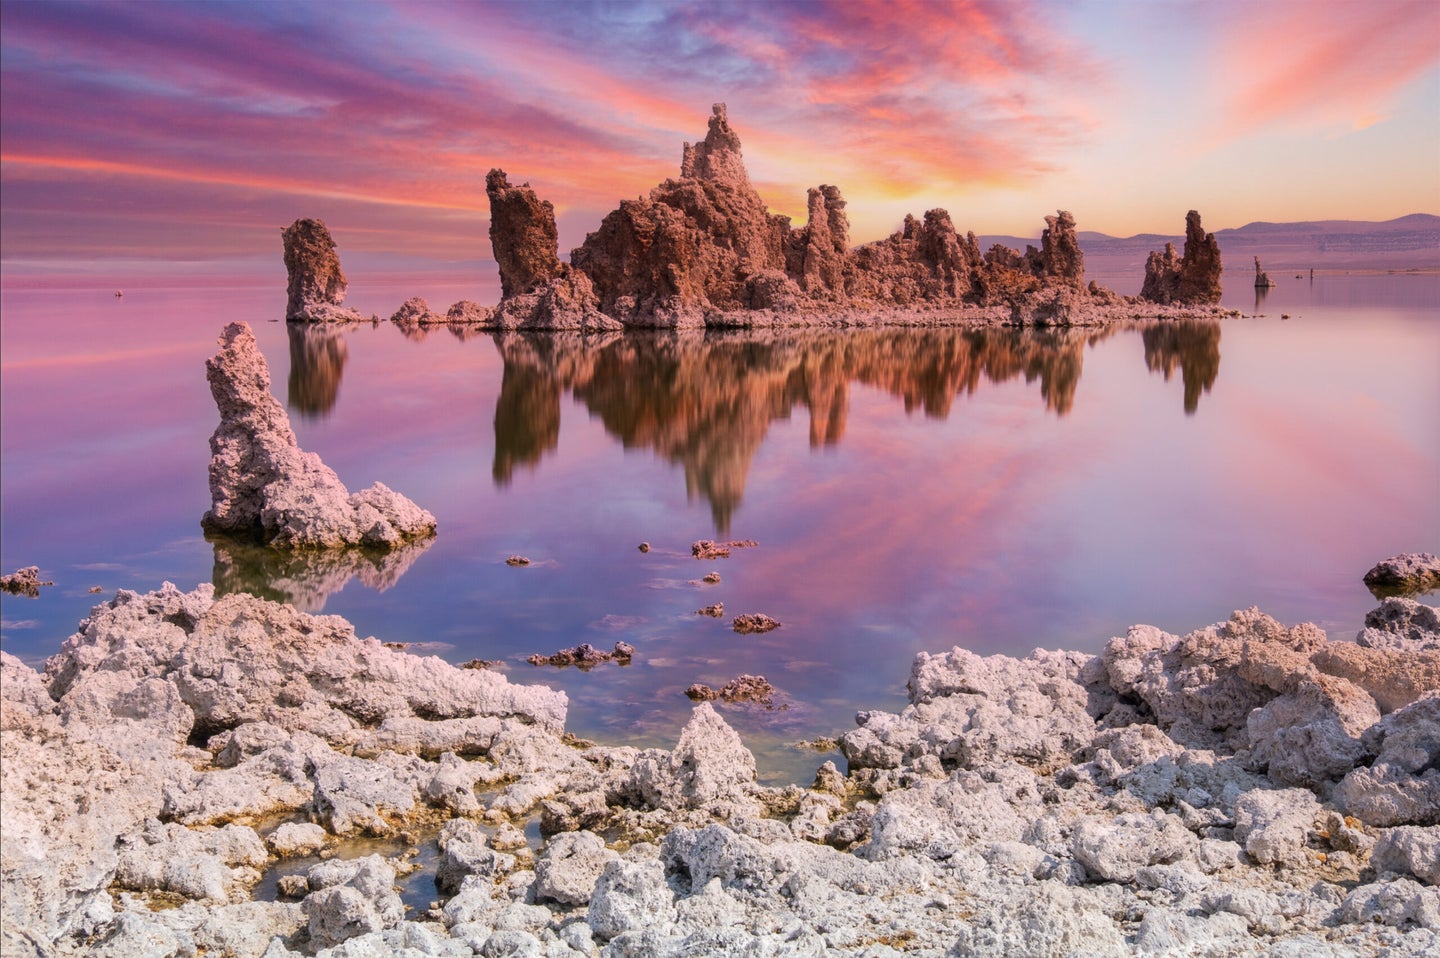
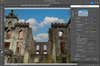
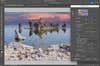
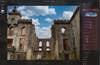
Below are the two test images will use.

Photoshop Sky Replacement
You could say Photoshop is the original sky replacement utility since its layers and selection tools were what you needed to use. Now, Adobe includes a specific Sky Replacement tool: Choose Edit > Sky Replacement.
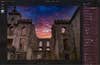
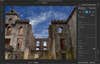
In my first test image, the ruins of a hospital, the feature right away has done a good job of replacing the sky, including in the windows where the sky shows through. The edges are clean, including the tree branches that have grown up beyond the top of the wall.
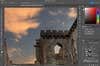
It includes controls for shifting and fading the mask edge, adjusting the brightness and temperature of the sky, and moving the sky image itself, both using a Scale slider and by dragging with the Move tool.
Switching to a sunset image also shows that the foreground lighting is adapting to the new sky, with options for adjusting the blend mode and lighting intensity. The Sky Brush tool allows some manipulation of the edges.

And typical of Photoshop, the default output option is to create new layers that include all the pieces: a masked sky image, a foreground lighting layer with its own mask, and adjustment layers for the colors. It’s nicely editable.
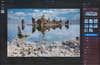
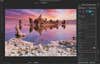
Notably missing, though, is recognition of reflective areas. When I apply a sky to an image of Mono Lake in Photoshop, the sky is changed but the glassy lake remains the same.
Luminar Neo Sky AI
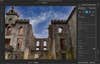
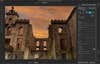
When I open the first image in Luminar Neo and choose an image from the Sky AI tool, the initial replacement is also pretty good. It has detected the top-right window, but not the openings in the center. And it’s unsure about the branches sticking up from the top of the wall, mostly catching their detail but also revealing an obvious halo and some of the original gray clouds.
To handle these discrepancies, Luminar uses a trio of Mask Refinement controls—Global, Close Gaps, and Fix Details—which to be honest are best used by sliding them and seeing what happens. In this case, increasing Global and reducing Close Gaps helps with the branches.
However, none of the controls can coax the sky into the windows at the bottom. That’s because the algorithm that detects the sky has decided they’re not part of the mask, and there’s nothing I can do to convince it otherwise. The Sky AI tool includes a manual Mask tool (as do most of Luminar’s tools), but in this case I can paint in rough areas using only a brush tool, exposing or hiding only the areas the AI has generated.
The Scene Relighting controls do a pretty good job of adapting the exposure and color and even include a “Relight Human” slider to adjust the appearance of the sky’s color when people are detected in the scene. I also appreciate the Sky Adjustments controls that help you match the sky to the rest of the image, such as defocusing it or adding atmospheric haze. However, note that the lighting isn’t really the problem here; with the sun setting behind the structure, more of the foreground would naturally be in shadow, illustrating the importance of the editor choosing appropriate imagery.
Where Sky AI excels over Photoshop is its reflection detection, which in the Mono Lake image has created a convincing sky and reflection. I have the ability to adjust the opacity of the reflected image and also apply “water blur” to it.
ON1 Photo RAW 2022
In ON1 Photo RAW 2022, the swapped sky has its pluses and minuses. It’s identified all the window openings correctly and handled the intruding branches pretty well. However, there’s obvious haloing around the top edges of the building, a telltale sign of a swapped sky.
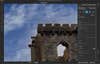
That can be mitigated using the Fade Edge and Shift Edge controls, but not entirely. Increasing the fade can sometimes make the edit less noticeable. Also, note that the choice of sky can be more or less effective.
The foreground lighting controls let me adjust not only the amount and blend mode of the effect, but also the color itself using an eyedropper tool, which provides more control.
ON1 Photo RAW 2022 does include reflection awareness, with controls for setting the opacity of the image and the blend mode.
Skies Wide Open
As you can see, replacing a sky is a tricky feat. It can be made easier using AI technologies, but there’s still more work involved. In both Luminar Neo and ON1 Photo RAW, it’s possible you’d do part of the work there and then clean up the image in Photoshop.
