The promise and difficulty of AI-enhanced photo editing
We tested out Luminar Neo's new AI-powered 'Relight' tool to see if it can really improve our shots. The results are, well, mixed.

Several years ago, an executive at Skylum (the makers of Luminar editing software) told me the company was aggressively hiring hotshot machine-learning programmers as part of a push to infuse Luminar with AI features. It was my first glimpse at the importance of using AI to stand apart from other photo editing apps. Now, Skylum has just released Luminar Neo, the newest incarnation of its AI-based editor.
One of the new features I’ve most wanted to explore is “Relight AI,” which is emblematic of what AI technologies can do for photo editing. Imagine being able to adjust the lighting in a scene based on the items the software identifies, adding light to foreground objects, and controlling the depth of the adjustment as if the image were rendered in 3D.
To be upfront, I’m focusing just on the Relight AI feature, not reviewing Luminar Neo as a whole. The app has only recently been released and, in my experience so far, still has rough edges and is missing some basic features.
Why ‘Relight?’
A lot of photo editing we do is relighting, from adjusting an image’s overall exposure to dodging and burning specific areas to make them more or less prominent.
But one of the core features of AI-based tools is the ability to analyze a photo and determine what’s depicted in it. When the software knows what’s in an image, it can act on that knowledge.
If a person is detected in the foreground, but they’re in the shadows, you may want to increase the exposure on them to make it look as if a strobe or reflector illuminated them. Usually, we do that with selective painting, circular or linear gradients, or making complex selections. Those methods are often time-consuming, or the effects are too general.
For example, the following photo is not only underexposed, but the tones between the foreground and background are pretty similar; we want more light on the subjects in the foreground and to create separation from the active background.
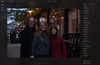
So I can start with the obvious: make the people brighter. One option in many apps is to paint an exposure adjustment onto them. In Luminar Neo, the way to do that is to use the “Develop” tool to increase the Exposure value, then use the “Mask” feature to make the edit apply only to the subjects.


Another option would be to apply a linear gradient that brightens the bottom half of the image and blends into the top portion, but then the ground at the left side of the frame, which is clearly farther behind the family, would be brighter too.
Ideally, you want to be the art director who asks for the foreground to be brighter and lets the software figure it out.
How Relight AI Works
The Relight AI tool lets you control the brightness of areas near the camera and areas away from the camera, it also lets you extend the depth of the effect. In our example, increasing the “Brightness Near” slider does indeed light up the family and the railing, and even adjusts the background a little, to smooth the transition between what Luminar Neo has determined to be the foreground and background.

The photo is already much closer to what I intended, and I’ve moved a single slider. I can also lower the “Brightness Far” slider to make the entire background recede. The “Depth” control balances the other two values (I’ll get back to Depth shortly).

Depending on how the effect applies, the “Dehalo” control under Advanced Settings can smooth the transition around the foreground elements, such as the people’s hair. You can also make the near and far areas warmer or cooler using the “Warmth” sliders.
What about photos without people?
OK, photos with people are important, but also low-hanging fruit for AI. Humans get special treatment because often a person detected in the foreground is going to be the subject of the photo. What if an image doesn’t include a person?
In this next example, I want to keep the color in the sky and the silhouettes of the building but brighten the foreground. I’m going to ratchet Brightness Near all the way to 100 to exaggerate the effect so we can get an idea of where Luminar is identifying objects.


We can see that the plants in the immediate foreground are lit up, as well as the main building. Luminar protected the sky in the background to the left of the building and didn’t touch the more distant building on the right. So Relight AI is clearly detecting prominent shapes.


When I reduce the Depth value, the nearest bushes are still illuminated but the buildings remain in shadow. Cranking up the Depth amount adds an unnatural halo to the main building—but the side building still holds up well.
So, overall Relight AI isn’t bad. In these two images it’s achieved its main goals: let me adjust near and far brightness quickly and easily.
Where It Struggles
This is where I hold up a large disclaimer that applies to all photos edited using AI tools: the quality of the effect depends a lot on the images themselves and what the software can detect in them.
In this photo of trees, the software doesn’t really know what it’s looking at. The bushes and groups of trees at the right and left are at about the same distance from the camera, and then the rest of the trees recede into the distance. My expectation would be that those side and foreground trees would be illuminated, and the forest would get darker the deeper it moves away from the lens.
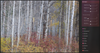
When I make dramatic changes to the near and far brightness controls, however, Relight AI falls back to gradients from top to bottom, since in many photos, the foreground is at the bottom and the background is in the middle and top areas. It looks like the prominent trees on the right and left have been partially recognized, since they don’t go as dark as the rest, but still, the effect doesn’t work here.
Other limitations
Occasionally, with people, the tool will apply the Brightness Near value to them and stick with it, even when you adjust the Depth setting. For example, in this photo of a person in a sunflower field, darkening the background and illuminating the foreground balances the image better, picking up the leaves and sunflowers that are closest to the camera.


When I set Depth to a low value to make the light appear very close to the camera, the flower on the left—the nearest object—gets dark, but the person’s lighting remains the same. The tool is making the assumption that a person is going to be the primary subject, regardless of the perceived depth in the image.

One more limitation with the tool is the inability to adjust the mask that the AI creates. You can edit a mask of the tool’s overall effect, much as we did when painting manually earlier, but that affects only wherein the image the tool’s processing will be visible. You can’t go in and help the AI identify which areas are at which depths. (This also ties into the argument I made in a previous column about not knowing what an AI tool is going to detect.)
Getting Lit in the Future
Luminar Neo’s Relight AI feature is audacious, and when it works well it can produce good results with very little effort—that’s the point. Computational photography will continue to advance and object recognition will certainly improve in the future.
And it’s also important to realize that this is just one tool. A realistic workflow would involve using features like this and then augmenting them as needed with other tools, like dodging and burning, to get the result you’re looking for.
