How to take Instagram-worthy photos of your home
Commercial photographer Vivian Johnson shares her tips for making interiors look stunning on camera.

Taking photos of your home that you’re proud of enough to share on Instagram can be a daunting task. Making an indoor scene look dreamily drool-worthy takes a special balance of focal length, composition, and exposure. Oakland, California-based photographer Vivian Johnson has some tips gleaned from her years of experience working with professional designers.
Build your compositions with a story in mind
Johnson suggests you start by asking yourself “What in this room do you want to feature? What do you love? The goal is to show the story of the home.” Identifying noteworthy areas in a room that tell that story will help you begin. Then, create a composition based on that.
When composing your images, Johnson explains that you should “be aware of what you’re cutting off and including in the frame so that it doesn’t look awkward. Just like when you’re shooting people, you try not to cut off hands or feet.” Watching the edges of the frame and how things like furniture and decor items meet those edges will help create a stronger composition.

Position your camera carefully
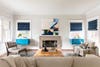
One of the most effective tools in creating interior photographs that look professional and natural is to keep your camera straight and level. Vertical lines, such as the corners of walls or railings, should be completely vertical and not converge. Avoid shooting at a downward or upward angle to keep lines parallel.
The height of your vantage point indeed makes a dramatic difference. “I start with positioning the camera and tripod at chest level, and then adjust the focal plane from there,” Johnson says. Photographing from just below eye level but slightly higher than sitting creates an appropriate sense of a viewer’s natural place in the room.
Beyond broad shots of the room, you may also want to highlight details. For example, if you’re in a space with specialty knobs or handles, consider tighter shots spotlighting those special items. “If a kitchen has a special faucet or appliance, I’ll shoot those details,” she points out.

Dial in the right camera settings and tools
When photographing interiors, you want to ensure that your camera settings will help provide the best results. To start, shooting with the lowest possible ISO setting your camera will allow the cleanest, most noise-free image. “I try to shoot at ISO 100,” Johnson says. Not only will you have an image free of noise, but you’ll have the most flexibility to adjust exposure while editing, too.
Aperture is the other main setting to consider with interior photography. A smaller aperture will maximize depth of field and help to get the entire room in focus. “I’m usually at f/11, or higher if I need to be,” she explains. Try experimenting with your lenses’ aperture values to maximize the depth of field needed to allow for sharp focus of the whole scene. But be warned: Using an aperture that is too small could cause a loss of sharpness due to lens diffraction, so don’t stop down any more than you need to.
A low ISO and smaller aperture will demand a slower shutter speed, so Johnson almost always shoots with a tripod. Placing your camera on a tripod steadies your camera for sharper images. Johnson also recommends it for keeping lines straight.
Focal length plays a significant part in creating successful interior photos, too. “I don’t like to shoot at a really wide angle, even when I’m doing a room shot,” she explains. “I try to get back as far as possible and then use the focal length that fits everything in the room.” Using a lens that isn’t excessively wide (say, 24mm) creates a more pleasing, natural perspective and cuts down on distortion.
Spend a lot of time lighting and styling
Your composition and settings serve only to showcase the most important things in an interior photograph: the quality of the light and the styling of the scene.
Having worked with many professional interior designers, Johnson suggests setting up your composition with the camera first and styling after the fact. “I’ll get the camera set up and then we’ll style from there,” she says. Staging after knowing the composition can help you to build up your scene from the camera’s perspective.
Of course, flattering light will enhance the quality of any scene. Johnson notes, “You don’t want to shoot when there’s harsh, direct sun coming through the windows,” she says. “Overcast days are great because it’s like a huge softbox outside.” She also suggests turning off all the lights, as they can cast a yellow tone through the room and complicate white balance.
Tap your smartphone and computer as critical aids
Johnson shoots tethered to a computer when on the job, so the image preview appears on a big screen. This makes it far easier to see small details you could possibly miss looking through the viewfinder or the back of a camera. Adobe Lightroom has a tethered shooting option that works with the cameras of major manufacturers.
To help with lighting, you can use an app to track the way the sun travels across the sky over the course of the day. Johnson uses one called Sunscout. “I can base my shot list and timing on how the light is coming into the room at which time of day,” she explains.
There can be times when limitations of available light need to be overcome with software tools. “Sometimes I’ll use multiple exposures in the room and then blend the images,” she says. She isn’t going as far as HDR, however; instead, she taps some careful masking and blending to create an equal exposure balance across the scene.
For those whose only camera is a smartphone, Johnson points out a potential advantage: “With a phone, you can get back further.” Being able to step back allows you to create compositions and find perspectives you otherwise couldn’t with a camera and tripod.
You can find more of Vivian’s work on her website and Instagram.
