How to change the light seals in an old film camera
Even the sturdiest film cameras will eventually need their light seals replaced. Here's how to do it cheaply and easily.

We may earn revenue from the products available on this page and participate in affiliate programs. Learn more ›
Old film cameras can last a long time with very little maintenance. One of the few things that fail, however, are the foam light seals. Thankfully, they’re easy to replace.
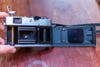
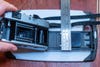
A few months ago I picked up a Canonet 28 from the early-1970s. Mechanically, it worked perfectly, but it had a really bad light leak. As cool as the effect was in some shots, it was incredibly unpredictable and so I decided to repair it. It’s the camera in all the demo photos in this article.
A few warnings
Old, decaying light seal foam is pretty gnarly stuff. It crumbles and the pieces that break free stick to everything. When you’re removing it, be very careful not to let it fall into the inner workings of your camera. It will just make a mess of whatever roll of film you shoot next. (I was somewhat fortunate that the seals in my Canonet were so rotten that there was very little left to remove.)
Also, while replacing the light seals is a relatively easy job, you should always be careful when working on old cameras. Take your time, don’t rush anything, and you should be fine.
What you need to repair light seals
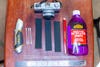
To replace your light seals, you need some new ones. They’re made of an opaque foam or felt that you can either buy in strips or, for common camera models, in pre-cut kits. I picked up this bumper pack from Milly’s Cameras in the UK, while Ebay seems to be the place to buy pre-cut kits. Go with whatever option will work best for you.
You also need a way to stick the new light seals into the camera. We’d recommend buying light seals that come with self-adhesive tape pre-attached, but you can also use Pliobond—it might just be a bit messier.
To remove the old light seals you need a few bits:
- A soft scraper. I used a wooden kebab skewer because I couldn’t find my iFixit repair kit.
- Cotton buds.
- Cloth or paper towels.
- A solvent, such as isopropyl alcohol. (I used methylated spirits as they’re easier to buy in Ireland.)
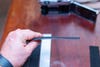
If you’re using a pre-cut kit, that should do. However, if you’re cutting your own you’ll also need:
- An X-acto knife or similar.
- A pair of scissors.
- A chopping surface.
- A metal ruler.
- A pencil.
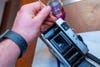
Step 1: Remove the old seals
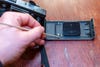
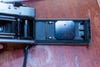
Remove the old light seals and any remaining adhesive residue. Start by scraping as much away as you can with your soft scraping tool, carefully tipping it out onto your work surface as you go.
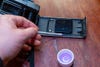
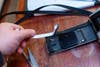
Once you’ve removed as much of the old seal as possible, use a cotton bud to carefully apply your solvent.
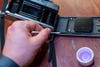
Use a combination of your cloth, scraping tool, and cotton buds to get rid of all the residue that remains.
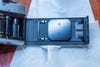
It can take a little while, but you will eventually end up with a clean surface.
Also, make sure not to miss any of the seals in the camera. They’re often on both the film door and surrounding the film chamber.
Step 2: Insert the new seals
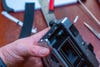
Unless you’re using a pre-cut kit, measure and cut the replacement strips. Make sure to use the foam or felt that most closely matches the original seals.
Dry fit your light seals to make sure they’re the right size. It’s easier to leave them a little long and then trim off the edges at the end.
If you’re using an adhesive, apply it now. Otherwise, carefully peel the backing paper from the foam and press them into the right spot on your camera. (Your soft scraper will be really useful for any awkward corners.)
Again, don’t miss any of the original light seal spots.
Step 3: Wait

As tempting as it is to load a roll of film right away, don’t. Leave the adhesive set for at least a few hours.
Then, close the film door and make sure everything fits okay. If you’ve miss-cut a light seal, you may need to trim it back or redo it.
Finally, load a cheap roll of film to test your work. If all has gone well, the light seal problem should be gone.
