10 tips for using darkness in your photography
In photography, darkness can be just as important as the light.
If photography is writing with light, darkness is the punctuation. Darkness defines shapes, makes two dimensions look like three, and heightens drama. It can even be a subject in itself. Here are 10 ways to achieve dark victory.
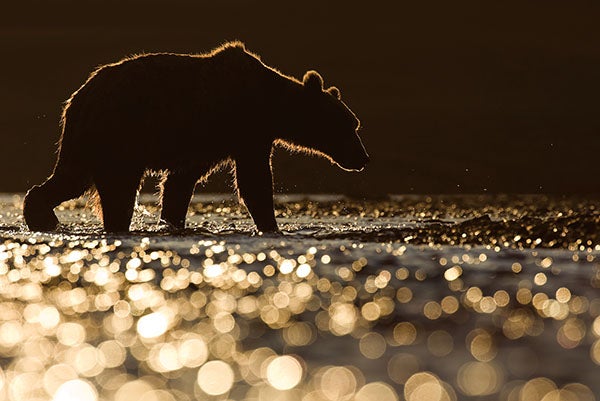
1. Take silhouettes
This time-honored (and often clichéd) technique defines forms by reducing them to dead black. It’s easiest to do when your subject is backlit; for a perfect sillo, meter off the bright background.
•Tip: Increase dimensional interest by allowing the edges of the subject to be rimlit; shoot bursts for a moving animal such as the bear above.
2. Exploit dark shade to define the shapes of trees
While direct overhead or near overhead sunlight is usually considered a no-no, photographing globular-shaped trees in full leaf and full sun can produce dramatic results. The small shadows cast by the trees make great design elements, particularly in wider-angle scenes with multiple trees as subjects.
•Tip: Shoot beach umbrellas or café umbrellas at high noon to allow the shadows to define their form. This is especially effective from above.

3. Use “negative reflectors” to define form
Black cards or panels, also known as flags, are popular among portrait and product photographers. They can tone down too-bright areas, prevent spillover from studio lights, and add shape-defining shadows. A more specialized device, called a gobo, fits over a studio light either to narrow the beam with a partial black covering or to project a pattern in black.
•Tip: Create a sense of mystery in portraits by partially blocking studio lighting so that an area of the scene is thrown completely into shadow. Try it on the diagonal!
4. Tone down image noise with dark-frame noise reduction
Dark areas of a photo get far noisier than the lighter areas, which can be a problem in late-day or night photography. Long-exposure noise reduction in DSLRs and ILCs (it’s a menu option) takes a second frame that is black—no exposure—then uses this frame to subtract much of the noise from the actual exposure. It typically doubles your exposure times, but they’re going to be longish anyway.
•Tip: In photos with heavy shadows taken at high ISOs, convert to black-and-white—the noise gain is far less objectionable.

5. Use shadows to give dimension to landforms
There’s a reason landscape photographers love the “golden hours” after sunrise and before sunset, and it’s not just the color. The low-angled light creates dark shadows that create a three-dimensional effect; shoot from the north or south for effective sidelighting.
•Tip: For shadowy landscapes, spotmeter on medium-bright areas and let the shadows fall where they may.
6. Employ exposure compensation
If the scene is dark, the exposure should be dark (within reason). Use exposure comp to maintain darkness—and remember, it works in all modes, even manual. Don’t worry about a perfectly centered histogram—it should, in fact, fall off the cliff in the shadows—that is, get clipped on the left side of the graph.
•Tip: Don’t forget about white balance—set a tungsten WB on your camera in daylight to simulate the bluish light of late day or heavily shaded scenes.

7. Use day for night
This is handheld night photography made easy. To make a daytime scene look like nighttime, simply underexpose it. We mean seriously underexpose it—by as much as four stops. You can make city scenes more realistic by dodging highlights into streetlamps or windows during postproduction to make them look lit.
•Tip: To add a dreamy quality to a day-for-night scene with moving water or windblown trees, reduce the light hitting your sensor by using an overall neutral-density filter. This will allow you to set a long exposure.
8. Add light to the dark
For added drama, use flash for the foreground in dark outdoor scenes. Flash shots of people near the end of the blue hour, for example, can be particularly effective. Be sure to keep the background exposure dark; for a somewhat more realistic effect, dial down your flash unit to – 1 to –2 EV.
•Tip: Simulate the light of the setting sun (even if there is none) by putting an amber gel over your flash head. Keep the camera’s white balance at daylight.
9. Use shadow patterns to create texture
A portrait or still life taken with window light streaming through open blinds, for example.“Venetian blind lighting” became a staple of film noir in the ’40s and ’50s.
•Tip: Create shadow patterns with the use of a cuculoris, or “cookie.” Simply create a panel with patterns cut out in it, and place it in front of a studio light. It’s an easy DIY project.
10. Define a frame with darkness
Use a tunnel, a dark interior window frame, or a backlit foreground landform as a natural framing device. Be sure to expose for the scene that’s inside the frame, not for the frame itself.
•Tip: Use features in dark shadow to define the planes in cityscape photography.