Photography A-Z: 26 Tips For Better Photos
From adding artistry to your action shots to zinging zip into your zebra portraits, this year’s annual how-to special is a veritable encyclopedia of photographic fun. Read on for an alphabet of inspiration.
A is for Action
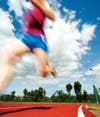
Photo by: Stu Collier/Fotolia.com
Want to enliven your action shots? Blur is the key. For simple blur: Drop the shutter speed one or two notches below action-freezing speed to blur the hands and feet of runners, the spokes and pedals of bicycles, etc. Add flash for ghosting: With flash on relatively close subjects, you can lower the shutter speed even further. Use second-curtain sync to get a ghost trail behind the subject. Pan with the motion: Use very slow shutter speeds to blur the background into a streak.
B is for Boat
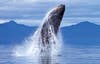
Photo by: Jon CornForth
Nature photographers Jason Hahn and Jon Cornforth (who shot the photo above) offer advice for keeping steady as she goes. Activate image stabilization: A first line of defense against wave-induced shake. (Nikon users: In very rough water, engage the Active setting on your VR lenses.) Set higher ISOs for fast shutter speeds—better a bit of noise than blurry shots. Roll with the waves: If you try to counteract the boat’s motion with your body, you’ll be less steady. Stay seated when possible. Use support: A monopod with a flat swivel foot is usually the best bet. Tripods can be cumbersome, especially in small boats.
C is for Camera Presets
Use custom settings for the types of shooting you do. Make the default settings (the ones that come up when the camera is turned on) those you use when shooting in a hurry. And fine-tune individual settings: Adjust a custom white balance to match the bulbs in your living room, for example.
D is for Diopter
If the view through your viewfinder is always blurry, check the diopter adjustment. Leave your lens cap on, turn on the camera, and adjust the diopter until the info display in the finder is as sharp as it can be.
E is for Exposure
The black cat on the black sofa. The kid in a white parka on a snow bank. These kinds of scenes fool through-the-lens meters into making these scenes gray. Fix 1, squash the histogram: Enable the histogram display on your DSLR, and use whatever meter and exposure mode you usually do to make a reading and/or exposure. Now set exposure compensation so that the histogram’s pixel pile gets shoved hard one way or the other: negative compensation to shove it to the left for dark scenes, positive compensation to shove it to the right for light scenes. Yes, you want clipping at the edge. Fix 2, ditch the camera meter: Use a handheld incident exposure meter to measure the light falling on the scene rather than reflected from it. In either case, shoot in RAW for extra leeway.
F is for Fog

Photo by: Stan Horaczek
Next time you’re literally in a fog, grab a camera and start shooting. Make flattering portraits: Fog can erase wrinkles, as well as wash out cluttered backgrounds. In really dense fog, use it for high-key portraiture—dress your subject in white and bump up the exposure. Add depth: Moderate fog can suggest depth in land- and streetscapes. Compose so that you have foreground elements close enough so that they are almost sharp, with background elements blurring out. Use it as a scrim: In the shot above, the photographer aimed a remote flash at the backs of the couple, letting the fog diffuse the beam.
G is for Gel
Even shooting RAW, you can run into white balance issues when foreground color temperatures are radically different than those of the background. There is an easy, cheap fix. Green-gel it: If you’re shooting with on-camera flash in fluorescent ambient light, pop a green gel over the flash, and set the camera white balance for fluorescent. Amber-gel it: Same situation, except tungsten ambient light? Use an amber gel on the flash and tungsten WB on the camera. Visit stickyfilters.com for a nice selection of gels.
H is for Hold Steady
In holding a DSLR, the left hand provides primary support; the right hand operates the controls. With a short lens, rest the camera on the base of your left hand; with a long lens, rest the lens on your hand so that focus and zoom rings are within reach of your fingers. Brace your left elbow against your body for stability.
I is for Image Stabilization
Maintain a half-press on the shutter button to activate stabiliza-tion, which needs a moment to settle down. Concentrate on keeping your eye on the subject. Check tripod compati-bility: With some lenses, you should keep IS on.
J is for JPEG
Yes, we recommend shooting RAW for maximum image control, but sometimes JPEGs rule. Stick with them when you want to… Shoot fast action: Many cameras reach their maximum burst rate only in JPEG mode, and can take far more shots in a burst than with RAW. Conserve memory cards: RAW files can take up to 3 to 5 times more bytes than a JPEG of the same image. Ignore the computer: If you’re uploading without editing via a camera’s Wi-Fi connection, unprocessed RAW files can look flat, while JPEGs don’t need to be converted, and upload much quicker. Not overdo quality: For a product shot for eBay, or a photo for a fishing license, RAW is overkill. Make a panorama or composite: Combining multiple photos is a serious workout for your computer; using smaller JPEGs can save you a lot of time in editing.
K is for Kit Lens
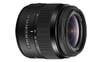
Kit lenses (typically 18–55mm in APS-C, 14–42mm in Four Thirds) perform really well for the price, but they do have drawbacks, notably slow speed. Here’s how to get the most out of them. Look sharp: Our tests show the sharpest apertures are f/5.6 at wide angle, f/8 at mid focal length, and f/8–11 at tele. Don’t neglect the mid focal lengths: With an APS-C lens, 35mm gives a normal perspective, and 50mm a very nice portrait tele view. Distortion is lowest at these settings, too. Get better bokeh: Depth of field decreases with magnification, so step closer, zoom farther, and get your subject as far from the background as you can. Move to put a plain background behind your subject.
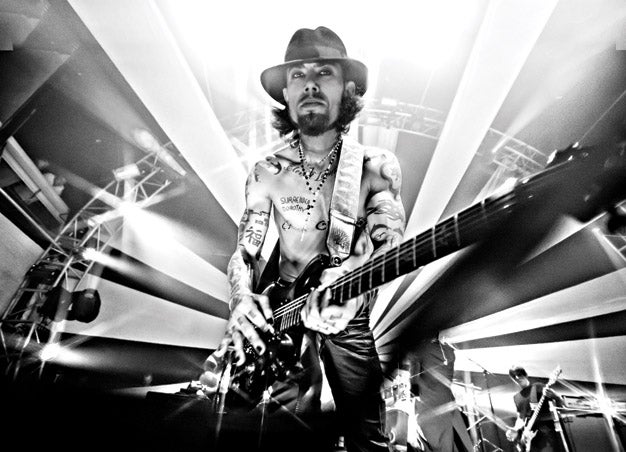
L is for Live Music

Photo by: Dan Bracaglia TheLondonBroil.com
Concert venues are notoriously dark, so fast prime lenses and flashes (if allowed) are the way to go. Crank up the ISO: Without a flash, your shutter speed will be slow, but 1/60 sec is the low limit. Noise is better than blur. Set your aperture wide open: For tight shots of individual band members, set aperture priority mode and lock an exposure on a spotmeter reading of the faces. For wide shots, use evaluative metering to get the proper exposure, and shoot in manual to keep that setting locked. Get facial expressions: Staying on the sides of the stage is a great way to do this, but remember to move around throughout the show to get photos of the crowd.
M is for Monochrome HDR
One of best ways to learn the basics of high-dynamic-range imaging is to start with monochrome—it is more forgiving than color and free of the artificial color shifts that often mar newbie HDRs. Contributor Jim Shoemaker (see this month’s Traveling Photographer, page 42) advises the following steps. Tone-map the image: In Photomatix Pro, use very low settings to avoid an “overbaked” look. The result will be pretty flat, but with full detail. Bring out midtone contrast: In Adobe Photoshop, use the Tonal Contrast adjustment in Nik’s Color Efex Pro plug-in. Fine-tune: Use Nik Silver Efex Pro to adjust contrast, shadows, highlights, brightness, and toning.
N is for Newborn
Photo by: Chloe Ramirez
Too young to smile or hold up their heads, newborns are a challenge to photograph. Here are some strategies. Make babies comfortable: Be sure they are fed, but wait about half an hour for postprandial gassiness to subside. Most newborns (until about 14 days old) will sleep through anything, so you’ll have much more freedom to position one than you will an older baby. Get blankets and fabrics with great textures, and place the baby in and on whatever you can find—baskets, mixing bowls, cushions. Turn up the heat (as warm as 85 degrees): Make sure the baby is toasty so you can get the all-important bare shots. Bonus tip: If baby gets the hiccups, grab a camera. Shoot in burst mode—if you catch the right moment, a hiccup can look like a smile.
O is for Organize
To figure out which memory cards are empty and which are full, create a system. Store cards right-side up and facing out if they are empty. Flip them upside down if they are partly full, and upside down and backwards when they’re spent.
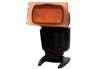
P is for Pop-up Flash
This can be harsh, so diffuse the output: Tape one or more sheets of single-ply tissue over the flash head, or use an accessory modifier such as the Lightscoop, a mirror that snaps in front of the pop-up to bounce its blast to a ceiling or wall.
Q is for Quiet
When a situation demands a silent camera, pros use pricey soundproof camera housings called blimps. For a gadget-free solution, use quiet mode (for instance, Canon’s EOS 5D Mark III has one). If your lens is noisy when focusing, go manual. And in a pinch, you can always wrap your camera in fabric.
R is for Ring light

_Photo by: Anastasia Abramova-Guendel _
Ring lights produce cool portrait effects beloved by fashion and beauty shooters—spooky ring-like catchlights in the eyes and a glowing, halo-like shadow behind the subject. Use a close-focusing portrait lens: The closer you can get your rig, the larger those impressive catchlights will be. Keep the ring light parallel to the subject: This will give you the halo-like shadow behind a subject who is close (but not immediately against) a white background. The halo will have more of a glow-like appearance if it’s defocused, so shoot at or near maximum aperture with a high-speed lens.
S is for Star Trails

Photo by: SeanPavonePhoto/Fotolia.com
Contributing Editor Ian Plant offers his best tips for capturing stars at long exposures. Find a remote spot: Any place near an urban area will have sky glow that can suppress star trails. Use a freshly charged camera battery: Hour-long exposures eat batteries. For very long exposures, consider auxiliary power like a Quantum flash power pack. Use a wide-angle lens: Make sure to include a foreground element. Shoot at ISO 400 to 800: It’s high enough to record stars, and low enough to suppress noise. Set an aperture around f/5.6: It will provide pretty good depth of field; smaller apertures will make the star trails faint. Aim at the North Star: This gives the classic vortex effect. Cut noise: In cold weather, noise is much less of an issue than in warm. Long-exposure noise reduction can work, but it doubles the exposure time; consider reducing noise in editing.
T is for Tone
The split-toning tool in Adobe Camera Raw and Photoshop Lightroom is aces for adding tone to black-and-white images, but it is cool for color, too. Make faux-vintage looks: Add warm tones to shadows and cool tones to highlights (and vice versa), or just go selectively sunbleached by warming up shadows and highlights separately. If you’re working in Lightroom, you can create presets to easily replicate favorite effects.
U is for Uploading
Photo-sharing sites can be cruel to your images, skewing their colors and adding artifacts. Give them a fighting chance by prepping them beforehand. Downsize them: Use Photoshop’s Save for Web option, which will make for quicker uploads. Make them to measure: Website auto-sizing functions often degrade image quality. So size an image as closely as possible to the dimensions at which it will be displayed. Sharpen after resizing: You’ll see more accurately than you would at full-res how sharpening affects the final image. Save images in the sRGB color space: Web browsers prefer this over alternatives such as Adobe RGB.
V is for V-Reflector
One of the most effective reflectors can’t be found in stores. Make your own: Tape together two same-size white foamcore boards along the long edge to form a hinge and let them stand freely. Modify light: Place the source within the V-reflector and adjust contrast by opening or closing the hinge. For hard light, place the source close to the hinge and close the doors. For softer output, open them and pull the light back from the hinge. Bonus: A large V-reflector makes an intimate background—see Irving Penn’s portraits of
Truman Capote or Igor Stravinsky.
W is for Weight Loss
Portrait subjects can be sensitive about their bodies, so try these slimming strategies as needed. Use short light: Turn your subject away from the main light or turn the light away so that it illuminates just one-quarter to one-third of the face, letting the rest fall into shadow. Angle the subject to the camera: Never have subjects stand or sit with the body square to the camera. Use short tele lens: Set it for 75–100mm, but no longer—the flattened perspective of very long lenses can appear to add weight. Raise the camera slightly above subject’s eye level: This de-emphasizes drooping chins. Dark clothing, please: Light clothing adds apparent weight; white adds the most. Avoid light backgrounds, too, since they define body mass. Watch the arms: Have women keep their arms slightly away from their bodies to keep them from adding to torso mass—especially with sleeveless and strapless dresses.
X is for X-Sync
Photo by: Jan Kraus
X-sync is an old term for electronic flash synchronization. Your DSLR or ILC can sync flash at a wide range of shutter speeds—and the shutter speeds does not affect the flash exposure. “Drag” the shutter: In indoor portraits with flash, slow down the shutter so that ambient background light is seen. Boost backlight: When using flash fill in outdoor portraits, adjust the shutter so that the background illumination is a stop or two overexposed. Saturate sunsets: In a flash portrait on the beach at sunset, speed up the shutter so the sky is underexposed by at least a stop for a dramatic backdrop.
Y is for Yourself
For better self-portraits, use a tripod and a self-timer or remote release. Frame, light, and focus with a stand-in. Focus manually, or lock the AF after framing. Then set a small aperture to keep your features sharp. Mind your expression: Set up a mirror at the camera position, use a camera with an articulating LCD that can face forward, or shoot tethered and use your computer as a live-view monitor.
Z is for Zoo
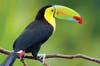
Keel Billed Toucan, from Central America.
_Photo by: Eduardo Rivero/Fotolia _
With a little planning, you can capture images of animals in your local zoo that have the mystery and majesty of portraits made in the wild. Plan your shooting day in advance: Visit the zoo’s website to discover feeding times, baby animals on exhibit, and any special rules or programs for photographers. Look at the website images to see which enclosures offer good backgrounds and light. Arrive early to beat the crowds: Do a quick run-through of displays and lighting. Leave your family at home to avoid distractions. Preset your camera: Use continuous shooting mode, high ISO, and aperture priority with a large aperture. Crop and defocus: Try to eliminate anything that says zoo—worn paths, concrete backgrounds, anything plastic or man-made. Include lots of natural color: Blues and greens suggest locations in the wild.