How To: Create Dramatic Light Painting Photos
Apply light in broad strikes to showcase your subject

The popular technique called painting with light treats your camera’s film or sensor as a blank, black canvas on which you “paint” in your subject by applying light something like the way artists apply paint to a white canvas. “One of the wonderful things about light painting,” says Harold Ross, who “painted” this idyllic scene, “is that it can transform the mundane into something greater.” Most light paintings are in one of two styles. You can illuminate your subject with a handheld light source, applying light to bring out its color, shape, texture, and dimensions. Or, you can turn your light toward the camera, and move it to create line drawings, patterns, or even words that become your subjects. Light paintings can be done outdoors after dark, or indoors in a darkened room, and your light source can be broad (LED panel) or focused (LED flashlight).
ENTER OUR MAY 2014 PHOTO CHALLENGE: OUTDOOR LIGHT PAINTING
Step 1: Shop Your Closet
Use a camera that lets you manually set long exposures, a tripod, and a remote release. For painting big scenes, use a large, soft light and a portable battery to power it. And wear black!
Step 2: Scout Location
Assuming you’re going to paint your scene with light (rather than make the light itself your subject), find an isolated subject that you can approach and apply light from all sides to bring out its dimensionality. Select locations with minimal ambient light contamination.
Step 3: Set Up Your Gear
For subjects like trees and water, wait for a windless night, preferably one with a full moon to light up your backgrounds. Go at least an hour before nightfall so that you can compose the scene and set up your gear while you can still see. Since histograms are of limited use in night shooting, consider tethering the camera to a laptop; this can help you evaluate and adjust the scene’s exposure as you paint. To add some extra color to your composition, use acetate gels over your light source.
Step 4: Practice Your Moves
Perform a dry run, without opening the shutter, to determine how long it will take to apply the light, then set an ISO and mid-range aperture that will allow you to set that length of time as your shutter speed.
Step 5: Shoot Your Scene
Open the shutter with a remote release or self-timer, step into the scene and start painting. Move quickly and continuously. If for some reason you need to pause, turn off your light source. Don’t aim the light straight at the subject, especially from the camera’s position. Instead, angle or “feather” the way the light strikes your subject to bring out shape, texture, and dimension. Painting the background around your subject can help define its outer contours. When finished, quench the light and close the shutter.
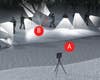
Kris Holland/Mafic Studios
Harold Ross used multiple exposures for his finished image, but you can make successful “paintings” in long single exposures. In twilight, Ross made ambient-light exposures for the water and background with a CamboWide RS body with Phase One P45+ digital back** (A)**. In full darkness, he opened the shutter and painted with two attached 10×10-inch LED panels (B), making separate exposures for each element. Later, he merged the exposures in Adobe Photoshop CC.