Software Workshop: onOne’s Perfect Photo Suite 8
We cropped, fixed color balance, processed twice to create a darker sky, and added reflected clouds in the water—all from within a plug-in suite
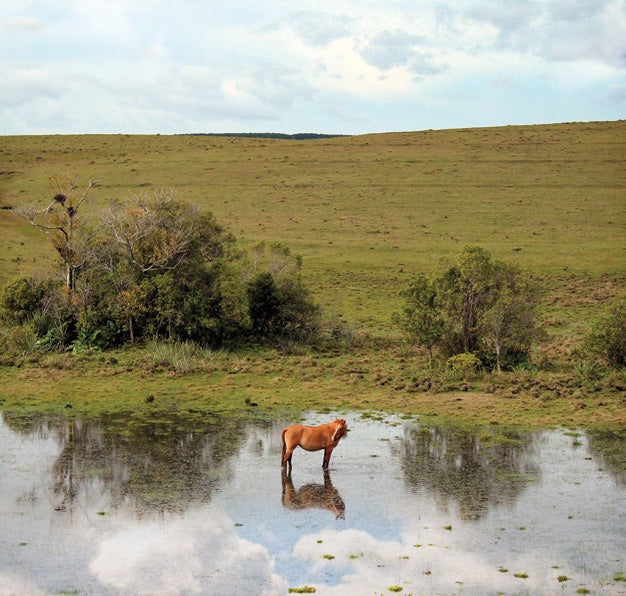
Lélia Valduga
Photo editing continually evolves, and these days it is changing faster than ever. Back when Adobe Photoshop’s traditional editing software was the best primary option for photographers, companies such as onOne came along with plug-ins that used Photoshop’s architecture to help users achieve quicker (and often better) results. Soon onOne began running its own algorithms within Photoshop. When Apple Aperture and Adobe Photoshop Lightroom began accepting plug-ins, onOne developed them to work there, as well.
Now, with the advent of quick, visual, mostly slider-based editing in mobile apps and even in RAW conversion, users have become accustomed to—and sometimes prefer—a mode of editing that previews what they’re going to get and helps them achieve it fast.
The latest onOne Perfect Photo Suite, version 8, does all that. When you run it as a standalone, it now has browsing capabilities to help you find your images and a new Perfect Enhance module to help you do basic corrections. Yes—it works as a plug-in, too, and still does things that Photoshop, Aperture, and Lightroom can’t. But here’s what your workflow might look like if you abandoned your editor altogether and worked only within this program that is now a full-fledged editor in its own right.
Step 1
Start by opening the standalone version of the suite to access all its modules. (If you open via Photoshop, redundant modules, like Browse and Layers, are inaccessible.) Find the image you want, then double-click it to begin working on it.
Step 2
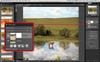
Perfect Enhance is new in this version, and allows you to make basic corrections to the image as a whole. Click on Enhance in the top-right part of the screen. This will bring up a menu of options for the file you’re editing. Set your color space, choose to edit a copy, and pick a layered file type in case you want to work on the image later in another program. Crop, then choose from the presets on the left or use the tools on the right to do basic tonal corrections.
Set File Preferences
You can work on your original, but it’s a safer bet to do your editing on a copy. Note that you can also set color space via the app’s preferences.
Step 3
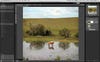
Click on the Layers module. You’ll see the Enhance adjustments you just made appear on their own layer. The sky could use more drama. We’ll add it using another Enhance layer, so head back to Enhance, lower the image’s overall brightness for a more dramatic sky, and click back on Layers. This will create a second Enhance layer on top of your first. Grab the Masking Bug from the toolbar on the left, and click on your image to add a mask. Use the pulldown menu at the top of the screen to switch from Reflected to Gradient, and position it so you see your darkened sky and reveal the lighter ground.
Step 4
If you like your work, hit the Merge Layers button to combine your masked layer with the one below. Then head over to the Effects module to really change the look of your image. You’ll find lots of filters and presets, all available for preview on the left of the screen, with finer adjustments available on the right. Try adding even more cloud action. Select the Texturizer filter, then choose Category: Natural, and Texture: Clouds 2. There’s a Masking Bug here too, so use it with the reflected gradient to apply the cloud texture to only the sky and water.
Layer Your Effects
Because effects can be applied as layers, you can add masks, using the Masking Bug, to control where in your image they appear.
Step 5
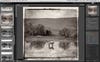
The Suite also contains a black-and-white conversion engine. To see how your image would look if it were monochrome, click on the B&W module. The “Over a Baril” effect is surprisingly beautiful for something so processed. If you’re not sure you want to keep it, click back to Layers—your b&w conversion will be on its own layer. You can save it and turn it off when it’s not the look you’re going for.
Final Step
Perfect Photo Suite 8 contains a module that is useful even for photographers who may never need the rest of the suite—Perfect Resize. Use it when you really need to jack up the resolution of a file; it allows for finer control than resizing in an image editor alone. Start by choosing a preset on the left, then adjust accordingly on the right. When you’re all set, head back to Layers, and hit Save to preserve your work.