Software Workshop: An Introduction to Digital Photo Editing
Here’s where to begin when editing a photo, regardless of the software


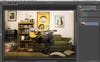
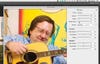
Dan Bracaglia captured Jim Testa, music critic for New Jersey paper _The Star Ledger, for a series on the local music scene shot for Bracaglia’s own site, TheLondonBroil.com._
Sometimes, when you first bring an image into your editor, it’s hard to know what to do—especially when it needs lots of work. There are many ways to proceed, but we’ve found it best to start with the big, quick adjustments and progress to the finer ones.
Fixing issues such as low contrast and bad color casts can go a long way, and once those are finished, it’s easier to judge the amount of saturation you’ll need to add or subtract (if any) and whether a crop is in order. Then it’s time for any necessary retouching and other touch-up work. Finally, when all of that’s accomplished, you can sharpen.
These instructions use Adobe Photoshop CC, but tools for these fixes are available in most of the more serious image-editing programs, even if their interfaces will appear slightly different. It’s useful to note that when doing a RAW conversion, tools for fixing the same issues are also available, and it’s a good idea to proceed in the same general order.
No matter what kind of image you’re working on, these tips will help get you started.
Step 1
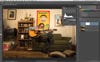
Whenever you open an image in Photoshop, duplicate your Background layer first. This preserves the original (for reference and other purposes). Next make brightness and contrast adjustments. Create a Levels Adjustment Layer, then slide the white triangle to the left to set a white point and the black slider to the right to set a black point. Generally, place the triangles where the histogram begins or ends. Finally, move the middle slider left to brighten.
Step 2
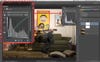
Adding contrast helps, but doing so makes it clearer what a strong yellow (and slight magenta) color cast this photo has. Make a Curves Adjustment Layer, then use the pulldown menu to select the Blue Channel. Drag the blue curve up to add more blue to the image, thus reducing the overabundance of its opposite color, yellow. Then do the same for the Green Channel to tone down its opposite, magenta. The result is more neutral.
**Add Midtone Contrast **
After adjusting color, select RGB, then add midtone contrast by creating a subtle S-curve toward the lower center of the graph.
Step 3
To add more excitement to this photo, create a Vibrance Adjustment Layer. Then crank it up. The beauty of Vibrance for portraits is that you can add a lot without ruining skintones or making the picture look too unnatural. Try moving the Saturation slider for comparison’s sake—note that your image can quickly verge on the garish.
Step 4
To see what your image would look like with less distortion, click on your Background Copy Layer to select it, and go to Filter > Lens Correction. (You won’t see the result of your adjustment layers in this filter’s preview.) Since the portrait subject is in the sweet spot of this lens, the distortion in this shot actually adds to its look, so click cancel to leave it as is. Still, the shot is distractingly crooked, so grab the Crop tool and click on the Straighten tool in the Options Bar. Draw a line parallel to something that should be horizontal. Then finish by cropping in and hitting Enter on your keyboard to accept.
Step 5
Now on to retouching. Create a new, blank layer to get rid of spots caused by sensor dust. Hit J to grab the Spot Healing Brush (type Shift + J to toggle between types of Healing Brushes). Check Sample All Layers, and turn on Content-Aware. Make your brush just bigger than the spot, and click to remove. If your subject has blemishes you wish to retouch, remove them using the same technique on their own layer. Now’s the time, also, to do any other retouching your image requires.
Final Step
Before you sharpen, create a new top layer that combines the layers below. Type these two keyboard commands, in order: Ctrl (Command on a Mac) +Shift + C, Ctrl (Command) + Shift + V. If you’ve set up Photoshop to show the proper print size, go to View > Print Size to sharpen for print. Then go to Filter > Sharpen > Smart Sharpen. Resize the window if necessary. Then check Preview to compare how your image will look at print size versus close up. This image has little noise, so you can get away with a high Amount setting, a low Radius setting, and just a bit of noise reduction.