Photography Tips: Shooting Photos of the Stars
Three top pros share their tips and techniques for epic star photos
The night sky has inspired artists for millennia, and it is no less a muse for photographers today. What’s more, digital technology, including lower-noise sensors and the ability to enhance and combine images during postproduction, makes shooting stars more accessible than ever—and requires no special equipment. Here’s how three stellar masters get their shots.
Matt walker has what might seem to be an ideal occupation for a photography enthusiast: he’s a horticulturalist who manages estate gardens in the San Francisco Bay area.
“Photography and gardening go really well together,” he says. “My job requires that I know the weather every day, and I became pretty good at understanding the weather early in my career. I love shooting landscapes with clouds, and being outdoors keeps me in tune with the conditions. I’m usually the first person to call out to my photographer friends about the approaching clouds.”
Walker, 47, has been photographing since his high school days, but began star photography only about two years ago. “I have always loved the stars, and after seeing some beautiful shots in magazines and on social photo sites, I had to try it for myself,” he says. “I have had the opportunity to shoot the night sky with some really good photographers this year, which helped me become a better star photographer.”
Walker often makes composite star images. “I want to be able to print my images large, and shooting the foreground at low ISO increases the sharpness and reduces noise,” he explains. “The stars at high ISO are not that bad printed large, but a foreground printed at high ISO looks horrible.” He adds, “All my shots are real, that is, the Milky Way was really there at the time, and I just shot the foreground in better light without moving my camera. I don’t want anyone to think I just blended a composite with some random Milky Way shot.”
His advice for photographers who want to try star shooting? “Just go for it, and experiment with different ISOs, and aperture settings,” he says. “A wide-angle lens that has a manual focus setting is mandatory—autofocus does not work at night.”
Besides having the obvious basics (camera and lens, tripod, remote-release cord), Walker urges careful planning ahead. “Finding a location with a good foreground—and making sure that you can remain in your location for a long time—is important,” he notes. “You don’t want to get kicked out by a park ranger when you are in the middle of your shoot. Dress for warmth, bring food and water, and a beach chair is nice when you are out in the field for several hours.”
Walker’s night portfolio is not limited to star shots; he takes plenty of land-, sea-, and cityscapes between sundown and sunup (you can see more at flickriver.com/photos/rootswalker). “Night photography has worked out really well for me because I have a family,” he says, “so when they go to bed, that’s my time to shoot.”
Walker says…
•Watch the weather. Cloud cover is an obvious deterrent to star photography, but remember, too, that “wind is a nightmare for long exposures.”
•Fast lenses, please. “A lens of f/2.8 or faster is best, but not mandatory. F/4 is as slow as I would go shooting the stars.” The slower the lens, the longer your shutter times will be.
•Be careful out there. Bring a headlamp and flashlight for finding your way to and from your car, and be aware of wild animals and any other hazards that may be in an area. “I also recommend shooting the stars with another photographer for safety.”
“I became interested in the night sky at a young age, long before I even had a camera,” says Darren White, a full-time professional photographer who now teaches workshops in night photography. “And once I had a good camera I was always trying to photograph the sky.”
White, 38, who recently relocated to Colorado (“It’s a whole new adventure out here—I am ready!”) is something of a purist when it comes to star shooting. “None of the work on my websites are composites,” he tells us. “I do all my work in single images, with selective adjustments in postprocessing. Sometimes I will create multiple exposures or blends for my own fun.”
White, despite his (relatively) young age, owes his photographic expertise to the film era, “My first real camera was a 35mm Vivitar that my mom got for free from a magazine subscription back in the mid ’80s,” he relates. “She gave it to me, and I put some film in and started photographing my friends skateboarding. I was hooked. After that I quickly upgraded to an SLR, and then to a pro SLR. I learned how to develop and print my own work; working in a darkroom is one of the biggest advantages to learning about exposure—understanding how much light you need to properly expose a scene.”
Exposure, of course, is a critical factor in star photography, where shutter time may range from several minutes to an hour or more. “When working with single exposures it’s best to get it right in the camera,” White says. “Know how to calculate out exposures up to an hour long. Start with 30 seconds at ISO 1600 at f/4 and go from there. If you don’t like star trails and want pinpoint stars, then you will need the widest, fastest lens you can afford. The wider the lens, the more time you can expose without seeing movement.”
The rule of thumb: Each time you cut your ISO in half, you’ll need to double your exposure time, given the same f-stop. So if your camera is providing a good (if noisy) exposure of 30 seconds at ISO 6400, you’ll need 60 seconds at ISO 3200, 120 seconds (2 minutes) at ISO 1600, and so on.
While star photography requires no special equipment—the camera and lens you own, plus a tripod and a cable release or similar, are all you really need—White notes that the early going in nighttime photography can be frustrating. “One of the biggest issues photographers have with photographing the night sky is how to focus,” he says. “Not all lenses will allow you to be crystal clear at infinity.” (Editor’s note: Since the advent of autofocus, manually setting an AF lens to the infinity mark may not guarantee sharp focus.) “Learn how to focus your camera on a moonless night so the stars are clear. I suggest you do this in the day, and put a mark on your lens so you know where ‘infinity’ is on that lens. This will save you considerable time.”
Another issue is digital noise, which is exacerbated by both the dark field of the sky and long exposure times. “I often see photographers get frustrated because they have way too much noise from a long exposure from their older crop-sensor camera,” White says. “I always suggest renting a camera that is a few steps up from your current model to see the difference it makes with night-sky photography.
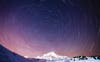
Sensor heat is also a major issue. The longer the sensor is on, the more heat it creates, add that to a warm humid night in the desert, and it will increase your noise. Take the same picture with the same settings on a cold, clear, winter night and your noise will be much lower. As it was with the image I am sharing with you here—the temp outside that night was right at 10 degrees—very cold.”
Knowing geography (and star charts) helps too. In the image seen here of Mount Hood, taken from the Timberline Lodge in Oregon, White knew that “the North Star is always over Mount Hood, so I knew that a long exposure would give a circular effect to the star trails.”
And it helps to enjoy being outside, in the dark, away from the crowds. “I do love the outdoors,” White says. “I grew up on the Oregon coast, and once I could drive I would spend my evenings at the beach photographing the sunsets. I moved to the Portland, area in 1999 and fell in love with hiking to my destinations and just exploring in general.” You can see lots more of his excellent outdoor shots at darrenwhitephotography.com.
White says…
•Take a workshop. “Learn from the pros the how’s and why’s of night photography,” he says. “We have done all the research and learned from trial and error.”
•Get (and stay) in shape. The best places for star photography are away from civilization. “There are so many undiscovered places that people will never see because they simply don’t want to put forth the effort it takes to explore and do a little bushwhacking,” he says.
•Don’t assume it’s all your fault. Noisy images in nighttime shots? Maybe it’s your gear. Huge strides have been made in noise control in recent camera models. White suggests you rent a newer camera body (with larger sensor) to see if it makes a difference.
Masahiro miyasaka came to photography relatively late, with the purchase of a Canon EOS Kiss Digital (the name in Japan for the EOS Digital Rebel) 10 years ago, when he was in his mid-30s. It was purely by chance; Miyasaka had casually read about the camera in a magazine and thought he would give it a try.
But from the very first photograph he took, it was clear to Miyasaka that photography was, both figuratively and literally, in his stars. “I shot a rose. It was very beautiful. I felt the universe inside it,” he says.
With his discovery that star photography is relatively easy with a digital SLR, he has produced a stunning body of work that shows the universe in the smallest of objects, and the shape of tiny things in the pattern of stars.
“A lot of people are interested only in stars,” says Miyasaka, 46, a specialist in factory automation. “But the universe and the patterns of flowers and shells are similar. I think the universe is hidden in the familiar world. Look for both at the same time—the stars and the flowers on the ground. There will be a new discovery for you.”
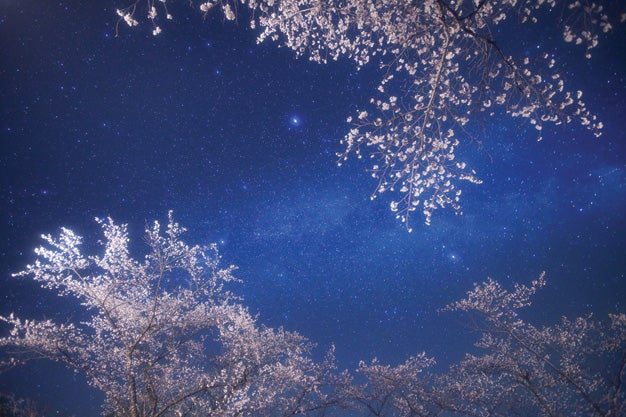
Besides flowers and shells, Miyasaka includes leaves, trees, rocks, ice formations, bodies of water, temples, and even creatures like frogs in the foregrounds of his star shots, which are, as you might imagine, done primarily with wide-angle lenses such as the 16–35mm zoom used for the image here.
None of these photographs are composites. “I will not composite in processing, no. Only one shot for all of them,” he insists. This is not to say that Miyasaka’s images are straightforward one-click shots; far from it.
The image here is one of his simpler ones, a long exposure during which he painted in illumination on the cherry blossoms with a Panasonic LED flashlight.
Images of smaller objects can get considerably more complex. In one example, a photograph of three blossoms against a background of a mountain and stars, Miyasaka’s bulb exposure started at f/2.8, with focus at infinity for the background. About a minute into the exposure, he illuminated the flowers with an LED lamp, using a different power ratio according to the distance of the flowers from the camera. Then, with the shutter still open, he stopped down to f/22 and refocused the lens on the near flower, and again painted in light with an LED. In effect, the final image is a multiple exposure made during one opening of the shutter. Miyasaka diagrams the procedure on his Flickr website, www.flickr.com/photos/43894176@N07/. (Obviously, you need a lens with manual aperture and focusing rings for techniques like this.)
Miyasaka also color-coordinates his foreground lighting with the color of his subjects. “For yellow flowers, use a yellow LED. A white LED is beautiful for white or pink flowers,” he says. He will also use accessory flash units, such as his Canon Speedlites, to illuminate foreground elements.
It may surprise readers to learn that Miyasaka commonly uses a soft-focus filter, namely a Kenko Pro1D Pro Softon, which produces the most blurring of the point-light sources in the frame. “Digital imaging devices produce, small, sharp images of the stars,” he notes. “This is not interesting. A soft filter makes for bloated stars—the pale blur is beautiful.”
Another off-the-beaten-path technique that Miyasaka employs can be seen in the angle of view of his photographs. While he makes plenty of star shots at the traditional angle—toward the horizon, aimed slightly upwards to take in both earth and sky—some are taken straight up, or nearly so. And why not? Haven’t you ever, on a brilliantly clear night, stared straight up at the canopy of stars?
As far as advice for prospective star shooters, Miyasaka says the same thing all astrophotographers do: get out of town. “A lot of people live in the city,” he says. “The night sky of the city is so bright that there are very few stars. I live in the country, with many high mountains. And the air is clean in Nagano. Photographers need to go out to the mountains, and to the sea.”
Miyasaka Says…
•Sharpness isn’t everything. The dreamy, ethereal quality in his photos is due to deliberate softening of the stars with a Kenko Softon filter, which produces the most blur on point-light sources, leaving other elements relatively sharp.
•Use phosphorescent tape. Put bits of this on aperture rings, infinity focus marks, and any commonly used controls so that you can find them in the dark without resorting to a flashlight.
•Always include an element besides the stars. “I’m not interested in only stars. I’m interested in flowers and stars—because I feel the stars in the flower.”