How To: Beautiful Photos From Refracted Light
No lens necessary— welcome to a new form of photo abstraction
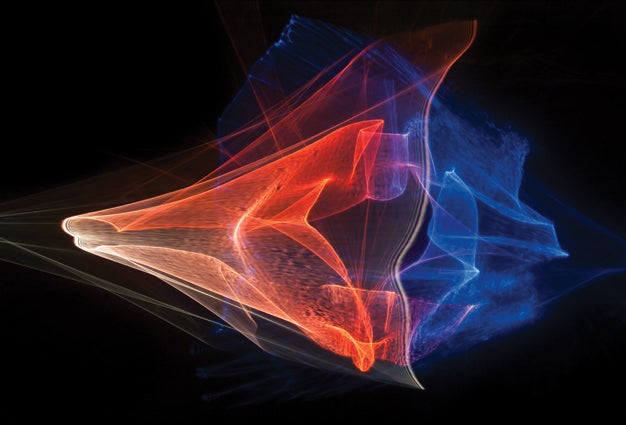
Here’s a completely different sort of project: refractography. Not long ago, while browsing a photo-sharing website, we bumped into this new (to us) form of photo abstraction. Visually exciting, with multi-colored patterns of bending and blending light, refractographs—like Rob Turney’s, above—are easy to make. You don’t even need a lens.
The 38-year-old Turney, of Melbourne, Australia, is passionate about refractographs. He describes the images as visual records of light as it is refracted through transparent objects.
Turney produces his in a darkened room with a very simple setup. This includes a refractive object (a wine glass), a tripod-mounted DSLR, and an ordinary LED flashlight mounted on a lightstand. To focus his light source, he cuts a cardboard square a bit larger than the flashlight’s head, pokes a small hole using a pin, and tapes it over the light. It should be the smallest hole that will still pass adequate light; the smaller the hole, the sharper the pattern detail. He then aims the LED light at his subject. Holding gels between the glass and the camera adds colorful effects.
Follow the steps for more detail. Turney has posted a video tutorial on robturneyvisuals.com—it reveals one of the most enjoyable, almost magical, aspects of refractography: watching as the refracted patterns swirl and mutate in a ghostly way across your camera’s LCD or viewfinder screen.
Step 1
Pick a refractive object. You can use almost any transparent item made of glass or plastic. Higher-quality glass generally produces sharper and more detailed patterns.
Step 2
Gather your photographic gear. Use an interchangeable-lens camera body (without the lens, but with body cap in place while not shooting) that offers Bulb exposures. Also, live view will make your life easier. Mount the camera on a tripod to which you’ve also attached an articulated arm and clamp (such as Manfrotto’s Magic Arm and Super Clamp) to hold the refractive object.
Step 3
Set up your shot. Place the camera and light as described in the text, clamping or taping the light onto a lightstand. With the room lights turned off and the flashlight aimed at the glass, hold the glass out in front of the camera body. Pivot the glass until light refracted through it strikes the camera’s sensor. Once you have determined the correct position for the refractive object, clamp it safely into place.
Step 4
Make your exposures. The room should be entirely dark, except for the LED flashlight. Adjust the light or the glass until you get a pattern that you like, open the shutter on Bulb. Exposures can be more than 10 seconds long, so the refracting object and light source must be absolutely still for sharp images.
Final Step
Add color. Clear glass produces yellowish white refractographs. Tinted glass will produce refractographs with color. But Turney prefers to fine-tune color effects using one or more gels, which he holds in place between the glass and camera.
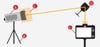
Mount an LED flashlight (A) on a stand (B) and focus its light through a pinhole in a baffle** (C)**. Aim the light at a glass object** (D)** and capture it with a lensless DSLR** (E)**.