How To: Illuminate Portraits with Window Lighting
Shape portraits like an Old Master—free of charge
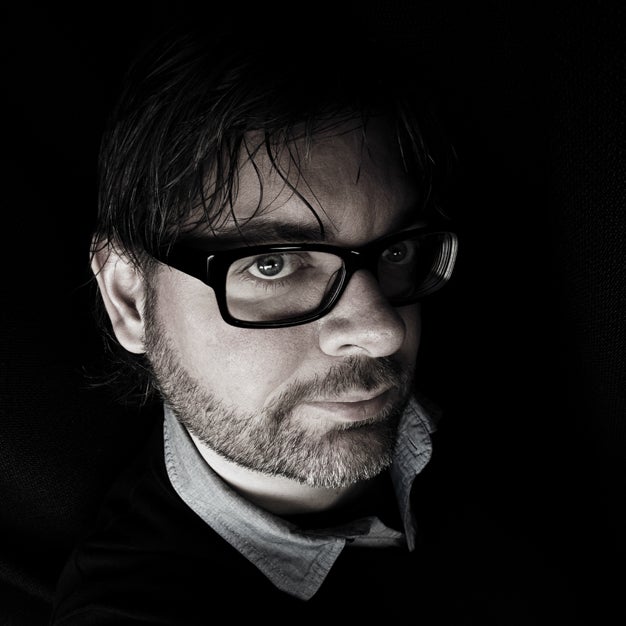
At the outset of their careers, photography buffs typically tune out the subject of artificial lighting. All the gear can add up to an unwieldy and expensive investment, with no guarantee that if you spend a million bucks, million-dollar images will follow. The truth, though, is something else, as Marco de Waal of Rotterdam, Netherlands, proves in this expressively lit self-portrait: Sure-fire lighting can be yours on the leanest of budgets.
Window light, after all, is free, and during daylight hours is almost always available.
Position your subject beside a north-facing window, and even on days of the harshest sunlight, the window can serve as a large, flattering light source. You can’t pick up and move it, of course, but in all other aspects it’s as effective and as flattering as a $200 softbox. Best of all? If you don’t have a north-facing window, time the sitting for an overcast day and almost any available window will do.
De Waal likes windows for their softness, but also for their strong directionality. “With window light, you always have a light and dark side of the face. The contrast makes the pictures more vibrant,” he says. As in his self-portrait here, it can also lend a sense of dark mood.
Want to try a window light portrait (or self-portrait)? Here are a few tips for success:
■ Look to the shade. The best windows for the job are outfitted with a black-out shade that you can lower to control the amount and size of your light source.
■ Consider distance. To adjust the contrast, move your subject closer to or farther from the window. The closer the subject is to the window, the starker the difference between highlight and shadow will be, especially if the background is black. To reduce the lighting ratio, move the subject away from the window, and adjust exposure accordingly.
■ Bounce sun to fill shadows. To reduce contrast even more, brighten the shadows by placing a white reflector opposite the window to bounce light back onto the darker side of your subject’s face. The closer the reflector, the lower the contrast.
■ Get light from above. To make it appear that the light is coming from above, seat your subject on the floor beneath, rather than directly opposite the window.
Kris Holland/Mafic Studios
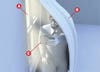
To illuminate a series of glowering self-portraits—a.k.a. “selfies” among Instagram fans—the Dutch photographer Marco de Waal opted for the softly dramatic look of window light. Choosing an overcast day to shoot, he inserted himself between a west-facing window (A) and its dark drape (B). He then set the lens on his Canon PowerShot G12** (C)** to its widest focal length (a 28mm equivalent in 35mm) and its meter to the evaluative mode. (“The G12 is really great for this type of candid self-portrait because of its articulated LCD screen,” de Waal explains.) Then, holding the camera in his extended hand, Marco turned its lens on himself and began exposing at 1/40 sec and f/4, ISO 80. Five minutes later, he had about 20 shots to work with. He took them into Adobe Photoshop Lightroom 3, drained them of saturation, and cropped them. Finally, he selectively darkened and vignetted the image to give it a somber bottom-lit quaiity. The photo was one of a 365-day series of de Waal selfies.
Marco de Waal’s self-portrait is one of many at [www.marco dewaal.nl](http://www.marco/ dewaal.nl). He also specializes in nature and beauty.