How To Turn Airplane Traffic Into Fine Art Photography
Capture moving lights as intricate line drawings
For the brilliant nocturnal landscape specialist Garret Suhrie, a fascination with helicopter and jet trails was a direct result of where he lives. “I’m in Los Angeles, and used to live in a seedy section, where police helicopters circled overhead almost nightly. I shot them, intrigued by their circular trails,” says Suhrie. He soon moved on to airports, and now his website thrills the eye with delicate line drawings etched into night skies.
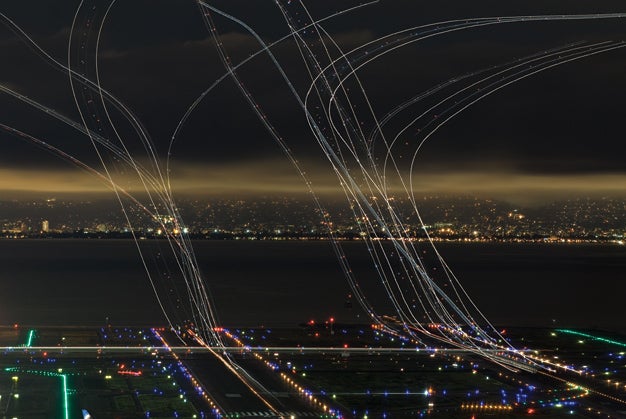
San Francisco is his favorite airport. It has numerous workable vantage points that let him perch his rig on nearby hillsides and parking garages. As in his shot of that airport’s north/south runways here, Suhrie likes to include the bay and far off clouds. Other shots show distant hills.
Want to try jet trails? Suhrie says your chances are best if you live near an airport with elevated vantage points. Other tips:
•Combine multiple exposures. Each trail in this image is a single exposure. With film, Suhrie creates the exposures by locking his shutter open and removing and replacing the lens cap as aircraft land or take off. With a digital camera, he composites multiple frames in software from stacked layers.
•Watch out for wind. A high perch, windy night, large lens, and slow shutter speed can result in blur. Use a heavy-duty tripod.
•Expect to deal with airport security. Suhrie presents them with a brochure showing his fine art jet trails. He’s still asked to leave, but at least he hasn’t been arrested!
Step 1
Gather your gear. A sturdy tripod, a standard to supertele prime or zoom lens with a hood, and a cable release are musts.
Step 2
Scout for vantage points by day. “In daylight, you can see the paths the planes will take, and find the best vantage points with the best backgrounds,” says Suhrie. “You’ll want more than one camera position, so figure out how to quickly get from one location to next. You don’t want to be punching around in the middle of the night in neighborhoods that are unfamiliar to you.” Backgrounds that are dark and free of street or building lights will show off the trails more dramatically.
Step 3
Make your images. “In summer you can typically have a little more than two hours of darkness before airport activity drops off. In winter the dark can give you five or six hours of shooting,” says Suhrie. Exposures typically run about a minute at ISO 160, with apertures ranging from f/2.8 to f/16, depending on the amount of ambient light pollution.
Final Step
Combine and polish your images. Sharpening, contrast, color, and exposure adjustments are often required. For digital composites, Suhrie recommends finessing a base image and applying the fixes to the remaining layers, reducing their exposures by about ½ stop. Stack your layers and set their blending modes to Lighten: The jet trails should pop thru to the front, without relatively darker elements such as clouds appearing in the image.
For more nightscapes like Suhrie’s view of the San Francisco airport above, visit www.garretsuhrie.com.