Software Workshop: Process Raw Photos Faster Using LightRoom Presets
Bundle settings for quick and beautiful transformations


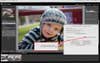
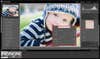
The photographer’s quick RAW conversion and use of a preset made this image shine.
Photo: Jessica Thew/One Willow
Digital cameras can produce images with incredibly accurate color and neutral white balance. While that can be a good thing, it is wise to consider a RAW file, shot with neutral tonality, as just a starting point. With RAW files, it is so easy to make good-quality color transformations that each image has tons of potential.
Photographer Jessica Thew was inspired by that potential and began using Adobe Lightroom to experiment with tone in her images. She saved her favorite settings as presets—groups of settings that you can quickly apply to your image in Lightroom or Adobe Camera Raw. When her blogged images began to attract attention, she started packaging and selling groups of presets through her company, One Willow (www.onewillowboutique.com). A number of other outfits sell presets, and most sets are fairly inexpensive (One Willow’s, for example, are $39 for a set that includes 20 presets and 17 postprocessing effects).
While not all presets are created equal, the best ones both improve your image and act as a teaching tool. After applying one, go through Lightroom’s adjustment panels and check out what the preset is doing; you’ll learn ways of manipulating images that you probably wouldn’t have thought of yourself. Here’s how to load and use a preset, and some tips on how to make them work for you. We used One Willow’s Retro Candy Collection, but the steps are the same for whatever preset you use.
Step 1
After you download a group of presets, put them into a folder where Lightroom can access them. Go to Lightroom preferences (under the Lightroom menu on a Mac, and under Edit on a PC), choose the Presets tab, and click on the button labeled Show Lightroom Presets Folder. Locate the presets you downloaded, then drag the entire folder of presets into the Lightrom Presets folder. It’s important to move the folder, rather than dragging individual presets, so that your presets remain organized once imported into Lightroom.
Step 2
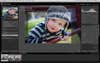
Before you apply a preset, get your image into optimum shape. While the white balance will often be tweaked by the preset, using the Exposure slider to set your white point and the Blacks slider to set your black point are key. This is also the time to do any necessary cropping and retouching. In this image, Thew cropped in closer, fixed the exposure, then used the Adjustment Brush to brighten her subject’s eyes and clean up his complexion.
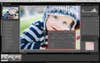
Step 3
Before you choose a preset, make a snapshot of your retouched image so that you can always go back to that state. Then open the folder of presets and watch the navigator on the left as you mouse over the list. As you hover over a given preset, you’ll see a preview in the Navigator window. If your presets are heavier on the toning, as this set is, pay particular attention to any skin tones in your images—be careful to make sure your skin tones remain natural. When you see a preset you like, click on it to apply.
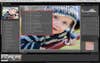
Step 4
Some presets will work perfectly right away, but others require further adjustment. The Rainbow Stick preset works for this image, but makes it overly warm, causing the shadows to appear orange-toned. This preset includes added Vibrance, and, Thew notes, anytime you add saturation or Vibrance you can get orange tone in the shadows. A quick adjustment of the white balance makes the subject’s skin tones peachier and minimizes the orange shadows.
Sometimes presets can make an image look flat. In this case, the preset was fine, but if your image lacks depth, fix it by readjusting the Blacks slider.
Final Step
After applying and adjusting your preset, check out the Detail panel. Some presets, like this one, add a bit of extra noise reduction. If your preset didn’t, or if the reduction is too heavy for your image, now is the time to tone it down. One Willow’s Retro Candy set also includes finishing presets called Posts, which can add effects such as vignettes or extra fill light. Apply them as a final touch.