How To: Make the Most of Layers in Photoshop
Put Adobe Photoshop's killer function to good use with these tips

A fantastic photographer, devoted to Photoshop, once said to me, “Yeah, I love Photoshop, but I really don’t use Layers.” I was agog. This is sort of like saying you love to cook but stay away from pots and pans.
Layers aren’t just for making composites and doing collages. They are important tools that afford you very fine control over the way you edit your images.

Photo: David Yu (Click for a full-res image)
Using Layers, you can control the amount of every change you make, double up on some edits and remove others, and carefully address small areas of your image—all while leaving your original image intact. And you can do far more with Layers than just duplicate them and delete them.
What follows are five tips for working with them in a more nuanced way. Some are great for users new to the tool, and a few are more sophisticated.
FYI: Layer keyboard Shortcuts
If you make a selection on any layer, you can quickly copy and paste the contents of the selection to a new layer by typing Ctrl (Command on a Mac) + J. To merge the selected layer with the one below, type Ctrl + E. If you want to merge a bunch, Shift + click on them all and then type Ctrl + E. To make a selection around all the contents of a layer, hold down Ctrl and click on the layer thumbnail.
Tip 1: Use adjustment Layers
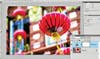
These sit on top of normal layers and affect all the layers below. They don’t modify your pixels directly, so you can always go back and readjust, and you can add lots of them with only the barest increase in file size. Each comes with a handy premade mask.** To add one to your image, go to Layer > New Adjustment Layer and choose the type you want.** You can adjust Levels, Curves, and more, or add a Photo Filter, as I did here.
Tip 2: Vary your Opacity
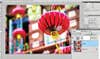
When you make a major change, it’s good to do so on a duplicate layer. Then, if you need to, you can reduce the effect by decreasing a layer’s opacity. This works on Adjustment Layers, too. Here, I duplicated the Background Layer, renamed it Vignette, and added a slight vignette. But it was still too much.** To turn it down, click on the small pulldown menu next to Opacity, and move the slider until you like the way it looks.**
Tip 3: Link your Layers
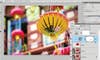
If you want an Adjustment Layer to affect just the layer right below it, you can link them.** Hold down Alt (Option on a Mac) and click on the line between the two layers you want to link.** You’ll see an icon with two overlapping circles—once they’re linked, the upper layer will show a bent arrow pointing to the one it’s linked to. This Hue/Saturation Adjustment Layer now alters only the color of the lantern floating on the layer below, not the whole image.
Tip 4: Use Smart Filters

Filters normally can’t be revisited and reworked. But if you turn a layer into a Smart Object, you can use a Smart Filter on it and readjust it. With your layer selected, go to Layer > Smart Object > Convert to Smart Objects. An icon will appear in the lower right corner of the layer thumbnail. Add a filter, such as Smart Sharpen, as usual. After you click OK, a Smart Filters layer will appear under the layer you worked on. Double-click it at any time to readjust your filter.
Tip 5: Organize Layers
When you have a lot of layers, your Layers Panel can get unwieldy, so organize it with folders:** Hold down the Shift key and click on the layers you want to keep together.** Then click the flyout menu in the top-right corner of the panel, and choose New Group from Layers. You’ll be prompted to name it; when you click OK, the layers will be in their own folder. You can nest folders inside one another. Turn a folder on and off to show and hide all the adjustments. You can even add a mask to it.