How To: Capture Winter Sports Action Photos
Mike Powell breaks down the best ways to make awesome skiing photos.
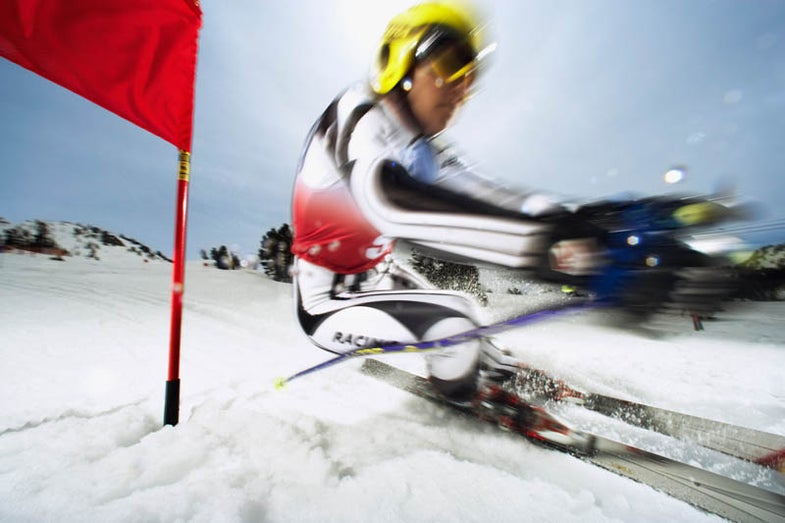
Nailing a downhill slalom shot like Mike Powell’s triumphant image here was once too difficult for most shooters. Camera technology has advanced so that it’s now easier than ever. The best current weather-resistant DSLRs and lenses rarely freeze up or fail in all but blizzard conditions, burst rates are ample, and histograms help handle the challenge of correct exposure despite all-white backgrounds.
Step 1: Seek permission from slope management.
Ski hill employees may know the most photogenic, least traveled, and safest spots for photography. They may also help you avoid the embarrassment of being tossed off the mountain!
Step 2: Dress warmly.
Powell recommends cross-country ski attire for its warmth, unencumbering weight and movement-friendly design. So that he can easily operate camera controls, he cuts a 1.5-inch slit in the index fingers of his gloves, which lets him extend and retract his finger tips as needed.
Step 3: Scout the hill.
Ski it a few times yourself. Look for backgrounds that don’t clash or blend with your subject’s attire and that are distant enough to allow you to defocus them if necessary. Avoid icy spots, which compromise the skier’s control. Devise a short course that the skier can traverse multiple times over short periods.
Step 4: Budget time
to work out details of lighting, composition, and exposure using a skiing assistant as a stand-in. Experiment, especially with shutter speed. You want some motion blur to suggest movement, but not too much.
Final Step: Begin shooting.
by performing several dry runs to work out exact positions for you and the skier. When you’re starting out, relatively slow skiing speeds are fine.