You Can Do It: Leaf Show
Learn how to find a new angle for fall foliage.
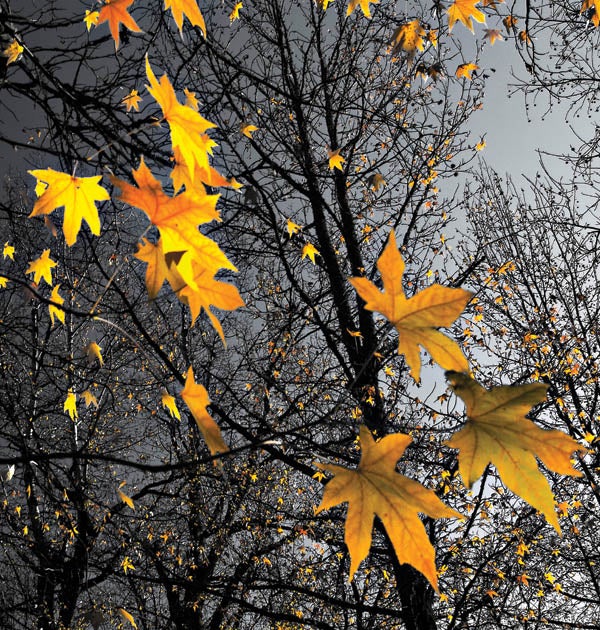
The usual approach to photographing fall foliage involves gaudy color and lots of it: yellows, reds, and oranges against saturated blue skies. But Erik Lundh, 54, of Tigard, OR, has a different strategy.
Rather than capturing broad expanses of brightly hued trees, Lundh exploits—and enhances—details, shapes, and contrasts for their visual power. “I do look for color, but also for separation in individual leaves,” he says.
The shapes that a wind-tossed leaf takes on, as well as the patterns that small groups of leaves form can pack a punch. “What attracted me to this scene,” says Lundh, “were the sporadic leaves on an otherwise bare maple.” Not your normal fall foliage shot, right?
The moral? Don’t passively fill your frame with colorful clichés. Use this striking time of year to explore new and expressive photo techniques, the below steps can help:
Step 1: Scout for great locations. Websites like the Foliage Network (www.foliagenetwork.com) tell you where the best locations are and when.
Step 2: Wait for the right moment. For a shot like Erik Lundh’s, hold off until the peak of the season has passed, when many trees are ornamented with only a handful of leaves. If sharpness and clarity are important to you, shoot on a day when little or no wind is predicted.
**Step 3: **Gather your gear. For Lundh, two musts are a polarizing filter and tripod. The polarizer will help you squeeze every bit of color from a scene, and the tripod comes in handy when exposing.
Step 4: Dial in the right camera settings. Conventional wisdom dictates high shutter speeds (1/250 sec or higher) to freeze moving leaves, and a small aperture for maximum depth of field when shooting a tree from below. Lundh, however, dialed in a mid-range aperture, because it’s his lens’ sharpest, and because he wanted a lower ISO to suppress noise. A tripod helped him avoid blur introduced by camera movement.
**Final Step: **Postprocessing. Tweak color, contrast, and sharpness in an image editor. Using Adobe Photoshop 7, Lundh selected the leaves, then inverted the selection and desaturated the background so his subject’s color didn’t have to compete with a richly saturated blue background.