How To: Photograph Basketball At The Rim
For a new take on the sport, hang a camera above the game.

How To: Photograph Basketball At The Rim
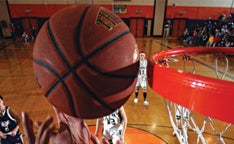
One of the most exciting angles for shooting basketball is from above, a vantage point few spectators experience in real life. But what’s really killer: Getting within inches of the action by placing your camera behind a glass backboard.
This is not easy to pull off. It requires precision, planning, and, most important, permission. Because of the obvious liability issues—imagine your rig crashing down on the players!—you should perfect this technique before trying it at an actual high school or college game.
I shot the photo at the top of the page with a Nikon D1x and 14mm f/2.8 AF Nikkor lens, though any remotecapable camera and wide-angle lens will do. Indoor courts need more light to stop the action, so I used four Dynalite Uni-Jr strobes, PocketWizard (PW) flash and camera triggers, and a PWN90M3 remote cable. A Manfrotto Magic Arm, Super Clamp, and multiple Manfrotto Safety Cables held my gear in place.
Before climbing a ladder and hanging your camera, lens, and remote triggers behind an actual backboard, gather your gear and practice mounting your rig securely on pipes in your basement or tree limbs in your backyard. When you’re ready for a court, start with players just dunking the ball or playing in simple one-on-one contests.
Once you get your rigging and shooting technique up to par, you’re ready for a game. Be sure to get permission from the school’s athletic department— and have the players sign liability releases.
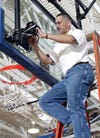
Step 1: Mount camera to backboard. Climb a ladder and attach a super clamp to a backboard brace and a magic arm (with a camera plate) to the clamp. Mount the camera to the plate and tighten everything with channel-lock pliers. A PocketWizard taped to the magic arm fired my strobes. A PW receiver plugged into my nikon’s remote terminal let me fire it from the floor.
Step 2: Compose and focus. on the ladder, estimate where peak action will be and manually focus there. With gaffer’s tape, secure the manual-focus ring and any control that could shift during play at the hoop. To control reflections off the glass, tape a lens shade (handmade from black cinefoil) between lens and backboard.
Step 3: Light the court. outdoor courts may be well-lit for stopping action, but few have glass backboards. indoors, stop action with flash. I had four 400-Ws dynalite strobes (fired by PW receivers) mounted high in the bleachers, aimed slightly down at the key. Set strobe output for 1/250 sec at f/4 at ISO 800.
Final Step: Test the system. Use an infrared or radio remote trigger to fire a few test shots of a player. The flash trigger, plugged into the camera’s PC socket, will fire the PW-receivered strobes. Retrieve and check the memory card, then adjust focus and exposure.
How To: Photograph Basketball At The Rim