Secrets of Wildlife Photographers
Top nature shooters share their tricks of the trade.
How do you take wildlife pictures as exciting as those in this magazine? We canvassed 19 great wildlife photographers (a list is on the last page) to find out.
Of course, these professionals generally use top-of-the-line gear, including DSLRs with fast burst rates (at least 5 frames per second, preferably 8), image-stabilized camera bodies or lenses, and the sharpest, fastest telephoto glass.
But the pros also shared their less-obvious techniques and strategies for finding, luring, lighting, posing, and coaxing photogenic behavior from their subjects.
Their advice isn’t always for the squeamish. Some get much closer than you may think wise. Some offer live prey to catch predators in action. And some enlist animal trainers to help them interact directly. Still, you’ll be able to apply at least some of their tips whether you’re photographing hippos on a safari or songbirds in your backyard.
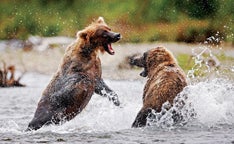
Out for Bear
You don’t have to head to Alaska to photograph bears—but it sure helps. Chris McLennan, based in New Zealand, captured these two grizzlies fighting over a fishing spot in Katmailand, AK. He cautions, “While most wild animals are best photographed when unaware of your presence, with bears it’s advisable to ensure they know that you’re around. The most dangerous bears are those that you surprise.”
Indeed, every bear photographer we interviewed dwelled on safety more than photographic technique. And before attempting to capture bears on their own, many professional wildlife shooters take workshops such as those in Charles Glatzer’s Shoot the Light series.
Over the years, Glatzer has learned that bears are governed by two overriding obsessions: food and fear. “As long as you don’t scare the bears, they will concentrate entirely on food and ignore you,” he says. “If you move slowly, and don’t stand erect or make loud noises, you can often get within 100 feet. If, however, their attention shifts from food to you, you better back up as quickly and quietly as you can.”
Besides keeping a safe distance between you and the bear, he recommends carrying a can of pepper spray within easy reach in your backpack. Bear deterrents are so important for photographers and others getting close to them that manufacturers such as Counter Assault, in addition to selling sprays and other deflection tools, sell inert, practice pepper-spray cans to teach you the mechanics of the safety lock, the arc and reach of the spray, and other operational fine points.
In the wild, never place yourself between two bears or groups of bears. The best way to avoid this is by watching your subject’s body language, especially the ears. If a foraging bear twitches its ear repeatedly to the right, there’s a good chance it’s following the progress of another bear or group of bears to its right through the woods. Also, cubs are cute, but their mother is especially dangerous—even if you don’t see her, she’s probably nearby.
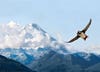
Birds of the Air
Oliver Klink, a wildlife photographer, workshop leader, and author from Los Gatos, CA, captured this horned puffin in Alaska’s Lake Clark National Park. “My first task is to look for birds that repeatedly traverse the same flight patterns. I learn the pattern, then find a background along the path that, even without a subject in flight, will make an exciting picture,” he says. “This horned puffin was very predictably circling its burrow, where chicks waited to be fed. I set up my camera, framed Mount Redoubt in the background, and just waited for the picture to happen.”
Metering birds in flight is tough. As you follow them across the sky, the background can change from dark to light to middle gray—and your exposures range from dark to light and back again. “I use a light meter to take an incident reading in the prevailing light, and then set that in the manual-exposure mode,” says Glatzer. “I then finesse exposure depending on the primary tones in my subject, giving slightly less exposure to darker subjects, and more to lighter. My exposures may be slightly over or under, but they’re consistent.”
Every avian family comes with its own set of tips for better pictures. With wading and shore birds, for example, Glatzer approaches from the water. “Shore birds are accustomed to threats coming from the land, not the water,” he explains. “If you put on a pair of waders and walk out into a bay to approach them, you will get within a few yards before they take flight.”
Bird specialist Jim Gilbert of Bernardsville, NJ, lays prone, on his stomach, for shorebirds. “They’re almost completely unconcerned about a photographer laying flat on the ground. It not only gets you close, but will also help blur distractions in the fore- and background of your photo if you shoot at wider apertures.”
For songbirds, Gilbert waits until spring to photograph males as they define and defend their territories. “Males in spring wear their fl nest mating plumage and have a series of favorite singing perches around their territories,” he says. “I find the perch with the best lighting and background, and sit there and wait for the male to return, usually putting early-morning light at my back.”
For birds of prey, many pros use their cars as blinds. “National wildlife refuges usually have tour roads,” says Gilbert. “If I see an osprey or eagle perched near the road, I slowly pull up to within shooting distance, and if my subject flies off, it gives me time to set up. It will often return.”
Like many pros who specialize in birds of prey, Scott Linstead of Maple Grove, Quebec, attracts owls and hawks with live mice, often sold in pet stores as food for snakes. Tossing them towards the birds works especially well on fields of snow, where predators are quick to spy their dark prey against the pure white backdrops.
“I track the incoming birds as they swoop toward the mice, fl ring bursts at 8 frames per second, usually coming away with a couple of sharp frames,” he says.
When metering a soaring bird, you’re often shooting its shaded side, so add slightly to the metered exposure—start with 1/2 stop of exposure compensation.
It also helps to have the right equipment. Especially for long lenses, gimbal-style tripod heads such as the Wimberley II offer much more freedom of movement when following soaring birds than other types of heads.
In the Not-So-Wild
Purists eschew game farms, but these offer a safe way to work with large predators such as mountain lions, bears, and tigers under controlled conditions, before you attempt them in the wild.
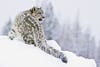
Paul Burwell, an Edmonton, Alberta, photographer, writer, and workshop leader, captured the snow leopard at the Triple D Game Farm in Kalispell, MT. “Game farm trainers have taught me a lot,” he says. “They can tell you so much about individual species, their behaviors, and how best to photograph them.”
Because most captive animals learn to expect treats from trainers, these handlers can also provide a point of focus for the wildlife, erasing a bored or lifeless expression by simply reaching into their pockets. Trainers were helpful in producing this snow leopard’s intensely alert expression, for example, by capitalizing on the cat’s instinctive attraction to quick movement, which helps them locate and catch prey in the wild. To coax the impressive over-the shoulder glance, two Triple D handlers tossed a snowball back and forth, successfully drawing and holding the leopard’s attention while Burwell fired away.
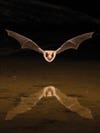
Nocturnal Creatures
To catch animals whose day starts only as daylight ends, Scott Linstead uses a motion-triggered camera. “My first task in photographing this big brown bat was luring it into within flash range,” he says. “I did it with a small artificial pond in the middle of the Amado, Arizona, desert. The water source in that very dry environment almost guaranteed a few thirsty subjects.”
Once the bats discovered his pond, Linstead lit them with four Nikon SB-800 Speedlights placed around its perimeter. With an infrared tripwire kit from Phototrap ($460, direct), his Nikon D300 fired automatically whenever a flying bat broke the infrared beam. At the moment of exposure, the D300’s built-in pop-up flash fired, triggering the optically slaved Speedlights.
“The system worked fine, except that the flash output was bluish and a little artificial looking,” says Linstead. “To compensate, I manually selected a warm white balance of around 8000K. To increase my chances of a sharp photo, I used f/16 for plenty of depth of field. The small aperture also prevented ambient light from contributing to the exposure, which reduced the chance of motion blur in the bats.”
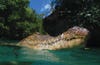
Smile, Crocodile
When we first saw Tim Rock’s shot of a saltwater crocodile made in the Rock Islands of Palau in the western Pacific, we assumed he took it from the safety of a canoe. But, no. He was swimming inches away from the mature, man-eating beast.
How did he survive? With the help of a former crocodile hunter, Rock first captured the animal and fed it until it could eat no more and became somewhat lethargic. Then, using a fine but strong nylon fishing line, he wrapped its snout closed. “Because all the jaw power a croc has is used to close its mouth, it’s fairly easy to tie it shut,” he says. “Its jaw muscles were too weak to break our filament, although it was almost too thin to be seen. We felt fairly safe swimming with and shooting the croc this way, always watching for the powerful tail and pointy claws.”
Wildlife in General
The pros we spoke with offered a plethora of useful tips for better wildlife photography, no matter what your subject:
-- Practice on Pets. Diane McAllister, who lives in the mountains outside Reno, NV, has taken some of the best grizzly photos we’ve ever seen—but she doesn’t attribute her success to her Canon cameras, her timing, or her fearlessness. She thanks her two pet Labrador retrievers. In the months before her Alaskan excursions, she practices focusing, exposure, tripod handling, lighting, and framing on her dogs. “They’re not as big as grizzlies, but they’re just as active and unpredictable,” she says.
-- Learn The Basics at locations where the animals have little fear of humans, such as the Falkland and Galápagos Islands, or in relatively isolated areas such as New Mexico’s Bosque del Apache.
-- Don’t get too close. Wild animal portraits have more impact if you include enough of the natural surroundings to prove that the animals are not confined.
-- Take advantage of a motionless subject to change camera orientation, crop, and exposure until you’ve exhausted the possibilities.
-- Move your tripod or monopod often. Even slight repositioning can add variety, and prevent the impression that you’ve taken the same picture multiple times.
-- Fast-moving subjects require f/2.8 and faster lenses.
-- The faster your subject, the higher your camera’s burst rate should be.
-- Go to the light. You can’t get good wildlife photos in dim or contrasty light. Your most productive outings will be those under bright but overcast skies.
-- Use flash underwater to compensate for subsurface blue casts as Brian Skerry did for his harp seal pup. The closer you are to your subject, the more effective this technique will be. Keep the flash off-camera to prevent backscatter.
-- Observe before you shoot. Looking for repeated and characteristic behaviors can lead you to better angles and lighting, as well as more expressive body language.
-- Concentrate on the edges of herds. Pro Jason Hahn focuses first on the fringes of groups to capture individual animals and smaller group interactions. Result? Generally cleaner compositions.
-- Look for patches of sunlight when searching for cold-blooded alligators, frogs, and turtles. They’re drawn to the sun for its warmth, so park yourself nearby.
-- Hire a local guide when you’re traveling for the first time to a distant location to help you find the best spots for photography.
-- Save your coordinates in the wilderness by using a GPS dongle such as Nikon’s GP-1 ($195, street) .Knowing your exact location will help you return for more.
**Here’s a list of all our experts: **
Kevin Barry, [www.flickr.com/photos/kevin_barry peter barta](http://www.flickr.com/photos/kevin_barry/ peter barta), bartaphotography.com John Blumenkamp, www.tetontrail.com Paul Burwell, www.paulburwell.com Fabiola anD Alfred Forns, www.avianscapes.com Jim Gilbert, www.jimgilbertphoto.com Charles Gatzer, www.shootthelight.com Barry Steven Greff, www.barrystevengreff.com Jason Hahn, www.jasonhahn.com Beverly Joubert, www.wildlifeconservationfilms.com Oliver Klink, www.incredibletravelphotos.com Scott Linstead, www.scottyphotography.com Diane Mcallister, www.imprintsofnature.com Chris Mclennan, www.cmphoto.co.nz Donald Miralle, www.donaldmiralle.com Tim Rock, timrock.com Brian Skerry, www.brianskerry.com Laura C. Williams, www.lauracwilliams.com