How To: 5 Nature Shooting Skills
Master these and you'll shoot like a pro
How To: 5 Nature Shooting Skills
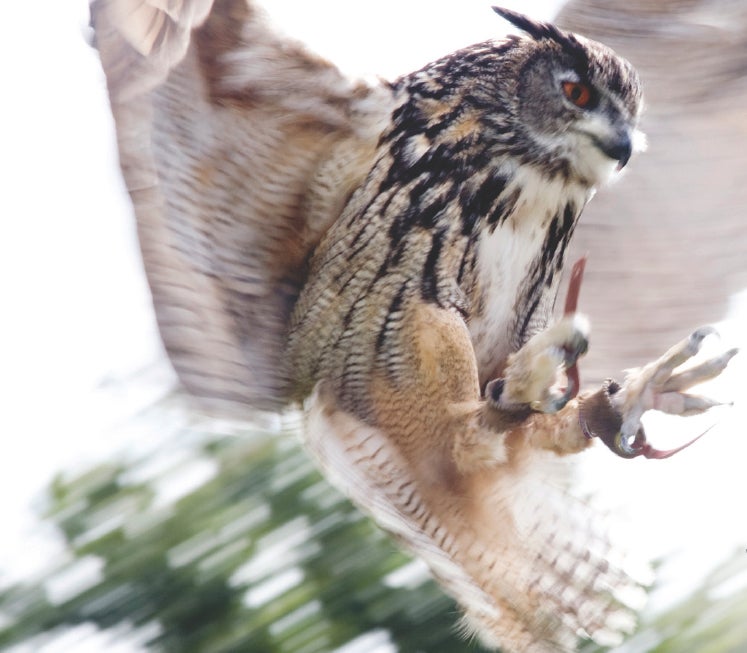
1. Pan a moving subject.
Panning-following a moving subject by pivoting the camera while the shutter is open-has two big benefits for shooting wildlife. It captures the subject sharply, while streaking the background to show motion (as in the photo above). It can also help you keep your subject sharp when the lighting’s too dim for you to set faster, action-freezing shutter speeds. Panning typically requires the shutter to be open for 1/8 sec or longer, depending on subject speed. Whether you’re handholding or using a tripod (which can produce straight, parallel lines in the background streaks-a cool effect), start the pan before the shutter is open and keep moving until after it’s closed. Like most things in life, practice makes panning perfect.
2. Check the histogram.
The peaks and valleys of this graph represent the amount of exposure in tones from darkest (far left) to brightest (far right). It’s the edges you should worry about: If any of the graph spills over the left edge, you lose detail in deep shadows and usually get a dose of noise. Spill over on the right edge, and you wind up with blown-out highlights, such as a blank sky. If the graph spills over on the left, increase exposure; if it spills over on the right, decrease exposure. Sometimes you won’t be able to get both sides contained simultaneously. Landscape shooters may opt to let the shadows fall off rather than get blown-out highlights, but there are exceptions-backlit landscapes such as David Clapp’s on pages 58-59.
3. Track with a zoom.
You want to fill the frame with a bird in flight, so you rack your long zoom out to the longest focal length. But when you put your eye to the viewfinder, you’re met with an empty field of blue sky or green foliage. Where’s the bird? Rather than swing your lens every which way in an often futile hunt for a moving subject, try zoom tracking. Set your zoom to a wide enough focal length to easily pick up the bird in flight when you put your eye to the viewfinder. As soon as you do, follow focus on it (as with panning, use continuous autofocus), until you’re in synch with its speed and trajectory. Then begin to zoom in and fill the frame. Also like panning, it gets easier with practice.
4. Set hyperfocal distance.
The hyperfocal distance is the focus setting that will give you the greatest depth of field (DOF) that still includes infinity. If your lens has a DOF scale (a series of inscribed lines adjacent to the distance scale and labeled with f-numbers), setting it is easy: Switch the lens to manual focus and turn it so that the infinity distance mark lines up with the f-stop you’re using. If your lens has no DOF scale, you can eyeball it using DOF preview (provided your camera has it): Set your aperture and trigger DOF preview. Focus the lens manually to a near distance, and, while looking through the viewfinder, set the distance farther and farther until the most distant object comes just into focus. If the viewfinder image is too dark, cover the finder, cup your hands around the eyepiece, and wait for your eye to adjust.
5. Bracket exposures and other settings.
A common myth is that one perfect exposure exists for every landscape, floral study, or wildlife portrait. But by under- and overexposing a scene, you can come away with two (or more) interpretations, each different yet compelling in its own way. Bracketing exposure-simple, thanks to auto bracketing on most DSLRs-nets you a decent exposure, several variations, and the potential to blend different exposures into a single, superior version of a scene. For really killer images, go a step further, if time permits: Bracket white balance, focusing, crop, and camera orientation (horizontal and vertical)