You Can Do It: Ice Shot
Put your art on ice with bold close-ups that give you a reason to go out in the cold.
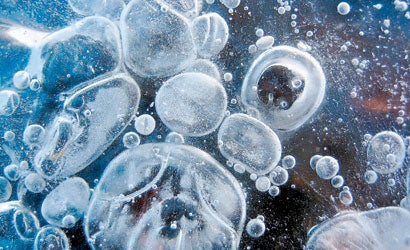
Although I live a rugged outdoor life of hiking and camping in some of the country’s most beautiful and remote landscapes, I didn’t photograph these ice bubbles in the deep woods but in a public park on the banks of the Mississippi River in Minneapolis.
Walking along the frozen shoreline one day last winter with my Canon PowerShot SD400 in hand, I was on the lookout for “perfect” ice, like that shown here. Clear and smooth-surfaced enough to reveal anything trapped inside it, it forms in both standing or briskly flowing water. The best ice has gone through a freeze-and-thaw cycle that has melted the surface a little, filling in cracks to become relatively transparent.
Conversely, ice that’s been under a layer of snow will often show pitting and crystal formations that can mask the subject. And ice that’s too thick can obscure the darker riverbed below, reducing overall contrast so the subject doesn’t stand out enough.
The bubbles themselves should form a pleasing pattern. It helps if they’re a variety of sizes, with a single, larger one as a focal point. Failing that, they need intricacy, like the “pyramid” below left.
I also look at what’s beneath the bubbles. Rocks, leaves, or any colored object under the ice can add a sense of depth and colorful contrast. Since ice often takes on the blue cast of the sky overhead, I try for subsurface backgrounds that contrast: red river rocks or sand-colored sediment, for example. These subsurface objects can’t be too near the ice, though, or else their texture and detail come into focus, competing with the subject.
When I found these bubbles, I knelt down and used my hand to swipe tiny debris and crystals off the surface for a cleaner view. If my subject has some dimension (like the bolts in the bottom photo, below), I’ll shoot at a 45-degree angle to the ice’s surface. This plays up the subject’s shape and allows me to use flash, which penetrates the ice, illuminating deeper subjects. (Because ice is reflective, shooting straight down on it with flash usually produces a disastrous hot spot.)
For these relatively flat bubbles, I shot straight down without flash. I set the SD400 to its Macro mode and made sure all other controls were on Auto. Holding the camera several inches above the ice, I took 16 pictures over 4 minutes, shifting the camera position slightly between each to fine-tune composition. The large one here was the best, and I later polished it with tweaks to color saturation and sharpness in Apple Aperture.
My last “tool” for getting this shot? Knee pads. Because river-bank ice photos require kneeling along the water’s edge in freezing conditions, I protect my shins with kneepads, well-padded ski pants, or an old blanket that I keep on hand to kneel on.
Finally, ice is a dangerous subject-step on it, and you can easily slip on or break through it. Because either could do a number on me and/or my camera, I step with care.
| Photos by Jim Brekke |
Jim Brekke, a 48-year-old optometrist from Hudson, WI, posts ice bubbles and other nature pictures on jimbrekke.com.