The Safari Next Door
You don't have to jet to Africa for great wildlife photos. Just trek to your local zoo.
Big-name wildlife photographers aren’t eager to admit it, but many of their most famous — and profitable — images were taken in zoos. Surprised? Don’t be. We’re pro stock photographers, and we shoot at zoos all the time. They not only educate animal-lovers about wildlife, they also offer the chance to take pictures (especially portraits and close-ups) that would be difficult, if not impossible, in the wild.
And if you do it right, your photos will go far beyond the typical “zoo snapshot” and really show the beauty and majesty of the animals. Here’s how:
First, prepare. Before embarking, check the zoo’s website to learn the feeding times, see which animals may have young this season, and hunt for other photo possibilities. Good pictures on the website are clues to which species and environments are most photogenic. Schedule zoo visits in early fall and late spring, before and after the school field-trip seasons.
Plan to visit animals in their mating season. Go in early fall for big antlers and dramatic behavioral displays from rutting North American mammals: sheep, goats, bison, elk, and deer. Return in early spring for birds with bright mating plumage, such as wood ducks, gold finches, and parrots.
Leave the kids at home, but do bring an assistant. He or she can do the obvious: lug gear, ensure no one trips on a tripod, and hold a flash. An assistant can also do the not-so-obvious: Often, while one of us is shooting, the other pops out from behind a window jam to get the attention of a bored animal.
We jam our Lowepro Mini Trekker AW backpack with about 40 pounds of gear: two DSLR bodies (Nikon D2x and D200), one dedicated to a 500mm f/4 Nikkor for distant subjects, and the other to an 80-400mm f/4.5-5.6 VR Nikkor and 24-135mm f/3.5-5.6 Tokina for nearer subjects. We make heavy use of 1.4X and 1.7X Nikon teleconverters. And we always bring a light and compact, but durable, Gitzo G1220 tripod.
A quick initial walk through the zoo will show you which are the best exhibits and which species the most photogenic. Look for direct, natural light and a lack of bars. Stick with exhibits that have foliage, actual rock formations (not poured concrete), and landscaping consistent with the animal’s original habitat. Beware of scratched windows, clutter, and evidence of captivity: toys, rope, and worn paths. And avoid exhibits that require a wide-angle lens, introduce artificial light, or show cement.
The best exhibits offer depth in front of and behind the animals. A deep foreground lets you use a lens with a longer, more flattering focal length. Space beyond lets you throw the background out of focus, eliminating “zooey” elements while keeping the attention on your subject.
We spend most of our day at two or three good exhibits, and rotate our shooting between them. That means you have to shoot strategically.
Arrive early. The best time of day is when the zoo first opens. Not only are the crowds at their thinnest, but the animals are often most animated when they’re first introduced to their enclosures after a night in separate sleeping quarters, if they have them.
Preset your camera. If a picture suddenly presents itself, you want to be ready. Here are our presets:
• Continuous firing mode. To catch fleeting facial expressions and body language, shoot at the highest frame rate possible — and shoot a lot.
• High ISO. Faster shutter speeds freeze an animal’s motion. To get them we usually shoot at ISO 320 or 400 — in better light, ISO 200. Our slowest speed is usually 1/500 sec.
• Wide apertures. They allow those higher shutter speeds, plus blurred backgrounds that help hide the zoo. Deal with the shallow depth of field by focusing on your subject’s eyes.
• Centerweighted metering. We just find it easier and more accurate.
• Auto white balance. It’s usually close enough, especially when you’re shooting RAW files. But you’ll need to try different settings in aquariums.
• Flash. We pop a shoe-mount flash when we can to put a catchlight in our subject’s eyes. Our Nikon SB-800 Speedlight will put a spark in a bald eagle’s eye at 25 feet away. But while flash is good for opening up shadows, it can ruin the shot if it calls attention to itself. And it can irritate some animals — make sure it isn’t banned when you want to use it.
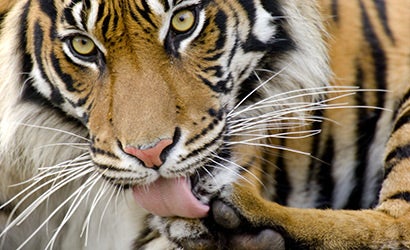
| Top Photo Zoos• Minnesota Zoo (Minneapolis) for Siberian tigers, Mexican gray wolves. • National Zoo (Washington, DC) for pandas. • Oregon Zoo (Portland) for wolves. • Point Defiance Zoo & Aquarium (Tacoma, WA) for sea otters. • San Diego (CA) Wild Animal Park for lions, lion cubs, lowland gorillas, condors. • St. Louis (MO) Zoo for wolves. • Woodland Park Zoo (Seattle, WA) for African wild dogs, lions, gorillas, wetland life. |
One of the biggest challenges is to avoid the “zoo” look. Color helps, whether it’s blue sky, green foliage, or even wildflowers. Brown mammals against brown backgrounds will make your pictures look zooey.
To eliminate bars or netting, use long focal lengths, open to maximum aperture, and position the lens close to the barrier. If sunlight is falling directly on the bars, come back when it has shifted or the sun is behind clouds. This is especially important if the bars aren’t black. (We’ve seen pros risk arrest by painting them!)
Glass walls can be a headache, too. We carry glass wipes in a resealable sandwich bag for cleaning smudges from glass and acrylic. Lip balm tones down some scratches.
To suppress reflections, we use rubber sunshades on our lenses, which we press against the glass. For lenses that don’t have rubber shades, we’ve made a light trap from half a cardboard box, with a hole cut into its back wall and its interior painted black. We slide our lens into the hole and press the box against the glass. We also carry a large piece of black fabric like the focusing cloths large-format photographers use. We hold or gaffer-tape it to the glass, then pull it over our entire tripod-mounted rig — good-bye reflections.
Then there are the creatures themselves. Zoo animals often telegraph clues of their captivity. If an animal seems fat or overfed, with a lack of muscle tone and a bored facial expression, move to the next enclosure. If it has claws, tusks, or fangs in the wild, try shooting at angles that don’t show that these features have been removed. You can often tell a captive bird of prey, for example, by its beak — underused in captivity, it forms an overbite.
Look for repeated behaviors. Often animals will replay the same movements, pace the same path, or interact with each other in a repetitious manner. This gives you valuable time to study the light, background, and angles and find the best vantage point, focal length, composition, and the like. Shoot portraits first, then zoom out for behavior and full-body shots.
Want to make eye contact or perk up a listless subject? Shake a big ring of noisy keys, especially around feeding time, to attract an animal’s attention. (Forget dog whistles. And tempting a subject with treats will get you tossed out.)
If you enjoy your zoo experience, you’ll want to go back in different light and at different times of year. And, as with most disciplines, the more you do it, the better the results will be.
Tom and Pat Leeson, a photo team for 25 years, write books and articles, and work on assignment for National Geographic, Audubon, the Sierra Club, and others.