The RAW Deal
Digital imaging expert Tim Grey examines the pros and cons of RAW capture -- and explains the process of converting RAW files using Photoshop CS3 software.
To go RAW or not to go RAW? For many digital photographers who now have the option of RAW capture, that is a pressing question. In his new book about digital imaging, Photoshop CS3 Workflow (published by Sybex, an imprint of Wiley Publishing, Inc.), author and digital-imaging guru Tim Grey devotes an entire chapter to the subject.
“RAW capture offers many benefits for the digital photographer, and it provides the best opportunity for maximum image quality and detail,” Grey writes in the introduction to his chapter on RAW Conversion. “Of course, the advantages of RAW capture come at a price: the step of RAW conversion added to the workflow. Still, when you need optimal quality in your images, the slight reduction in overall workflow efficiency is well worth the benefits you can achieve with RAW capture.”
In the following excerpt from Photoshop CS3 Workflow — available through the Wiley Publishing Website — Grey discusses the benefits and drawbacks of RAW capture, as well as the detailed process of converting RAW image files. — Jack Crager
Benefits of RAW
Photographers take a lot of steps to ensure the absolute best quality in their images. Using a tripod, employing mirror lockup, selecting lenses with image stabilization or similar technology, and using the lowest ISO setting possible on a digital camera are all examples of such steps. Capturing in the RAW mode offered by many digital cameras is yet another way to help ensure the best image quality.
The quality benefits of RAW capture derive from several factors. Each of these represents a potential benefit to the photographer as well as the quality of the final image.
White Balance
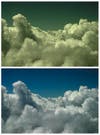
Digital cameras introduce the need for photographers to deal with color temperature and white balance. Film photographers have to choose film appropriately balanced for the lighting conditions to be used. However, temperature is a much more significant issue with digital color. The camera needs to compensate for the color of the light, which is measured as a color temperature in degrees Kelvin (see image number 2 in the accompanying slide show). In a general sense, you can think of this as a way to make a white sheet of paper look neutral no matter what type of lighting is illuminating it. Whether the light source is daylight, fluorescent, incandescent, or flash can have a considerable effect on the color of the light as seen by the camera.
Most digital cameras do an exceptional job of automatically determining the appropriate compensation for the lighting conditions under which you are photographing. For that reason, the Auto setting for white balance can generally be trusted to produce accurate results. With RAW capture, you can trust the Auto setting completely because even if the camera does a poor job, you can correct the image in the RAW conversion with absolutely no penalty in image quality. In fact, adjusting the white balance settings during RAW conversion produces exactly the same effect as if you had used the white balance preset in the camera that matches the color temperature you use during conversion.
Exposure Errors
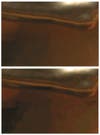
Because RAW captures are recording the amount of light that reaches the imaging sensor during exposure and aren’t being converted immediately to a standard image file format, they offer additional exposure latitude above a JPEG capture. The best digital single lens reflex (SLR) cameras offer about six stops of exposure latitude. RAW capture adds about three stops of potential latitude. However, it is important to realize that the final image file will still be able to contain only about six stops of latitude. RAW simply offers the ability to extract more detail from the image and make adjustments to recover from exposure errors.
In general, it is possible to compensate for an exposure error of about one stop overexposed or two stops underexposed with RAW capture (see slide show, image 3). That doesn’t mean you’ll always avoid blown highlights if you overexposed by one stop. It also doesn’t mean quality will be maintained at the same level as though the exposure were correct at the start. For example, if the exposure is dark and needs to be brightened considerably in the RAW conversion, you’ll still have a higher risk of noise and posterization in the darker shadow areas of the image.
Think of this capability as a way to recover from some exposure mistakes, within reason, as well as a way to fine-tune the exposure after the fact. It won’t necessarily save the day with captures that have bad exposures, but it can help make mediocre exposures look exceptional.
High-Bit Data
The final major advantage of RAW capture is that high-bit data (typically 10- or 12-bit data stored in a 16-bit file) is preserved in the capture and can be preserved in the conversion process. This means that more discrete tonal and color values are being recorded and retained in the final image. This is a twofold benefit.
For one thing, the higher bit-depth used for the in-camera analog-to-digital conversion results in more information, so that smooth gradations of tone and color can be maintained. In short, more detail is retained within the image because there are more available values for each pixel. Second, by converting the RAW capture to a high-bit image file, you maintain the benefit of being able to make significant adjustments to the image without risking posterization (slide show, image 4).
For images captured with proper exposure, the high-bit advantage is a minor one. However, whenever you need to make significant adjustments to achieve your vision for an image, starting with high-bit data will help you maintain maximum quality throughout the process to the final print.
Higher Image Quality
When you capture in RAW, no image compression is applied, so you are retaining the highest image quality possible. With JPEG, which is the most common alternative to RAW, image compression is always applied to reduce the file size, even when the highest quality option is selected. As a result, there is a risk of artifacts (random pixel variations) in the image. Also, because JPEG compression divides the image into blocks of pixels, in some cases a grid pattern may be visible within the image. Capturing in RAW completely eliminates the risk of such artifacts. The price is a larger file size, but the benefits can be significant in some cases in terms of image quality.
When your digital camera records in RAW format, it isn’t actually creating an image file. Rather, it is creating a data file that contains the information collected by each individual photodiode on the imaging sensor during exposure. This is the reason RAW captures need to be converted in the first place.
Besides enabling you to produce an image file that can be adjusted, the RAW conversion process provides an opportunity to optimize the image. By making careful adjustments in the RAW conversion, you can assure yourself of the best quality possible. However, just because you need to be careful about these adjustments doesn’t mean the RAW conversion process can’t be incredibly efficient.
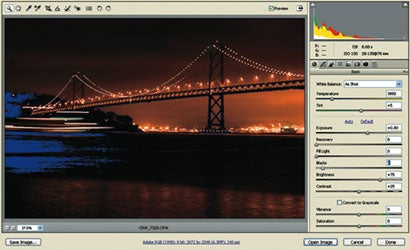
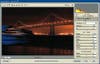
Utilizing the Camera Raw plug-in within Photoshop provides a distinct advantage in convenience and workflow efficiency. Bridge (the included file browser) allows you to preview your RAW captures, and starting the conversion process is as simple as opening the RAW file. Furthermore, the Camera Raw interface is designed efficiently to allow you to work quickly when establishing the optimal settings for RAW conversion (slide show, image 5). You can even batch process RAW captures that can be converted with the same settings, such as when the images were all captured under similar lighting conditions.
To get started with Camera Raw, simply open a RAW capture either from the File > Open dialog box or by double-clicking the image thumbnail in Bridge.
Camera Raw Settings
The first step I recommend when converting a RAW capture for the first time in Camera Raw is to remove the sharpening that is applied by default. To do so, click the Preferences button on the toolbar in Camera Raw to bring up the Camera Raw Preferences dialog box. Set the Apply Sharpening To dropdown to Preview Images Only (slide show, image 6) and click OK. I strongly recommend doing this for three reasons. First, using a single slider to adjust sharpening doesn’t provide nearly the degree of control I’d like to exercise over the sharpening process. Second, the default setting is simply too aggressive and often creates halo artifacts at high-contrast edges within the image. Finally, I prefer not to apply any sharpening until the image is being prepared for final output, as will be discussed in greater detail in Chapter 14, “Output Processing.”
In addition to the sharpening setting, you might want to turn on the clipping preview options in the histogram display, so you’ll see a color overlay on areas where detail has been lost in the highlights or shadows. I say that you might want to enable this display because you’ll also have another option for seeing a clipping preview as I’ll discuss later in this chapter. If you want to see a color overlay that identifies areas where clipping has occurred, simply click the triangle buttons at the top corners of the histogram display. The one on the left toggles the clipping display for shadows and the one on the right toggles the clipping display for highlights. A light gray box appears around the button when the clipping display is turned on.
You also might want to set the Camera Raw dialog box to fill as much space as possible and reserve as much space for the image and controls as possible. The button at the far right of the toolbar (just to the left of the histogram) allows you to toggle between full-screen view and normal view. Simply click the button to toggle.
Toolbar
The toolbar at the top of the Camera Raw dialog box provides a variety of tools for working with your image during the RAW conversion process. Some are very helpful as you’re working to establish the best settings for the image in Camera Raw. I tend not to use some of the others in the RAW conversion process.
The first two buttons on the toolbar are the Zoom and Hand tools. These tools function exactly the same as the tools by the same name found within Photoshop. You can use them to zoom in to get a closer look at any portion of the image you’d like as you’re making decisions about the best settings to use for a RAW conversion.
The next two buttons are the White Balance tool and the Color Sampler tool. Both can be used to adjust the color in your image to produce a perfectly neutral value in a specific location. In most cases, I recommend against using these tools. Just because something in your image really was a neutral gray doesn’t mean it should appear neutral gray in your image. For the same reason that photographers tend to seek out warm light, such as that found in the early morning and late afternoon hours, you might not want to produce a perfectly neutral color tone in your image. Therefore, in most cases I’ll simply work directly with the Temperature and Tint adjustments discussed later in this chapter.
Still, there are situations where these tools can be helpful. If you want to adjust the overall color tint in the image so a specific area of the image is neutral, select the White Balance tool and click on the area in the image you want to make neutral. The Temperature and Tint sliders (discussed later in this chapter) will be adjusted automatically so the pixel you clicked on becomes neutral.
If you want to apply a bit more control to the process, use the Color Sampler tool. Click the button for the tool, and then click in the image to place a color sampler in a spot that you feel should be neutral gray. A new bar will appear showing you the color sampler (you can add up to nine to the image) and the RGB pixel values for the pixel where you placed the sampler. You can then adjust the Temperature and Tint sliders (discussed later) to fine-tune the color. The idea is that you want to make the adjustments so all three values (red, green, and blue) for the desired color sampler have the same value, resulting in a neutral gray. However, you can also “override” that aim based on how the image actually looks. When you’re done working with the color samplers, you can click the Clear Samplers button to remove them from the image.
The next four buttons offer adjustments I recommend not applying in Camera Raw. Instead, wait until after you have converted the image and start working through the rest of your workflow. The first of these buttons is the Crop tool, which behaves in an almost identical manner to the Photoshop Crop tool.
The next button is the Straighten tool, which allows you to rotate an image quickly and easily to straighten a crooked horizon or otherwise correct the rotation of an image. This tool will both crop and straighten at once. You operate it by simply dragging to define the line that should be perfectly horizontal or vertical. However, as with the Crop tool, I recommend waiting until after the RAW image is converted to use it.
The third of these buttons is the Retouch tool. I definitely don’t recommend using this one in Camera Raw, because you’ll effectively be altering the original pixel values. You could certainly go back and reconvert the RAW capture if you decide you made a mistake, but it is much better to work on a separate layer for these adjustments in my opinion. The same goes for the Red Eye Removal tool. If you need to apply this correction, wait until you get into Photoshop and use the Red Eye tool there.
The final two buttons on the toolbar in Camera Raw are rotation buttons that allow you to rotate your image in 90-degree increments counterclockwise and clockwise, respectively. Most digital cameras provide an automatic rotation feature, so the image will appear with the proper orientation in Camera Raw by default. However, if this doesn’t work with your camera and you didn’t already rotate the image elsewhere (such as in Bridge), you can apply that rotation here.
The first option in the Adjust tab is actually for White Balance. The White Balance dropdown and White Balance tool provide the potential to establish good color within the image quickly and easily; however, to me this contradicts the very benefit of RAW capture: the ability to exercise greater control over your images. I strongly recommend skipping the White Balance dropdown and instead starting with the Temperature and Tint sliders. In the vast majority of RAW conversions, you’ll probably want to fine-tune these sliders anyway, so it makes sense to start with them and achieve the best results possible in your image.
The Temperature slider allows you to adjust the color temperature of the lighting for which you want to compensate. In theory, that means you simply want to adjust the slider to the color temperature of the lighting under which the image was captured. Of course, chances are you have no idea (or just a general idea) of what that color temperature was. Also, you don’t necessarily want to simply compensate for the lighting that was used. Instead, you should take advantage of the capability to fine-tune these adjustments to provide the best image in terms of aesthetics with no penalty in terms of image quality. This will enable you to interpret the image as you desire, rather than simply neutralizing a color cast.
As you get started with the Temperature slider, I recommend moving it between extremes to get a sense of how the adjustment will affect the overall image and to get a preview of what variations might be possible (slide show, image 7). Moving to the left will cool down the image, compensating for “warm” lighting (light with a lower Kelvin temperature), and moving the slider to the right will warm up the image, compensating for “cool” lighting (light with a higher Kelvin temperature). Obviously, either of the extremes isn’t likely to be an appropriate choice, but the perspective of those extremes helps you determine which setting is best. After sliding through the extremes, start to settle down on the area that seems to represent the most pleasing color for the image. After you have moved the slider to the point that seems to provide the best color, release the mouse and use the up and down arrow keys on your keyboard to fine-tune the adjustment. This will make it easier to make subtle adjustments as you make a decision about the best look for the image.
With the Temperature value established, you can move to the Tint slider. This should be thought of as a tool for fine-tuning the white balance in your image. It effectively adjusts the color balance between green and magenta. As with the Temperature slider, I recommend sliding through the extremes to get a sense of how the image is affected, even though you won’t use those extremes for the final setting. Adjust the slider to taste based on the preview image, and then use the arrow keys for fine-tuning, as you did with the Temperature slider.
With both the Temperature and Tint sliders established, the overall color balance of the image should look pretty accurate. Of course, accuracy is in the eye of the beholder here; you may be adjusting the sliders to introduce a desired color cast, as opposed to focusing exclusively on compensating for the color of light that illuminated the scene.
Tonal Adjustments
With the white balance settings established, you’re ready to move on to the overall tonal adjustments for the image. When doing so, it is important to keep in mind that the basic goal of tonal adjustments in a RAW conversion should be to optimize dynamic range and ensure maximum detail within the image. In other words you shouldn’t be concerned at this point with producing an image that is ready to print because that will be dealt with during the rest of your workflow in Photoshop. Instead, you should be looking to maximize the amount of detail within the image so you have as much flexibility as possible when optimizing the image.When making tonal adjustments in Camera Raw, the four key controls are Exposure, Recovery, Fill Light, and Blacks. Together these controls allow you to optimize tonal range while maintaining detail, as well as adjusting the overall appearance of the image.
Exposure
The Exposure slider allows you to adjust, in effect, the brightness of the image, using as its scale an Exposure Value. In other words, if you adjust the Exposure slider to a +1 value, that is the same as though you had brightened the exposure by one stop in the capture. Likewise, setting the slider to -1 would produce a similar effect to darkening the exposure by one stop in the camera. This would lead most photographers to believe that the Exposure control should be used as a basic brightness adjustment (and would probably make them wonder why there is also a Brightness slider in the same dialog box).
The behavior of the Exposure slider makes it ideal for establishing the white point within your image. By adjusting this slider, you can effectively determine which pixel value within the image should be set to white. This is virtually identical to the behavior of the White Point slider in Levels.
As a general rule, I recommend setting the Exposure slider to maximize the white point for the image without clipping any detail. In other words, use Exposure to brighten the image just to the threshold before you start to lose detail in the highlights. You can watch the histogram display as you adjust the Exposure slider, but it can be a challenge to determine when you’ve actually started to lose detail. Fortunately, by having the Highlight Clipping option set in the histogram display, you’ll have a visual indication when you lose detail in the image. With the checkbox selected, raising the Exposure setting to a value where clipping occurs will cause a red overlay to be shown in those areas. Adjust the Exposure slider to the point just before this overlay starts to appear.
I prefer to use an option with the Exposure slider that provides a bit more detail about any clipping that will occur with the adjustment by utilizing a more powerful clipping preview display. To enable this display, hold the Alt/Option key as you adjust the Exposure slider. When you do so, the image will go completely (or nearly completely) black. As you increase the Exposure value, you’ll start to see pixels appear. The color of those pixels indicates the color channels that are losing detail with the current Exposure adjustment, and when the pixels shift to white, it indicates those pixels have indeed gone to pure white. In general, I recommend increasing the Exposure value until you start to see pixels appear, and then moving the slider back to the left until the point just before the pixels start to appear, leaving no pixels visible (except specular highlights).
Although setting the Exposure to make the brightest pixels nearly white works with many images, that doesn’t mean it should be adjusted this way for all images. You need to evaluate the image itself to make sure the adjustment is a good one, and refine the adjustment as needed.
Recovery
The Recovery adjustment provides a way for you to recover highlight detail that has been lost based on the Exposure adjustment or in the original capture. As I mentioned in the Exposure section, I recommend adjusting that setting so no detail is lost, which might make it seem that the Recovery adjustment is not necessary. However, it can still be helpful even when no detail has been lost because it can help tone down bright areas that got too bright with the desired Exposure adjustment.
The way I normally work with the Recovery adjustment is to first set the Exposure setting to produce the best result as previously discussed. Then I move the Recovery slider to the right to darken the brightest highlights to help recover detail there. The other situation where Recovery can be helpful is when the exposure was particularly bright and highlight detail was actually lost in the original capture. In those situations, I’ll actually start by increasing the Recovery value before adjusting the Exposure value. Even though Exposure is designed to compensate for a poor exposure, the Recovery adjustment can do a better job of rebuilding lost detail in the image.
Fill Light
The Fill Light adjustment is similar to the Recovery adjustment except that it operates on the shadows instead of highlights in your image. It will brighten up the shadow detail in the image without brightening any pixels that are actually completely black. Move the slider to the right to brighten up shadow areas and reveal more detail. Even if you don’t think you’ll want to have shadow detail revealed significantly in the final image, I recommend brightening up shadows with the Fill Light adjustment to help maximize the amount of detail in the converted RAW image. You can always increase contrast to darken shadow detail later, but my preference is to start with as much visible detail in the image as possible.
Blacks
The Blacks slider is used for setting the black point in the image, very similar to the behavior of the Black Point slider in the Levels adjustment you’ll see in Chapter 5. When you know how to use the Exposure slider, the Blacks slider is suddenly easy to master as well, because it works in virtually the same manner.
As with Exposure, make sure the Shadows Clipping display is enabled with the button in the histogram display. You can then use the Clipping display (which shows up as a blue overlay) while making your Blacks adjustment to see when you lose shadow detail in your image. As discussed for the Exposure adjustment, you can also hold the Alt/Option key to get a more-detailed clipping preview, with the image appearing completely white until pixels are clipped, and then a color (or black) showing where detail has been clipped.
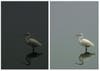
Although it is often beneficial to sacrifice some shadow detail to optimize contrast in an image, I don’t recommend giving up this detail during the RAW conversion. Instead, I recommend saving that sort of adjustment for your full workflow in Photoshop. Therefore, the basic process is to adjust the Blacks slider to the right until blue pixels (or any pixel values if you’re using the Alt/Option key to see the more detailed clipping preview display) start to appear (slide show, image 8). Then move the slider back to the left until the pixels disappear. This will ensure you have maximized tonal range for the image without clipping detail in the shadows.
Brightness
The preceding methods discussed for tonal adjustments will expand the tonal range and detail within your image but may not produce optimal overall brightness. The Brightness slider allows you to correct that problem. You may already be familiar with the Levels adjustment (which will be covered in great detail in Chapter 5), and the Brightness slider is like the Middle Tone slider in Levels. In most cases, you’ll find that the tonal adjustments covered previously will enable you to produce a good adjustment, so you won’t generally need to use the Brightness adjustment. However, it is a simple way to fine-tune the overall brightness of your image if you find that necessary.
Contrast
Many photographers like to boost the contrast of their images, and in fact many images benefit from an increase in contrast. However, in the case of a RAW conversion, I don’t recommend boosting the contrast to the point that the image seems ready to print, simply because it means you are sacrificing too much information in the image at this early stage. Also, you’ve already established a basic contrast adjustment for the image by adjusting the Exposure and Blacks sliders as outlined earlier. Therefore, I recommend that you not adjust the Contrast slider at all. Doing so will only undo the careful work you did to expand tonal range with the Exposure and Blacks adjustments.
Color Adjustments
Below the tonal adjustments in the Basic section for Camera Raw, you’ll find some color adjustments. The first is a checkbox to convert the image to grayscale. However, I do not recommend that you use this option. Instead, perform your grayscale conversions using the new Black And White adjustment layer in Photoshop CS3 and discussed in Chapter 11, “Creative Adjustments.”
Vibrance
The next color adjustment is the Vibrance slider. This slider is very similar to the Saturation slider, except it produces a more subtle adjustment so you don’t have to worry too much about oversaturating the image and producing posterization or artificial colors. It also does an intelligent job of adjusting the colors, producing a less intense effect with skin tones, for example. To increase the vibrance of colors in your image, simply move this slider to the right.
Saturation
The Saturation slider allows you to adjust the intensity of the colors, but it isn’t as sophisticated as the Vibrance adjustment. Therefore, I recommend that you not use the Saturation adjustment, instead work with the Vibrance adjustment. If the Vibrance setting doesn’t produce a strong enough effect, I still wouldn’t use the Saturation slider. Instead, wait until the image is converted and then use an adjustment layer to boost the saturation.
For more information on RAW capture, see JPEG vs. RAW: The Advantages and Disadvantages Explained. For more info on Tim Grey’s Photoshop CS3 Workflow, visit the Wiley Publishing Website.
RAW-Conversion-RAW-capture-offers-many-benefits-f
RAW-Conversion-Digital-cameras-need-to-compensate
RAW-Conversion-RAW-capture-makes-it-possible-to-r
RAW-Conversion-The-high-bit-data-of-a-digital-cap
RAW-Conversion-The-Camera-Raw-dialog-box-provides
RAW-Conversion-The-clipping-preview-for-the-Black