Picture Doctor: Photo Anatomy
Crop your plants, repair stained glass, and other remedies for your photography.
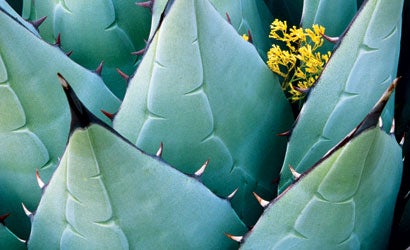
Why It Works
• Fundamentals: Simplicity, contrast of textures.
• Simplicity: The agave plant fills up the frame edge-to-edge, reducing it almost to a pattern (it would make a great necktie).
• Contrast of textures: The fearsome teeth and points of the plant provide a stark counterpoint to the little blossom placed among the leaves. (It’s not an actual agave bloom, but for artistic purposes, that’s no matter.) The cool gray-green of the leaves also contrasts with the warm yellow of the flower. nLighting: Many a Pop Photo Nature columnist has extolled the value of soft lighting, and you can see why perfectly here: Every detail from shadow through highlight is visible. nRule of Thirds: If you think this hoary guideline is just so much blather (and sometimes we feel that way), look how the flower spray, nearly exactly one-third down and one-third in, looks just right where it is. That’s because it is just right.
6 Ways to Capture Stained Glass
If you do any travelling at all, sooner or later you’ll find yourself photographing stained glass, whether in a house of worship or a historic mansion.
But it’s fraught with pitfalls, due mostly to low light (which can cause blur) and to the contrast with dark surrounding areas (which can trigger overexposure). The picture on top illustrates this double whammy. So follow these tips:
1 Meter for the glass itself. Switch your camera to spotmeter to read a midtone color.
2 Or, use exposure compensation with an overall meter reading. Start with -0.7 to -1.0 EV.
3 Use a high ISO. Stained glass eats up light. Even bright windows may need ISO 1600 if you’re handholding. This can cause noise and reduce color saturation, depending on your camera, but these are better than blur.
4 Use image stabilization, if your camera or lens has it. Most systems can give you at least 2 stops’ leeway, which will let you handhold at lower speeds (1/15 rather than 1/60) or set a lower ISO to nip the noise (ISO 400 rather than 1600).
5 Use dynamic-range fixes (such as Nikon D-Lighting or Sony DRO) if you want more detail around the windows. Don’t overdo it though, or it will look fake.
6 Or, add a bit of flash, if discretion allows. Once you have the exposure okay, set the flash for a low fill amount. Try about -2.0 EV.
|||
|—|—|
| Not Right| Perfect|
|
| Watch your glass: And use your spotmeter, or your images will be overexposed. Both photos were taken with a Nikon D2xs with 18-200mm f/3.5-5.6G Nikkor ED VR lens. Left: 1/10 sec at f/4, ISO 400. Right (using spotmeter): 1/20 sec at f/4, ISO 400. Photos by Inge Johnsson, www.ingejohnsson.com |
Problem Solver
Use your head: Two problems with mounting a compact camera (or accessory flash) to a tripod: 1) Overkill — a big clunky head that’s three times the size of the camera. 2) Underkill — a flimsy little ballhead that flops over under the weight of a few ounces. Here’s a great alternative from the Cullmann tripod people: the model 40150 Magnesit Mini ballhead ($22, street). This well-made ballhead can be securely locked (in fact, it’s rated for 2.2 pounds), and the large knurled lock knob is much easier to tighten/loosen than those little wingnuts. The top platform is reversible to a flash cold-shoe. (www.cullmann-foto.de/en)