Picture Doctor: 4 Ways to Cure The Blues
Cure the blues, add a socket, pass the clamp, and other prescriptions for better photos.
4 Ways to Cure The Blues
Even with winter turning into spring, you can still get chilly just looking at photos taken in the shade or on overcast days. In the photo above left, the blue cast is a faithful rendering of this shaded waterfall, but…brrr! Enhancing reds and suppressing blues adds warmth to a photo. Here’s how:
Warming filter: If you’re using film, put a warming (yellow/amber/orange) filter on the lens. For sub-jects in the shade, an 81B filter restores colors to what they’d be in white light. The slightly weaker 81A is for dark, overcast days. For heavy warming, try the 85.
White balance: On digital cameras, white balance (WB) controls can work in place of filters. The WB preset for shade is about equivalent to an 81B, and the cloudy preset acts something like an 81A. Many newer DSLRs let you fine-tune white balance with slider controls. Moving the slider toward amber will warm things up.
Shoot RAW: Shooting a digital camera in RAW mode means extra work at the computer, but this lets you experiment with different WB settings to get one that’s just right.
Adjustments > Photo Filter roughly mimics warming filters, including the 81- and 85-series. I created the image above right by adding a layer of orange (at 25% opacity using the Overlay blending mode).Fast Relief
Socket to ’em: You say you don’t have a clamp to attach your accessory flash to your lightweight tripod? Oh, yes you do:
Look in the box. Most mid- to high-level accessory TTL flashes come with a cute little tablestand with a flash-shoe mount. They’re no great shakes as stands, but turn ’em over and — aha! — there’s a standard 1/4-20 tripod socket.
30 Second Photoshop
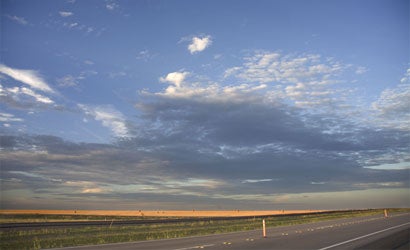
Super Skies It: Here’s a quick way to add some pop to dull or dreary clouds: Go to Layer > Duplicate Layer, and click OK. Then switch the duplicated layer’s Blend Mode to Multiply — you’ll find the pull-down menu to switch the mode from Normal on the upper-left corner of your Layers palette. Once it’s set to Multiply, you may have to add a mask to the layer and hide the effect on the elements of your photo that aren’t in the sky (see this month’s Digital Toolbox for hints on how).
| Before | After |
What’s That For?
Custom program mode: Depending on your camera, this can go by Custom Mode, User Mode, My Mode, or other monikers. Lots of compacts (film as well as digital), and a number of digital SLRs have this design-it-yourself exposure mode.
Where it is: As usual, anywhere from the obvious to the obscure. Some cameras have it right on a mode dial (convenient); others have it in a menu (inconvenient).
What it does: Stores in the memory the exact combination of settings you make, so you can access them near-instantly on demand.
Why: With digital SLRs, the number of settings that can be made is dizzying — besides exposure, focusing, and drive modes, there’s file format and size, white balance, ISO, color space, etc. Generally speaking, the standard exposure modes (e.g., program, aperture-priority) maintain your settings until you change them. But it’s nice, as well as prudent, to have your exact preferences available with one press. The other good use is to store settings for a specific photo task that you do frequently. For example, if you do tabletop shots of your junk…er, vintage collectibles for sale on eBay, User mode is the fast way to set up the camera.
How: Usually straightforward; you go down a list of menu items, make the settings you want, then click OK. But check your manual!
On this camera: Samsung’s GX-10 has a User Mode where it should be — on the exposure mode dial.Problem Solvers
Happy clamper: When I’m shooting studio work — people, products, or still-lifes — I can never have enough Bogen Manfrotto multiclips (#2880) on hand. These $10 (street) wonders hold improvised barn doors on lighting units, fill cards, gels, and other small items. (I even use one on my office lamp to hold a card to keep glare off my computer screen.) The multiclip consists of two 3-inch-wide spring-loaded clips connected by a U-shaped metal bar. While the clips can rotate around the bar, they have enough friction to hold the position you leave them in. To use, simply clip one end onto the thing you want to hold and the other end onto a convenient anchor, like a tabletop or a photoflood reflector. They’re not strong enough to hold large objects, but for something like a piece of cardboard they’re just what the Picture Doctor ordered. (www.bogenimaging.us)