Photoshop How-To: Two RAWs Make a Right
Convert twice and combine for perfect exposure.
One of the biggest advantages to shooting RAW is the postprocessing. By making two conversions, each with different exposure values, you can get results as good as if you had bracketed when you shot. And since the images are exactly the same in every way except exposure, it’s easy to combine the two to get one great picture with one great big dynamic range.
Before #1
Quick Tip
Adobe Camera Raw’s sliders have confusing names. Translation: Exposure sets the white point, Shadows controls the black, and Brightness and Contrast affect the midtones. Stick with just one variable for a convincing composite.
Before #2
Quick Tip
When you want something lined up or squared off, think Shift. Hold it down when you’re using the Marquee tool, and you’ll get a perfect square or circle. Hold it down when you’re doing a free transform or a crop, and the image’s proportions will stay the same.
TWO RAWS MAKE A RIGHT: STEPS 1 – 3
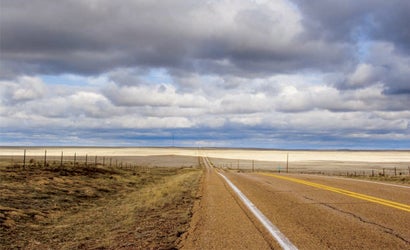
After
1. Open your favorite RAW converter (I’m using Adobe’s Camera Raw), and assess your image. Settle on the color, contrast, and saturation you like best. We’ll be changing exposure but leaving the rest of the settings constant.
2. Adjust the exposure of your focal point first: In this case, the sky’s more important. Move the slider left to decrease the sky’s exposure and darken it. Ignore the land below; don’t worry if it looks too dark-we’ll fix that later. When you’re satisfied, open the image in Photoshop. Save it as Sky.tif.
3. Then go back to Bridge (or your favorite browser) and open the RAW file to convert again. All your settings remain. Now slide the exposure right until you like the way the land looks. Open the image in Photoshop and save it as Land.tif.
TWO RAWS MAKE A RIGHT: STEPS 4-6
4. Now we’ll put the image with the right sky (Sky.tif) on top of the one with the right land (Land.tif). Grab the Move tool (hit V on your keyboard), hold down the Shift key, and drag and drop Sky.tif on top of Land.tif. Holding down Shift aligns it perfectly with the layer below.
5. Next we have to hide the bad land to let the good land shine through. The first step is to add a mask to the top layer by clicking the Add Layer Mask button (third from the left on the bottom of the Layers palette).
6. We’ll use the gradient tool for a subtle transition from what we want to reveal (the good sky on what’s now the Background layer) to what we want to remain hidden (the too-dark land on the Background layer). Since we want the transition from good sky to good land to happen smoothly where they meet, start your gradient by clicking in the sky just above the land, and dragging down to just slightly below it (circled). If you don’t like your work, draw the gradient again. It will simply replace the first. Keep trying until no one would ever guess you left the house without your gradu- ated neutral-density filter.
Quick Tip
Make sure to draw your gradient on your layer mask and not on your image; you’ll know it’s selected when its icon has a little box around it. You’ll know it’s not if your image gets covered up by a big black-to-white gradient.