The Photoshop Heretic
Cole P. Thompson breaks every rule in the book, but he makes digital black-and-white prints that will take your breath away. Just don't try this at home.
Cole P. Thompson, a 51-year-old executive who lives in Laporte, CO, has never taken a class in Adobe Photoshop. But you wouldn’t know it from his digital images or final prints.
Counting as influences such black-and-white greats as Paul Strand, Edward Weston, and Ansel Adams, he spent many an hour in the darkroom when he was young. But it wasn’t until he went digital that he really found himself as a photographer.
How he uses Photoshop may not be efficient (he’ll spend 50 hours dodging and burning one photo) or technically correct (he favors the noise-prone blue channel for black-and-white conversions). Yet there’s no arguing the beauty of his finished photos.
Thompson’s work is testament to the idea that no matter how much gear you have or professional advice you follow, your own vision — and your drive to realize it — is what counts.
Here’s how Thompson made five of his favorite images. (Visit www.ColeThompsonPhotography.com to see more of his work.)
Cole’s Way
He mounts his Canon EOS 5D, 20D, or Digital Rebel on a tripod, sometimes adds a neutral-density filter or two, brackets in the camera’s b&w mode, and shoots RAW files. This lets him see the LCD image in monochome, while saving all the color information the sensor records.
Using Photoshop CS2’s Camera RAW to convert to TIFF, he makes minor tweaks, making sure no highlights are blown out and occasionally adjusting contrast. In Photoshop, he uses the Channel Mixer to go b&w. His secret is the blue channe — often dark and murky, it’s perfect for deep, inky black tones.
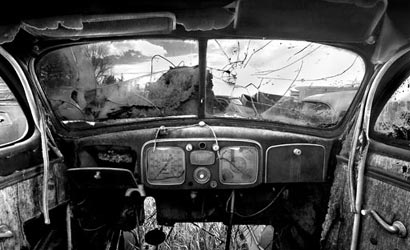
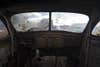
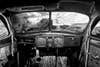
A Junked Car
| Before | After |
• Windshield: Thompson bracketed exposures when he shot the ruins of this antique, then pasted in the windshield from his -1 EV exposure to show details in the scene outside.
• Speedometer: This image took about 50 hours of work, and no wonder: He zoomed in and used his pen tablet to dodge and burn each number.
• Wasp’s nest: He didn’t even notice this wasp’s nest in the glove compartment until he got in close and began bringing out the hidden details.
Tech info: Canon EOS 20D with 16-35mm f/2.8L Canon EF lens. Exposures, 1/10 sec (for the exterior) and 2/5 sec (for the interior) at f/13, ISO 100.
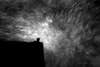
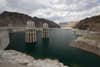
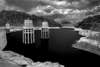
Hoover Dam
| Before | After |
It was an unusually rainy day in the desert outside of Las Vegas when Thompson got this shot. Security rules prohibit stopping your car near the dam, so he parked and walked a mile in the rain. This image is a rare case where he strayed from the blue channel: He converted the sky to b&w with 100% red, then used 100% blue to convert the rest.
Tech info: Canon EOS 20D with 16-35mm f/2.8L Canon EF lens. Exposure, 1/20 sec at f/13, ISO 100.
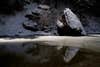
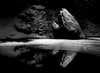
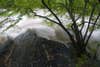
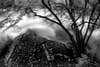
Light From Above
| Before | After |
Using his LCD to preview, Thompson envisioned this rock as if it were lit by moon-light, then processed the image as a night scene. Really, it was daylight, dimmed with optical filters.
Tech info: Canon EOS 5D with 24-105mm f/4L Canon EF IS lens and two ND filters. Exposure, 6 sec at f/8, ISO 100.
Rushing Waters
| Before | After |
This is another instance where two neutral-density filters on the lens allowed for a very long exposure in bright daylight. In Photoshop, Thompson spent time on each leaf that clung to the rock to help it stand out and take part in the image’s composition.
Tech info: Canon EOS 20D with 24-105mm f/4L Canon EF-IS lens and two ND filters. Exposure, 30 sec at f/22, ISO 100. p
The End of the Pier
| Before | After |
It’s hard to tell from the original color picture, but the final result was actually close to what Thompson saw in the water when he shot the photo. The image was there, he just couldn’t seem to record it. But as soon as he converted with his trademark 100% blue and pumped up the contrast, this picture began to take shape.
Tech info: Canon EOS 20D with 24-105mm f/4L Canon EF IS lens. Exposure, 1/2 sec at f/18, ISO 50.
A-Junked-Car-Before
The-End-of-the-Pier-After
A-Junked-Car-After
Hoover-Dam-Before
Hoover-Dam-After
Light-From-Above-Before
Light-From-Above-After
Rushing-Waters-Before
Rushing-Waters-After

The-End-of-the-Pier-Before