The New Infrared Revolution
Thanks to digital technology, photographing the invisible is easier and more spectacular than ever.
Infrared (IR) photography — imaging by electromagnetic radiation that’s invisible to the human eye — isn’t just for masochists anymore. Okay, we’re exaggerating, but digital IR photography is much more accessible than IR film photography ever was. So much so that a growing legion of IR fans are transforming it from a minor cult to a major genre.
One reason: Digital capture is a lot easier than using IR film, with its special handling and processing. (As a result, digital’s much cheaper, too.) Another big reason? Flexibility. A CCD or CMOS sensor can capture infrared images in color or black-and-white, and conversions from color to monochrome can be made after the fact with little fuss. And if you want to fuss, digital IR practically invites play in Adobe Photoshop or other image editors. (Combining multiple IR frames into a high-dynamic-range, or HDR, photo is currently the rage.)
Then there’s the technology cycle. With consumer DSLRs now in third and even fourth generations, there are plenty of perfectly good Canon EOS 10Ds, Nikon D70s, and others waiting for a new purpose in life. Many photographers convert these for IR shooting (see “The Right IR Stuff” on the next page).
IR photography, though, isn’t just about the equipment. “With infrared photography, I am able to see that invisible world and reveal something potentially spectacular that is, when viewed normally, unremarkable,” says Andrew Hefter, one of the photographers presented here.
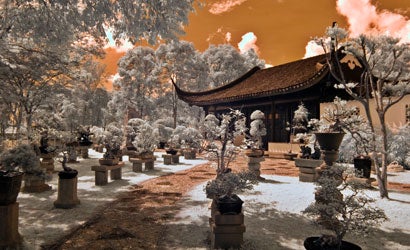
Photographer Ruel Tafalla, who captured the pagoda shot on this page, notes that this transformative power has its pragmatic side. “In normal landscape photography, I’m limited to shooting from sunrise to 9 a.m., and from 4 p.m. to sunset, to catch the good light,” he says. “But with infrared, I can shoot as long as the sun is there — the more harsh the light, the better the image.”
How it Works
Infrared is the part of the electromagnetic spectrum starting at wavelengths just above that of red, the longest visible wavelength of light. Infrared-sensitive films of one sort or another have been around for nearly a century.
Digital image sensors are inherently sensitive to IR, which for conventional photography is a bad thing — it makes pictures pink, and sometimes fuzzy, because IR focuses at a slightly different point than visible wavelengths. (It also turns IR-reflective black materials purple or mahogany.) For these reasons, digital camera makers install an infrared-blocking or IR-cutoff filter in front of the sensor.
But if you remove the IR-cutoff filter, you restore the camera’s IR sensitivity. Now, cover the lens (or the sensor) with a filter that blocks visible light (called an IR-passing filter), and you’ll be photographing almost entirely by IR wavelengths. Commonly used filters include the deep red (Hoya R72, and other designations), and true IR-passing filters such as 87-series black filters, which are opaque to the human eye.
Strange things now happen. If you set your camera for monochrome capture, you get something like what b&w IR film did: ghostly white foliage, and blue skies that go black. (Chlorophyll is a very effective reflector of infrared radiation; blue skies are not.)
Unlike IR film, digital IR can be very fine-grained, which can add to the surreality. Want a grainier look? Pump up the ISO to get more noise, although you still won’t get that halation (grainy aura) of IR film.
Shoot in color with IR-passing filters, and your results can vary wildly. If you use automatic white balance, your shots may come out very red. Instead, set a custom WB off green grass — not so strange, when you consider grass strongly reflects IR. This will give you (generally) brick-red skies, white foliage, and some other colors nearly natural. Different white balances net different results.
IR portraiture can be fun, disturbing, weird, wacky — or all of the above. For starters, IR lightens all skin tones and often darkens eye color. And many shades of hair look red. One salutary effect: It eliminates virtually all blemishes and skin imperfections. Think ultrasmooth, if ghostly, skin tones.
Finally, after the shot, you can do lots of further manipulation in image editing. Using the Channel Mixer in Photoshop to swap red skies for blue is a popular procedure.
But if you’re not an inveterate control-twiddler, IR photography may not be for you. It not only invites experimentation, it requires it. And IR radiation is highly unpredictable, varying considerably by altitude, for instance. You rarely see what’s coming.
Technically, you don’t need to convert a digital camera to shoot infrared — some rays get through IR-blocking filters, so you need only mount an IR-passing filter and shoot. But you’ll need to use very long exposures — handholding is out.
If you really want to get into IR, an IR-ready (see “Out-of-the-Box Experiences” below) or converted camera is the way to go. When using a DSLR without live view (most of them), you’ll need to focus and compose without the IR-passing filter covering the lens. This isn’t an issue with compact and EVF cameras.
You can convert a DSLR for dedicated IR use and maintain clear viewing by replacing the camera’s IR-cutoff with an IR-passing filter — but it now can’t be used for conventional photography.
Looking to turn your old digital camera into an IR shooter? Here are some outfits to check out.
• LifePixel: Possibly the biggest service for IR conversions, which run from $95 for a replacement filter for do-it-yourselfers to about $290 to $500 for most DSLRs.
• Khromagery: Australia-based, but does conversions for U.S. and Canadian customers. Specializes in Canon models. Conversions run $275 to $440 for advanced compacts and DSLRs.
• LDP Net: Makes or modifies wide range of still and video equipment. Most DSLR conversions run about $450.
Out-of-the-Box Experiences
• Fujifilm IS-1 ($800, street): A Fujifilm S9100 EVF factory-modified by the removal of IR- and ultraviolet-cutoff filters. Has 28-300mm equivalent f/2.8-4.9 zoom. In a forensic kit ($2,000), it comes with nine filters, including a 900 (18A) that passes both IR and UV for intriguing color effects. • Hot: Live view (EVF and LCD), manual and autofocus, long zoom range, can be used for conventional photography. • Not: Ridiculously restrictive end-user license agreement, 2-inch LCD, noise at higher ISOs.
• Fujifilm IS Pro ($2,600, street, body only): Fujifilm S5 Pro DSLR factory-modified by removing IR- and UV-cutoff filters. Has all S5 features, including Nikon mount. • Hot: Live view, huge number of lenses, shoots RAW. • Not: That ridiculously restrictive end-user license, 30-sec live view limit.
• Sigma SD14 ($1,140, street, body only): The IR-cutoff filter, mounted in front of the mirror box, is easy to pop in and out. (Wear lint-free cotton gloves!) • Hot: Easily converted back to normal shooting, many lenses available, shoots RAW. • Not: No live view, RAW works best with limited Sigma software.
• Sony Cyber-shot DSC-H9 ($388, street): NightShot mode uses an IR beam to shoot in the dark, but it’s next to useless. Instead, use the H9 outdoors with an IR-passing filter (a Cokin P499 Universal Ring with Cokin P filters) and you can shoot in IR — in monochrome at a high ISO. • Hot: Live view (EVF and big 3-inch LCD), huge zoom range. • Not: Clumsy filter mounting, noisy images, greenish monochrome, exposure limited to 1/30 sec wide open.