My Project
Astrophotographer Paul LeFevre tells you how to shoot the stars.
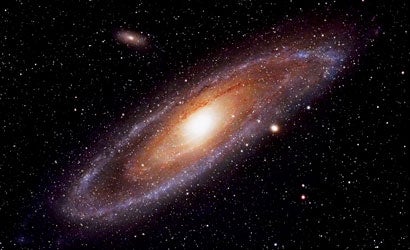
What does it take to get an image of a galaxy 2.5 million light years away? Passion, devotion, and, as 47-year-old Paul LeFevre says, “a lot of naps.”
While some shots of a pretty starscape may be clear on an ordinary 10-minute exposure, his images — close-ups of the Andromeda Galaxy (right) and Horsehead and Flame Nebulae (below) — require exposures up to 12 hours long. Which he makes — every clear night. That means 10 or 11 times a month.
These hours may make sense for an astronomer. For a commercial photographer who moved his family to rural Valley Center, CA, to build his own observatory far from light pollution, it’s an obsession.
LeFevre considers it a way to see the unknown: subjects invisible to the human eye, that can’t be seen even through a telescope. Sometimes he’s shooting a blur, and sometimes even total darkness with only a star map to guide him.
LeFevre first mounted an Olympus OM-1 to a telescope in 1996, out of an interest in the comet Hale-Bopp. Using a 2000mm f/10 telescope, he found his focal length too long for shooting without stabilizing gear, and every session was hit or miss. “I probably went through 500 rolls of film before I had one acceptable picture,” he says. “But I’m stubborn.”
But once LeFevre mastered the technique, he was hooked. An early upgrade to a CCD camera knocked down noise. He switched to Canon DSLRs with the advent of the EOS Digital Rebel in 2003, now alternating from 20D to 5D to a custom-built computercontrolled StarlightXPress astronomy camera with thermoelectric cooler, and telescopes ranging from 454mm to 1800mm — including a home-built 10-inch astrograph he calls “Big Red.” With his full rig hooked up to a computer system in the observatory, he makes and combines series of 30-minute exposures.
Amateur astrophotographers may not want to invest in a multi-scope, multi-refractor setup, but you can still shoot for the stars using these tips:
1. Do it in the dark.
“It’s hard to find places in the suburbs or near cities without light pollution,” causing a loss of contrast and detail, LeFevre says. High-altitude, remote locales are best.
2. Go for comfort.
For long exposures at high altitudes, wear warm clothing and bring coffee, a comfortable chair, and a lot of batteries or an AC adapter (if there’s a power source).
3. Find that star.
Use a tracking chart or software such as SkyMap Pro ($130, direct; www.skymap.com) to figure out patterns in the sky, and then align your rig accordingly.
4. Keep track of the world.
The earth rotates 1 degree every 4 minutes — so in a 4-hour exposure, your astral body has moved 60 degrees away from you. Buy a tracking mount, which compensates by rotating slowly the opposite direction. The Min-EQ tabletop mount with tracking motor starts at $88 (street); sturdier versions for both telescope and camera go for $600 (street). A cheap solution is a “barn door” mount, which tracks manually using two hinged boards.
5. Use a short focal length.
“The longer the lens, the more perfect tracking and guiding has to be,” LeFevre says. Above 200- or 300mm, tracking must be precise to avoid star trails. But with a 28mm, you can go 4 or 5 minutes on a tripod without tracking.
6. Check your exposures.
This helps you adjust for framing and focusing errors — which you will make, focusing in darkness on something you can’t see. The LCD isn’t bad if your camera has a zoom function, LeFevre says, but it’s best to bring a laptop computer or battery-operated TV to use with the AV Out.
For more information on astrophotography, and how you can make images of space on your own, check out Paul’s How-To: Astrophotography 101.