Megabytes, Megapixels, JPEG Compression, and File Size Confusion
Isn't 100K a really small size for a photo for Your Best Shot? We explain JPEG compression, from camera to computer monitor.
We answer this question relating to megapixels, megabytes, and file sizes in the July 2006 Tech Support column of Popular Photography & Imaging:
I want to submit pictures to Pop Photo’s Your Best Shot contest, but you require a 3MP or higher (9MB) image size if accepted for publication. I shoot with a Canon EOS Digital Rebel XT and, even with the largest format at 8 megapixels, I can’t get a 9-megabyte file size. Does that mean I can’t participate? –Arjun Saha
No, it doesn’t. Please send your photos. Most digital images have two file sizes. The first is the size of the file that’s written to a memory card, usually as a compressed JPEG. This is what camera makers use when they state how many images fit on a card of a given capacity. But when an image is imported into an image editor such as Adobe Photoshop, it assumes a second, uncompressed file size. So, your 8-million-pixel Digital Rebel files will triple to 24 megabytes once they’re opened and viewed easily large enough to be published full-page if you triumph in Your Best Shot. Just don’t send us RAW files, which take up more space than JPEGs and need post-processing that’s your job.
Shortly after the issue went to press, I received a call from a reader wishing to submit photos for Your Best Shot who could not figure out how to make his images look good on-screen, and still meet our 100-kilobyte file size limit.
Guess what? The 100K limit is the compressed file size limit! Just as your in-camera file is smaller than the uncompressed image when opened in Photoshop, the file size you see in the corner of the Photoshop frame is the uncompressed file size.
To clarify this common misunderstanding once and for all (or at least we HOPE so) we’re going to use a full-frame image from the 5-megapixel Panasonic Lumix DMC-TZ1 to explain file size and compression variables, from in-camera capture, through saving for screen display.
Check out Image 1. Circled on the File Info box, upper left is the compressed file size of 2.2MB. Check out the uncompressed file size of 14.4MB, circled, lower right, when opened into Adobe Photoshop. If we save this image in an uncompressed format such as TIFF, the uncompressed 14.4MB is the file size that will be saved on your hard drive.
Now take a look at Image 2. This photos has been cropped and resized to 5.25 inches by 7 inches at 72 dpi, which is sized to fit our website. The uncompressed file size (circled) is 558.1K. How do you get this photo under the 100K limit? Easy. Save it as a compressed JPEG!
The JPEG process is a ‘lossy’ one, meaning that some data is removed, and color gradients are simplified, which may result in some image degradation based on the amount of compression you choose. That is why it makes sense to save your files with JPEG settings that get you as close to the file size limit we specify as possible.
There are two ways to save your photograph as a JPEG file in Photoshop, and both have their strengths and reasons for choosing one over the other. The first we’ll be looking at is Save For Web.
Under Photoshop File Menu, choose Save For Web, and select the 4-Up tab in the upper right of the window (Image 3), which gives you four views of the photo: the original, plus three previews of image quality at various compressions. To the right of the previews, select the drop-down for JPEG in the top left output options dropdown (GIF is the default setting). You will have to highlight each of the previews and select JPEG or another file type for each preview (for our purposes, just make them all JPEGs). Once you have selected the JPEG option, you will see a slider titled Quality (circled.) Slide it to 59 and the top right preview will show a file size of 98.41K! That’s well under the file size limit. Click Save and you’re done!
The two lower images show the file size if you choose 25 quality and 0 (zero) quality. Try this on your computer and you’ll better be able to see the relationship between image quality and file size, as the lower right preview, set at 0, will be really ‘fraggy’. For websites, this is handy, because you can select your exact level of acceptable image quality while keeping total page load time quick.
It is important to note that Save For Web strips EXIF information (data about the image capture ISO, shutter speed, etc.) and any user-inputted File Info, such as captions or copyright info, to make a smaller file size. If you need to send along embedded captions or wish to preserve the EXIF data, choose Save As JPEG from the Photoshop File Menu.
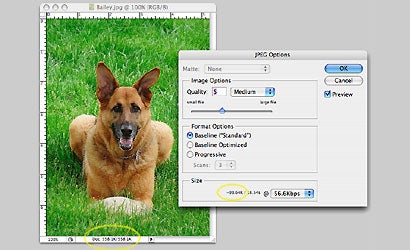
Before saving as a JPEG or choosing Save For Web, make sure your image is flattened, with no Alpha Channels otherwise you will be warned that you can only save a copy. Select Format JPEG, name your file, and click Save. A new window will pop up (Image 4) with your JPEG saving options. Check the box for Preview (circled) and move the slider to a desired quality. We chose 5 on the slider, resulting in a saved file size of 93.64K. Once again, we’ve turned our 558.1K screen-sized image into a saved JPEG that is under the 100K file size limit! And if we want to see what the tech specs are, we can still view the EXIF info.
It’s pretty simple, once you understand it. Any time you see a file size limit, be it 100K, 500K, or 1MB or whatever, follow these steps and you’ll be on your way!