Learning from the Best
Three great photography teachers share their wisdom.
For young photographer Ralph Clevenger it was one of those mountaintop moments-literally. As a shooter breaking into stock photography, he’d gone with his mentor, photographer Craig Aurness, to a high point above the Santa Ynez Valley to get an aerial perspective.
As Clevenger surveyed the scene below him, Aurness asked him, “What’s the money shot?”-the image that would make the whole trek worthwhile.
Clevenger looked around. He had to admit he had no idea.
“Turn around,” his teacher suggested.
Clevenger did so, and he found himself staring in wonder at the twisting path of the dirt road they had taken up to reach their high vantage point. That was the money shot.
Thinking back today-many years and photos later-on that and other lessons he learned from the late National Geographic shooter, Clevenger, who now teaches photography himself, says Aurness “pretty much taught me what I needed to know in order to be successful” as a stock photographer.
Nothing teaches like experience-although, of course, magazines and books can help a lot. But rare is the photographer whose career has not been touched at some point by a gifted teacher.
Photographers have an unusual advantage when it comes to finding instruction. An amateur golfer or business student probably won’t come any closer to a world-class player or a Fortune 500 CEO than the autograph line. But in photography, the very best in the business often give workshops and teach classes open to just about everyone.
Also, those photographers who’ve chosen to teach full-time often still shoot professionally on the side, meaning their experience comes from a lot more than just the classroom. In photography, those who “can do” often teach as well.
Here’s a look at three different teachers of photography. Hailing from different parts of the country and emphasizing different aspects of shooting, all of them offer their students insights needed to push the limits of their art. And they share their tips on the pages that follow.
When Ralph Clevenger’s students step into his classroom at the Brooks Institute of Photography in Santa Barbara, CA to learn nature photography, it doesn’t really matter just what they want to shoot-landscapes, animals, plants, bugs, even people. Their teacher can do it all.
Clevenger remembers how he arrived at the school as a student in 1976, thinking only of learning underwater photography. Nearly three years of study changed that. “The whole outdoors subject matter opened up,” he says. “I was really enlightened about the possibilities.”
A look through Clevenger’s photography shows how true that is. Snakes coil right next to images of the Big Sur coastline. Bikini-clad surfers stride down the beach in one frame, while bees zoom among the flowers in another. An iceberg image shows far more than just the tip. In fact, he doesn’t really draw much distinction between a flower shot and a landscape. “It’s all photography,” he says. “It’s only what you put in front of it [the camera] that changes.”
Clevenger comes by his interest in the outdoors naturally. His father is a lifelong outdoorsman, one who first took his seven-year-old son diving off the coast of North Africa while working in the oil industry there. The younger Clevenger became a diver and biologist for the Scripps Institution of Oceanography in La Jolla, CA. Later, after starting his photography career, he worked for renowned nature shooter George Lepp, learning both the business and artistic sides of photography.
So what do Clevenger’s students find in his classes or in the workshops he gives around the world? Though he’s been teaching since 1983, he says he feels he’s in the classroom primarily as a working professional who’s willing to share his knowledge and experiences. “I’m not going to teach you anything,” he says. “I’m just going to provide the opportunity to learn”-an opportunity that he says mainly comes through shooting.
|| |—| | Ralph Clevenger www.ralphclevenger.com | That doesn’t mean he has nothing to offer students beyond a camera and an assignment. Trying to “motivate them by example,” he asks them to study others’ photos and even paintings to develop an eye. In fact, he’s an advocate of taking an Ansel Adams book and going through it-upside down. The reason: “To learn that strong composition doesn’t depend on the subject matter.” (In other words, Adams could have been photographing nudes or buildings; the photos would have been powerful no matter what.)
Clevenger has advice to offer for almost every kind of nature photography. Want to shoot flowers? “Finding a pretty flower is half the battle,” he says. How about animals? “It’s behavior” that makes the photo.
Most of all, he talks about not shooting: “Most great nature photography has to do with patience,” whether waiting for the right light or watching for a snoozing creature to do something interesting.
Clevenger teaches workshops that are open to everyone, but the Brooks Institute is targeted at people who want to earn a living from photography, and he takes pride from helping students do just that. “There’s a lot of satisfaction from seeing a student who goes on to be successful,” he says. “It’s certainly great to know that you had an impact on somebody’s life.”
Nature How-To TipsChange POV. Shooting flora? Try swapping the macro lens for a wide angle, like a 20mm or 14mm. “It’s a whole different way of looking at flowers,” Clevenger says.Capture motion. When photographing animals, “look for behavior. You want your subject doing something besides just sitting there, even if it’s just a yawn.”Get the lay of the land. In landscapes, his rule of thumb: “If it has an interesting foreground, you need to think wide angle. If it has an interesting background, it’s telephoto.”Stay a spell. Don’t shoot on one-night trips, which don’t leave enough time in one setting. “It should be two to three nights minimum” in each place.Experiment. Try different ways of working. “I was doing a work-shop in Alaska with this guy who had more equipment than I did, but he’d never shot a close-up-only animals, and at a distance.” Be open to other possibilities.Sit tight. Above all, nature shooters need patience. Good photos come to those who wait!
One of Lauren Shaw’s photography students at Emerson College in Boston last year chose her fellow students as subjects, and the images she showed were pretty good. Shaw says the young woman did a marvelous job of removing herself from the scene, as if she were a “camera on a table” at the gatherings she’d photographed.
But how to push the work further? Shaw, who’s been teaching photography at Emerson for 34 years, had some suggestions. “I told her she needed to get more personal, maybe working one-on-one, maybe taking a few steps closer, and maybe having a conversation with her subject.”
Making portraits more intimate is a given for Shaw, whose own 10-year project, Maine Women: Living on the Land , was published last year. In it, she interviewed women in New England’s biggest state and photographed them in the landscapes intimately tied to their lives.
According to Shaw, a portrait is “what happens in that magical space between the photographer and the subject.” It comes not from a quick snap with a long lens but as the result of some interaction between subject and photographer.
Shaw’s interest in teaching grew out of her desire “to find a profession that would allow me to maintain my sense of identity as an artist. I wanted to integrate my avocation with my vocation,” she says. As a teacher, “I’m looking at photographs all day long. I’m encouraging young photographers. I absolutely love it.”
She teaches only advanced courses, with names like “Ways of Seeing” and “Finding Your Voice.” Her school’s curriculum requires students to know the history of photography, and she frequently has them look at different photographers’ work. It’s all part of educating their eyes, showing them what’s been done before, and helping them understand how what they’re doing now fits in.
|| |—| | Lauren Shaw www.laurenshaw.com | Although portraiture is not a separate course at Emerson, when it comes to people photography, Shaw draws on experience. “When you’re doing portraiture, it’s a collaboration” between subject and photographer, she says.
She has suggestions for strengthening that collaboration, including such simple acts as moving closer and talking with your subjects before picking up a camera. Her students are not allowed to snap at a distance-she tells them they must start out using a 50mm or 35mm lens (most of the teaching is in 35mm film). And she tells them to keep the gear simple so that they can be “so comfortable with the equipment it becomes invisible.”
Her students may end up doing “portraits” of inanimate objects or of themselves. One student took staged photos of himself as “Everyman,” posed doing things like fixing the furnace in the basement. As the project continued, it became clear he was really photographing himself in the role of “the man of the house,” a role that he had been forced to take on at age 16 when his father died. Shaw had suggestions for him, too. (“How about taking your clothes off, and do body identity, not just costume?”)
“For me to have access to a teacher like Lauren Shaw is something I couldn’t have expected,” says Emerson student Katherine Kordaris. Part of her work involved people photography. “We were able to talk about it with her, which was really great, because she is a working photographer.”
People How-To TipsGet personal. Go metaphorically or literally into the “inner rooms” of a person’s life. Converse.See their place. In many portraits, the subject’s environment, and how he or she interacts with it, makes the image.Look around. “You’ve got to see behind your subject.” Be careful not to look only at the person but at the whole scene.Frame carefully. Check what happens at the edges. Shaw sees people cut off at the wrist, the finger, the ankle. “It’s OK to cut off a head,” she jokes, “but not an ankle.” Watch the bottom of the frame, in particular.Liven them up. Strive for animation from your subjects. “It takes tremendous energy to get people to animate themselves,” Shaw says. She admits to acting goofy or doing whatever it takes to make this happen.Shift position. Don’t stick to the eye-level point of view. You can climb higher, get down low, walk around your subject, or move in and out. Each POV will lead to a different image.
Some people become interested in photography as a way to go on adventures and see the world. Not Nevada Wier. She was already working as an outdoor guide and instructor in places like Kathmandu in the late 1970s and early 1980s. After years of guiding for pay and taking pictures for fun, she realized that her photos were good enough to sell to airline magazines and stock agencies. Gradually photography took over, until Wier was shooting stories for publications such as National Geographic and Outside.
But the former Outward Bound instructor never stopped teaching. As her photography career grew, she found herself leading workshops in her hometown of Santa Fe (at the Santa Fe Photo Workshop) and around the world.
So what does a seasoned world traveler tell students? “It’s really just about having fun,” Wier says. “If you don’t have fun, your pictures aren’t going to be any good.”
It’s advice that may shock her students, some of whom are so involved in their gear that Wier warns they produce photos with “no soul.” For her, good travel photography is often about people. That’s part of what led her to change from guiding to photography. “I became much more interested in what was at the bottom of the mountain than at the top of the mountain,” she says.
In teaching, “I talk a lot about photographing people, and about difficult lighting conditions.”
The people part is challenging. “Approaching people is always a big question” for her students. And if you don’t speak the language? Wier says it’s all about how the photographer handles herself. “It’s about you. You have to be approachable. Learn nonverbal cues. It’s not like trying to shake hands with an elephant-it’s not that hard.”
|| |—| | Nevada Wier www.nevadawier.com | Says Elise Widlund, who with her husband has taken both workshops and international trips with Wier, “She gave me the courage to step forward and approach people.”
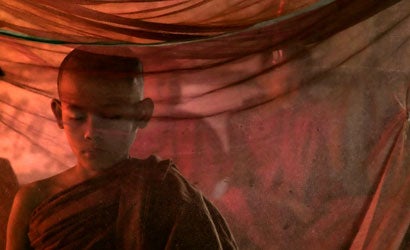
Widlund says that Wier’s teaching has led her into amazing situations, like a recent trek into the backcountry of Myanmar. In a remote village where many of the people are tattooed, Widlund spotted an older woman whose face was completely covered with tattooing. Rather than snap a candid, she let her cameras hang and approached the woman to compliment her shawl. She ended up in a room with the villager, who demonstrated how she’d made the shawl herself-a scene Widlund never would have photographed if Wier hadn’t taught her how to approach people.
As for those difficult lighting conditions, Wier sees this as a big part of the territory for travel photography. “Anybody can photograph in good light,” she says, but in travel you rarely have time to wait for it. And even if you can, your subject won’t. One solution: fill flash, which can get a good photo out of bad lighting.
In travel photography, difficulties are a given, says Wier. “There’re so many limitations. There’re always problems.”
But she sees this as an advantage: Is there something in your way, or a lens you didn’t bring, or maybe another jeans-and-sneakers clad tourist planted in the middle of your exotic view? Good! It will force you to be a little more creative with your approach to the image.
Travel How-To TipsTravel light. You don’t always have to have all your gear with you. Carry one body and a single lens sometimes. Go light and be creative.Simplify. Don’t let the gear you do bring get in your way-if you’re too involved with it, you’ve brought too much. “You need to keep a balance of your gear with your skill level.”Master fill flash. It will help you deal with the bad lighting that travel photographers face so much of the time.Beat the clock. When doing landscapes, you do need good light, so “get up early and get out.”Use your head. “When you’re not shooting, you should be thinking,” she says. For example: What’s this place like at another time of day? What else may be going on around here?Be flexible. Take advantage of the fact that things won’t go as planned. If you’ve counted on sunrise but are met with rain, don’t give up-put that rain to use in your photos.