HowTo: Action Studio Photography and Composite Posters
Making cool action portrait posters of kids is a snap with some practice.
Maybe you are a professional portrait photographer trying to separate yourself from the high school senior market or maybe you are a parent just wanting to impress your children. Either way, this simple project can be great fun and produce professional results for photographers of all skill levels.
A couple of months ago I was doing a portrait session in the studio with an 8 year old boy. I was shooting him with his football on a high key white background. I asked him to throw the ball up in the air. As he did, I fired off a shot. After reviewing the images, I noticed what a great job the strobes did in stopping the movement of the ball. It got me thinking that this could come in handy when shooting high school seniors. It would be great to catch the cheerleader or martial artist in mid-jump, the golfer or tennis player in mid-swing or even the skateboarder doing tricks in mid-air! Seems this would be a hit with the parents and kids alike and much better than some boring static shot.
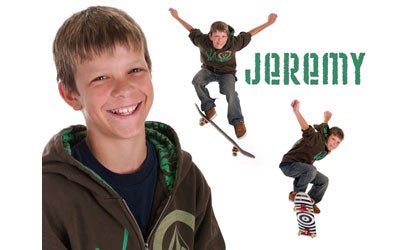
To test my idea, I recruited my 12 year old son Jeremy. Jeremy is an aspiring skateboarder and best of all, he works cheap. A simple bribe of taking him to the local skate park was more than enough to get him up early and into the studio on a Saturday morning.
The lighting setup was just the standard high key lighting setup. I used a total of four Alienbee AB800 strobes, two on the background and two on the subject. For the background, I placed one light on either side of the background and metered the center of the background at f/8. I did not use any modifiers on background lights other than the standard reflectors. For the subject, I placed one light on either side at 45 degree angles. The main light was set to f/5.6 and the fill was set to f/4. I did use softboxes on the subject lights, but you could use standard umbrellas. While my shots were taken in the studio, this could have just as easily been done in the garage with just two subject lights or even outside in the driveway using natural light. Just remember that the better you light your background the less cleanup you’ll have to do in post processing.
The scene was shot on a 9′ roll of seamless white roll paper that you can purchase at most camera stores. You could also use something as simple as a white sheet or muslin backdrop to keep it cheap. Because we are capturing the subject in mid-air, we are not as concerned with the floor as much as a clean white background.
The shoot itself was really pretty easy. I had Jeremy take his skateboard out on the seamless and get ready to do some simple jumps. After setting my camera to the max flash x-sync of 1/250th and the focus mode to AI servo, we were ready to start shooting. After a couple of test shots, I found that by getting down fairly low, Jeremy began to look like he was flying much higher than he really was. (It also eliminated the floor which was quickly getting marked up!) I also found that Jeremy likes to look down at his feet when he jumps, so I needed to remind him to look at the camera when he was airborne.
Once I got the images in the computer, it was just a matter of cleaning up the background to get the nice simple white look I was after. Luckily I did a fairly good job of lighting the scene, so the cleanup was fairly simple. There are many ways to clean up a white background, and if you’ve got a method that works for you — use it! Here’s my method:
After using the magic wand tool to select the white areas, I use the burn tool set to highlight mode at roughly 20%. The burn tool works best for me as it gives me the control I need to get natural-looking results.
To create the poster, I used Photoshop CS2. You can use any image editing software that allows you to work with layers. I started by opening a new 16×20 file at 250 dpi. Since I am working with white, I did not need to add any fill color to the background. The first thing I did was copy/paste the larger “portrait” image of Jeremy into my new document. Then I flattened the image. Using the rulers in Photoshop as my guide, I used the rectangle selection tool to draw a box one inch in from all four edges. I then did an Edit>Copy followed by an Edit>Paste. This created a new layer in Photoshop. On this new layer, I added a drop shadow and a gold stroke using the Layer>Layer Styles menu. This new layer is the actual working area with the background becoming the border. Once I had my working area and my border done, it was just a matter of dragging the two images of Jeremy onto the white working area. I positioned the layers in a way I felt looked good. With all the images matching the white background, it was a snap to use the eraser tool to erase any areas where the images overlapped. Once that was all done, I added his name in an appropriate text. All I had to do after that was flatten the image and print out the poster!
Be sure to check out Terry Watson’s website at www.terrywatsonphoto.com.