How to Read a Viewfinder
How to make sure that what you see is what you get.
You know a great picture when you see one. And you know enough to lift your camera to your eye when you see a perfect moment. So how come those super situations don’t always turn out to be super pictures?
Maybe that’s because even though you’re looking, you’re not really seeing what’s in your viewfinder. If you learn to pay close attention to what’s there, it won’t be long before the picture you had in mind is the picture you get.
So, before you push that shutter button, ask yourself the questions on the pages that follow, each of them corresponding to a different element you’ll see in your camera’s viewfinder.
A. What’s the subject?
Chances are there’s a reason you’re taking the picture. And there’s nothing worse than finding out that the very thing you wanted to photograph came out fuzzy. So before you click, make a conscious effort to ensure that what’s important to you is what’s in focus.
Using autofocus will take you part of the way there — not only does it compensate for our sometimes-faulty eyesight, it also keeps things sharp when they otherwise might, by error or forgetfulness, be blurred beyond fixing.
But a camera’s autofocus system has its own ideas about what should be sharp, and if it’s on total auto mode, it may focus on a zone that has nothing to do with your subject. Pay attention! If it picks the wrong zone, toggle around your focus points until the focus is on the right spot.
Another option: Set your autofocus to the center point. When you know what you want sharp, center the subject, hold your shutter button halfway down to focus, then swivel your camera and compose the shot again.
B. What’s around the edges?
The edges of the frame are the places in our pictures where all the junk collects, messing up our photos without our noticing. The edges are where unwelcome streetlights hang down from the sky, where disembodied hands float, and where things that should be making your composition better end up undermining it. So before you shoot, check those borderlands!
Don’t just get rid of strays — find elements that can help hem in your subject and guide the eye to the thing that you’re trying to photograph. If you’re shooting outdoors, look for tree boughs that might make a natural frame for a portrait. If you’re zooming in on a bug, use the surrounding leaves to make the photo about more than just the insect. If there’s a picture frame growing out of someone’s head, shift your position.
C. Is your subject in the center?
If you look through your viewfinder and find the most important thing in your picture smack in the middle of your frame, move! The one best way to get better composition and more compelling pictures is to keep the subject out of that central territory.
By the way, this rule applies chiefly to the rectangular frame of an SLR image. If you’re shooting in square format, or plan to crop to a square, or you’ll fill the frame with your subject, go ahead and put it in the center.
D. Is your scene super bright or ultra dark?
Ever shoot a gorgeous snow scene in which, once you let your camera do its thing, the pretty white stuff turned gray? Or take a photo of a city at dusk only to find your picture’s bright as day? To get your shot to look like what you see in your viewfinder, all you have to do is adjust your exposure compensation. Tell your camera to let in a little more light by cranking it up, and those white sandy beaches and brightly lit amber waves of grain will glow like they’re supposed to. When you want to see the city lights but not everything that’s hiding in the shadows, turn your exposure compensation down and get the night scene you’re dreaming of.
E. Could you use a little light boost?
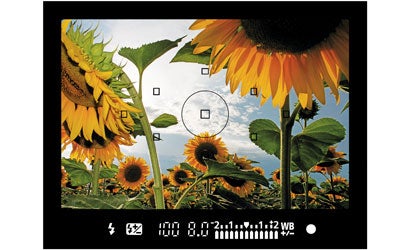
Sometimes the best uses of flash are at the very moments your camera doesn’t pop it up. Take this sunflower picture, for example. Without assistance from the flash, the flowers would have been dark and the sky nicely exposed, or the flowers bright and the sky blown out. When you’re looking at a scene that’s very bright in the background and dark in the front, turn on that flash to balance out the scene.
You can also take years (or, at least, months) off the faces of your outdoor portrait subjects by adding a little extra light. Hide the shadows under their eyes by flashing them a bit. If you’re getting too much or too little flash action, crank it down or up with flash exposure compensation.
F. Is your subject whizzing by?
There’s nothing worse than motion blur when you want a freeze frame. If in your mind’s eye there’s a frozen cyclist, but on your LCD monitor there’s a whooshy smudge, you should have adjusted that shutter speed before you clicked. Set it at a minimum of 1/500 to stop the action.
What if you’re envisioning a calming, peaceful, and blurred-out waterfall, but all you’re getting is a stilted stream? If you want to really capture motion blur, make sure you leave your shutter open long enough. And before you do, put your camera on a tripod. When that’s not an option, set it down on something flat and use your automatic timer to get the photo without jiggling it. Then dial your shutter speed to 1/2 sec or more.
G. Is one element of your picture by far the most important?
When you were looking through the viewfinder at your beautiful grandmother as she sat at her kitchen table, all you saw was her face. Unfortunately, the camera picked up the cabinets, and the dishes in the sink, and the floral-patterned wallpaper behind her.
Next time, before you click, tune out the distractions by opening up your aperture. The smaller the number, the wider the aperture will be — and the less of your image will be in focus. Don’t go down to f/1.4 for a portrait, or only grandma’s nose will be sharp. Try f/2.8 and focus on her eyes.
Wide apertures, up to f/3.5, are also great for dramatizing still lifes. Food pictures and flower shots have all kinds of impact when you focus on that tiny bud, and let the rest fade into the background.
If, on the other hand, you don’t want to lose a bit of that sunny landscape, close your aperture down tight. At f/16, you won’t miss much.
H. Do you love the light you have?
It’s evening and the natural light of the setting sun is gorgeous, so you turned off the flash. But your pictures keep coming out blurry. You can still get the shot you want if you fix the ISO — the higher it’s set, the less light you’ll need to get a steady shot. (Note: ISO isn’t shown in every viewfinder, but you can always find it in your camera settings.)
Fiddling around with ISO can help when you need to curb the light, too. If that motion blur shot you wanted was coming out way too bright, turn your ISO down and take the picture again.
I. Do your colors look the way they should?
When the pretty golden glow of evening turns out way too blue in your photo, the culprit could be your automatic white balance. You can remedy that: Cycle through the white balance modes until you find one that replicates the real color of the moment. If it’s still not right, see if your camera will let you set the Kelvin temperature. A higher one should do the trick — to ensure a warm look, start at 5000K and work your way up from there.