High Dynamic Range Imaging with Adobe Photoshop CS3
A handful of seemingly small upgrades add up to a more powerful program for HDR photography.
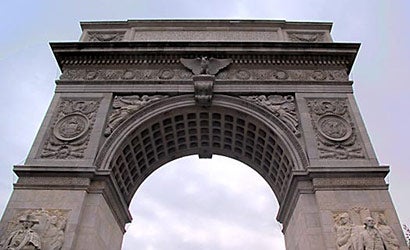
On the surface, the handful of additional functions and features for High Dynamic Range (HDR) imaging in Adobe Photoshop CS3 seem like slight incremental upgrades. But taken as a whole, these small improvements add up to a much more powerful HDR experience.
The HDR workflow is still a bit quirky, as there’s still no dedicated “Tonemap HDR Image” command. But due to a happy accident of trying to pull up the Tonemapper command box with the wrong image active, we discovered that Adobe Photoshop CS3 — and CS2, for that matter! — can be used to tonemap a single image.
It’s ridiculously simple and hiding in plain sight. All you have to do is convert a single image to 32-bit, and then drop it back down to 8- or 16-bit space, and it will bring up the Tonemapper. But there’s a slight catch. You can’t go from 8-bit to 32-bit. You’ve got to convert from 8- to 16- to 32-bit, and then back again to smaller bit space. But if you’ve got a 16-bit source file, it’s just a quick jump up and back again.
The ability to tonemap a single image is a nice addition, but you’re likely to see better results from multiple source image bracketed exposure HDRs. One of our biggest gripes with HDR generation in CS2 was that there was no option to align the images when the Merge to HDR command was hosted via Bridge. There was a checkbox to align the images when Merge to HDR was hosted in CS2, but not through Bridge. Does it really matter where the Merge to HDR command is hosted?
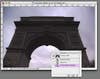
If you wanted to work with straight RAW files, yes, it does. If there were any potential alignment issues, the RAW source files would have to be processed via ACR and opened into Photoshop CS2 before being merged to a 32-bit HDR file. We’re happy to report that Bridge 3 now supports an automatic alignment function when merging source images to HDR, but in keeping with Adobe’s quirky HDR workflow protocol, there’s no user input! It just auto-aligns the images if it thinks it necessary and informs you of such with a progress bar during HDR generation.
|| |—| | New to HDR Imaging? Check out popphoto.com/hdr for a crash course in HDR! | The good news is that it works most of the time for slightly askew source images. That you wouldn’t know it’s there unless you tried to merge source images that may not be pixel-for-pixel perfectly aligned is just another part of Adobe’s weird HDR workflow.
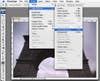
A really nice touch is the full-image preview of the 32-bit file with an exposure slider that allows you to actually get a feel for the image and apply some global adjustments to the 32-bit file prior to tonemapping.
Nothing much changes under the Filter menu from CS2 to CS3, and the only filters we’re interested in for working on 32-bit images are Sharpen and Blur, both of which are active in both programs. Both can also be applied to all or individual channels, as desired.
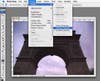
But CS3 offers a few more powerful tools under Image > Adjustments that allow for 32-bit global changes that could add more control and potentially better output for your HDR images. Levels, Auto Levels, Auto Contrast, and Auto Color, Exposure, Desaturate are now actionable, but we’re most excited by Hue/Saturation, Channel Mixer and Photo Filter.
With Hue/Saturation, you can change the overall colorcast, add or subtract depth to the luminosity, and boost or decrease saturation either globally or to a specific section of the spectrum. Boost the blue sky, or desaturate skin tones selectively with this command!
Channel Mixer, when Monochrome is checked, is probably the most powerful monochrome converter in Photoshop, and it provides much more user input than either Image > Mode > Grayscale or Image > Adjustments > Desaturate.
Photo Filter, as the name implies, applies classic photo color correction filters to the 32-bit file. Warming, cooling, and your classic red and yellow monochrome filters, among others, allow for classic film-based field techniques to be applied to your 32-bit file in the digital darkroom.
Outwardly, the HDR conversion command box is unchanged, but behind the scenes, there’s a faster engine running the whole of CS3, and it feels a lot faster, both in preview redraw and with tonemapping the output file. As with CS2, Local Adaptation via the 32-bit Curves command usually yields the most impressive output.
The most recent version of two of Photoshop’s HDR processing competitors, FDRTools Advanced and Photomatix Pro feature different “ghost removal” processes, but this functionality is missing in the straightforward HDR process with CS3.
There’s a powerful-looking “tourist remover” filter process, but it’s only available in Photoshop CS3 Extended. We’re still figuring out how to best use this “tourist remover” function for HDR, and we’ll report back in a few weeks.
Even without a de-ghosting process, Adobe Photoshop CS3 adds a bunch of small features that add up to a much more user-friendly HDR imaging program.
Click here to launch a slideshow of editing HDR images in Adobe Photoshop CS3.

Photoshop-CS3-HDR-This-simple-pop-up-progress-bar
Photoshop-CS3-HDR-The-slider-on-the-bottom-of-the
Photoshop-CS3-HDR-A-handful-more-commands-are-act

Photoshop-CS3-HDR-Using-Hue-Saturation-the-user
Photoshop-CS3-HDR-Call-up-the-HDR-Conversion-dial