Four Perfect Moments
Life happens. Will you get the picture? Four pros show you how to photograph the best times of your life.
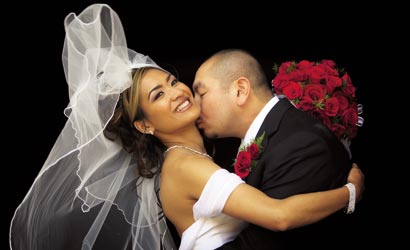
Wedding
For a bride, groom, and their families, the wedding day — after months of planning and obsessing — goes by in a kaleidoscopic blur. Preserving it, so that every moment remains vivid and infused with emotion, is the photographer’s job. And you can’t flub it.
But gratifying as it may be to capture the most important day of two lives in a way that makes it seem magical, it’s also, as veteran wedding photographer Bambi Cantrell of Pleasant Hill, CA, puts it, “an enormous amount of responsibility and a hell of a lot of work.” To be sure you get those “perfect” moments, she offers this advice:
1. Beat the bells. “Weddings are entirely unpredictable,” Cantrell says. “Your first line of defense is getting to the event early enough to troubleshoot impending problems.” Arriving a few hours ahead gives her ample time to photograph the bride preparing. She heads off next to photograph the groom and the site, and to prepare for the ceremony. “The closer it gets to the ‘I do’s,’ the more insane things can become,” she says. So she takes portraits early and is usually rewarded with more relaxed and flattering expressions.
2. Have a helper. “My assistant is worth his weight in gold,” Cantrell says. If you can’t afford an assistant, enlist a friend to help you carry or watch over equipment, park the car, hold reflectors or a flash, pose a subject, and keep children’s attention during shots.
3. If you can’t buy, borrow. This means lenses, which are extremely important at a wedding — where the crucial shots range from a dark room to sunny out-of-doors, from close-up to long distance, and from one to 20 people. “I love using a 70-200mm to avoid being up on my subject,” she says. If you don’t have long, fast lenses, rent them — either from websites like Rentglass.com (for as little as $14 per week) or from a local camera shop.
4. Maximize available light. “Available light is much less intrusive and allows you to focus in solely on the subject,” she says. She uses the 5-in-1 reflector by Westcott ($40, street): “It lets me see where the light is going.” The black side allows you to subtract light to sculpt cheekbones or draw attention away from an unflattering detail. For couples with varying skin tones, the silver side is more directional and can be aimed to lighten just the person with darker skin without washing out lighter faces. The translucent side diffuses light broadly on a bright, sunny day.
5. Bounce flash. If flash is absolutely necessary, Cantrell turns the flash head. Shooting in RAW, she’ll set the camera to auto white balance, increase her ISO, and bounce flash off a wall either behind or beside the camera. “Many reception rooms are white or cream-colored, and you can turn the walls or ceilings into a natural-looking light source.”
6. the art of posing. “I first turn the couple’s bodies 45 degrees away from the light source,” she says. “I tell the bride to separate her feet shoulder-length apart and put her weight on her back leg. It creates a really pretty S-curve and shadows on the waistline, so she appears more slender.” She tells the groom to “lift his front foot off the floor and set it down gently,” to shift his weight to his back leg.
7. keep it tight. This is where you need a long lens. “Wedding photographers often show too much information. I prefer to photograph with a shallow depth of field and come in as tight as possible,” eliminating distractions, Cantrell says. She prefers f/2.8 (except for group portraits) to defocus background clutter.
Bambi Cantrell was one of American PHOTO’s Top 10 Wedding Photographers.
Baby
| © Donna Padowitz |
| Donna Padowitz lay on her stomach, facing her subject. “She kept crawling toward me — I had to shoot fast!” Captured with a Nikon N90s and 50mm f/1.4 Nikkor lens. Exposure, 1/160 at f/2.8, ISO 320. |
There are only so many days that your son will crawl before he learns to walk, and so many chances you’ll get to photograph your daughter’s fine blond curls before they become a full head of hair. Kids grow fast, and stages of their growth can slip right by. Years from now, when you want to look back on a certain time, you’ll want to have a perfect picture to wrap around those memories.
Though babies are great subjects for portraits, they’re usually the least cooperative. Capturing a particular expression usually means having your camera ready. What else do you need to know? New York-based child portraitist Donna Padowitz has a five-point formula for memorable photos:
1. Simple backgrounds. “I like an environmental feel to my portraits, so I generally schedule the sessions in the client’s home or outdoors,” Padowitz says. If indoors, choose a solid wall or open space. Outdoors, go for the green foliage of low trees and bushes, and blur the background (with a shallow depth of field) to make it less distracting. She doesn’t advise shooting outdoors with babies younger than nine months old, since it’s tough to keep their focus. “Staying in their home and the familiar environment eliminates distractions and lets us achieve more subtly nuanced expressions,” she says.
2. Go natural. “Nothing beats natural window light.” But if that’s not available, Padowitz uses a continuous-source tungsten light such as the Lowel Tota-light ($140, street). “This way I can see exactly what I’m getting and, when used with an umbrella, it provides a very flattering light.” It’s also diffused enough to avoid upsetting the baby.
3. Get down. “I lie on the floor, on my belly, so I am right at the baby’s eye level,” Padowitz explains. This eliminates any distance or detachment from your pint-sized subject. If you can’t lie down, place the infant on a bed or sofa and shoot while sitting on the floor.
4. Posing pointers. “If they have the upper body strength, I place them on their bellies, with arms in front for support. This makes for great eye contact and is also a very flattering angle,” she says. Avoid leaning them back on a pillow — it creates an unflattering double-chin look.
5. Happy baby. Timing is everything. “The best time to photograph is after a nap!” Have a toy for baby to play with — sometimes you can incorporate the interaction into the photo. Overall, remain gentle and calm, and don’t get frustrated or put any pressure on the baby — or the parents.
Click here to launch a gallery of baby photographs by Donna Padowitz.
Family Portrait
The posed family portrait may be the oldest, most classic type of photograph. It captures loved ones at a moment in time, and generations from now it will be an heirloom. Fortunately, unlike our ancestors, we don’t have to sit through 15-second exposures, wearing stiff corsets and high-collared shirts.
But even in these digital times, the family portrait isn’t easy to do right. Positioning people of varying heights, ages, and body types in a pleasing way before the five-year-old wanders out of the frame is a daunting task. Family portraitist and wedding photographer Nick Adams, based in Sanibel Island, FL, offers these tips to make it easier:
1. Matching clothes. “Everyone must have color-coordinated outfits,” Adams says. “Not a uniform, but there must be a theme.” Pastels are usually appealing, enhancing natural skin tones. Black or white can look amazing on some subjects, but white makes a pale complexion paler, and black creates unappealing shadows on those with double chins.
2. Timing counts. “Sunrise and sunset are the best times, particularly the last 35 to 45 minutes before sunset and after sunrise,” says Adams. Given a choice, he takes sunset for available-light shooting. “As a rule of thumb, have your subjects look toward, not at, the sun as it lowers.”
3. Pose them. Adams starts with his subjects in a tight group: parents in the middle with children on either side. Since he often shoots on beaches, he adjusts for the too-tall sibling by shooting at a 45-degree angle to the shore with the tall sibling standing on the downward slope near the water. Watch out for clenching of hands, and angle them to flatter each person’s body type. The father figure should never be dwarfed by others. If he’s short, have him sit.
4. Loosen up. “Nothing looks worse than a row of soldiers standing at attention on a beach,” says Adams. Have family members lean in close to each other to show a connection. Encourage them to put their weight on one foot, angled so they don’t face the camera with squared shoulders. Ask those at the ends to turn out and lean against the others. Don’t let anyone aim their feet at the lens — “Size 10s will appear to be size 20s.” Also watch your subjects’ body language, he warns. “If someone is trying to hide a slight paunch with their arm, place a child in front or get the subject to turn to another angle.”
5. Look closely. “Keep backgrounds simple and uncluttered,” he says. Beaches and other natural settings are an easy bet. But seek shelter if necessary to avoid windblown hair. “Nobody likes the ‘hurricane-swept’ look.” And pay attention to verticals and horizontals with both your subjects and background. Is an errant branch in the background making Mom look like she’s sprouting a tree? With larger groups, avoid arranging heads vertically. If a parent is holding a toddler, position the child to the left or right so the heads don’t line up.
6. Position yourself. Camera angles? “I try to shoot up to subjects; it makes them look a little taller and more regal,” Adams says. With seated subjects, lie on the ground.
7. Try anything. If posing isn’t working well, shoot the group running, walking, even jumping. Especially with children. “There is nothing that makes you smile more than watching kids being kids.”
Sports
| © Jerry Lodriguss |
| To catch Diane Guthrie clearing the high-jump bar before winning the women’s heptathlon at the 1995 Penn Relays, Jerry Lodriguss used a Nikon F3 and 400mm f/2.8 Nikkor lens with Fujicolor 400 film. |
Every athlete remembers that first great accomplishment. But will you — the family photographer — capture the moment of glory? With 31 years of sports shooting to his credit (20 of them as staff photographer for the Philadelphia Inquirer), Jerry Lodriguss has the rules down pat. His tips:
1. Chalk talk. “You have to figure out where the pictures are going to be, which comes from a knowledge of the sport,” he says. If you’re not a rugby fan but want to shoot your nephew the flyback, learn where and how he’s going to score. Also, scout out the field beforehand for access points and areas where the action will unfold.
2. Players only. “I always try to shoot from a spot that will give me a plain background,” says Lodriguss. Nothing should distract from the athlete. “I also like to shoot with a wide-open aperture, because it separates the athlete from the background.”
3. Just essentials. Don’t lug a lot of gear around the field. Lodriguss recommends a 70-200mm f/2.8 zoom for most sports, or a 300mm for football and soccer. “With a zoom, you have a lot more flexibility,” he says. “And a monopod is almost a necessity.” A tripod can be dangerous and hard to move on the sidelines.
4. Shoot manual. Avoid Program mode. “That makes it easy to get the exposure wrong,” he says. “It knocks the shutter speed down too much and tries to stop the lens down so things are more in focus. You usually don’t need that much depth of field. With digital, you can shoot in manual for the perfect shutter speed and aperture. Just make a few test frames and check exposure on the LCD.” If you’re comfortable with histograms, use them. Metering? Your camera’s evaluative meter, not its spotmeter.
5. Height of the action. Literally. Shooting small players? “With little kids’ games, sit on the ground so that you’re more at their eye-level,” Lodriguss says. “Bring a cushion.” He shot this high-jump directly head-on.
6. Practice. Sports don’t let you thoughtfully compose shots. So be prepared for the action. “It’s partly a natural skill and partly practice, and you’ll always get better with practice,” he says. “When your brain tells your finger to press a button, there’s a certain delay there. With practice, you can shorten, even eliminate, that delay.” That’s being on top of your game.

image

image

image

image

image

image

image

image

image

image

image

image