The Fix April 2008
Can't get enough color? Restrain yourself and bring more subtlety and depth to your photos.
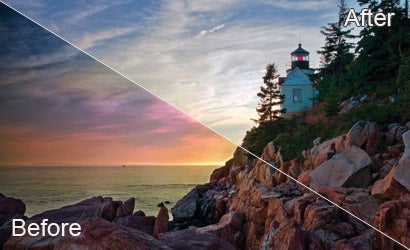
The problem: ‘Aha! An HDR,” we said, referring to what seemed to be a high-dynamic-range photo assembled from multiple exposures. We were wrong. This picture was carefully put together from a single photo using multiple layers in Adobe Photoshop and then tweaked until it barely resembled the original shot. We’re not arguing with the skill, but with the interpretation: Though we’re all for dramatic skies, a member of the Fix Team thought this looked like a motel painting. So we decided that rather than a makeover, we’d perform a make-under.
What now? We layered two light and dark exposures from the RAW file to get the sky to have pretty color, but not too much. In another adjustment layer, we darkened the rocks and added some contrast to get more snap, but not too much. (We think the photographer did a pretty good job with the rocks to begin with.) Now the photo looks like, well, a photograph, and the solid composition and timing of the picture comes through. But did we underdo it? In our zeal to tone it down, did we make it too bland?
Next time: We’re starting to think that Photoshop and other image-editing programs should automatically shut down after 10 minutes of adjustment to a photo. We reject more contest entries because they’ve had too much, not too little, work done on them. Yes, they are your photos to interpret in any way you want, and it would be a dull world if tastes didn’t differ. But a little subtlety goes a long way.
Tech info: Canon EOS-1D Mark II N, 24-70mm f/2.8L Canon EF lens, 1/40 sec at f/10 through 2-stop Cokin graduated neutral-density filter to tone down the sky, ISO 50. Multiple corrections and adjustments made in Layers in Adobe Photoshop CS2.
| Before | After |
| © Emmanuel Panagiotakis Aliquippa, PA |
The problem: We confess to usually hating floral still lifes. But we made an exception for this one, a fine composition with a lovely counterpoint between two colors. That’s why some little things about it bother us: The dark background needs to be closer to a deep black that will let us really concentrate our gaze on the tulip. To use a term from the film world, it has low maximum density. And the bottom of the stem is just too bright — it fights with the subtle blossom.
What now? With Levels in Photoshop, it was a simple matter of restoring a true black point in the background. We then masked off the bottom of the stem and made a custom curve to tone down the brightness there. Notice how these small fixes bring out the color saturation of the tulip, even though we didn’t touch the saturation adjustment tools. (The sort of thing that happens when you underexpose slide film.) We tightened in from the top and right, although we’re not sure if that improves it. What do you think, Fix fans?
Next time: Tweak softly and carry a big impact.
Tech info: Canon EOS Digital Rebel XT, 28-105mm f/2.8 LD Tamron lens, 1/60 sec at f/3.2, ISO 200. Hue adjustment in Picasa.
| Before | After |
| © Jim Forgette San Andreas, CA |