The Fix
Our experts salvage a black-and-white conversion and punch up a quiet scene.
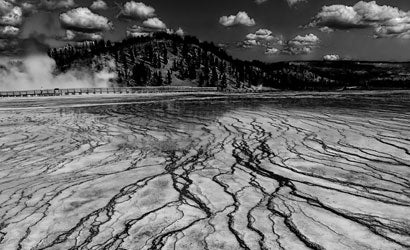
Edgy Landscape
Jerry Rusk, Lakewood, CO
The problem: There’s certainly nothing wrong with the scene selection (Yellowstone National Park’s Grand Prismatic Spring), or the composition, or the lighting, or the decision to convert to black-and-white. But the conversion left artifacts in the clouds (notice the overly crisp — actually jagged — edges of the clouds against the sky) and dropped the trees on the hillside into murky darkness.
What now? The photographer supplied us with the color original, so we first made a duplicate background layer in Adobe Photoshop CS3, then used the Multiply Blend tool to increase shadow density — in effect, giving us a little more detail to work with. Then we used the Channel Mixer to convert to monochrome, but here we did something a little more involved than usual. In viewing the image in the different channels, we saw that the sky looked good in the red channel alone, and the ground looked good in the blue channel alone. So we put them in two separate layers and combined them. Because this made the sky so dark, it made a lone cloud in the top center of the original frame fight for your attention, so we cloned it out to make an even, dark expanse.
Next time: We see quite a few good pictures that develop problems in conversion to b&w. If monochrome is your mania, it’s worth experimenting with the Channel Mixer in Photoshop and Photoshop Elements’ B&W Converter, or plug-ins such as Alien Skin’s Exposure.
Tech info: Tripod-mounted Canon EOS 20D with 10-22mm f/3.5-4.5 Canon EF-S lens. Exposure, 1/40 sec at f/18, ISO 200. Converted to b&w in Photoshop.
|||
|—|—|
| Before| After|
|
Floating Element
Michael Dreese, Middleburg, PA
The problem: Okay, we admit we’re suckers for pictures of small boats drifting in the fog. We like this one, but the fog is so thick, and the contrast so low, that the boat almost gets lost. Also, while the boat is positioned off-center along the horizontal axis — that’s good — it evenly splits the picture vertically, which lessens dynamic tension. It should move either up or down.
What now? First we made a new crop from the original RAW image file. Closet traditionalists that we are, we put the boat right at the rule-of-thirds intersection point, one-third up, one-third in. We sharpened the file a bit to get a little more snap in the boat. We noticed a slight magenta tone to the image; we decided to boost it by using Photoshop’s Photo filter adjustment to add a pink overlay.
Next time: Simple images can provide plenty of opportunity for experimentation with cropping, color, contrast. You know, those things people used to do in — what was it called? — oh yeah, the darkroom.
Tech info: Nikon D70 with 18-70mm f/3.5-4.5G DX Zoom-Nikkor. Exposure, 1/10 sec at f/8, ISO 200. RAW converted in Photoshop CS.
| Before | After |