Digital Toolbox
Build your Photoshop skills by controlling color with Curves.

It’s a good thing photographers are inclined toward the technical. What other artists would accept that the best way to perfect their masterpiece is by manipulating points on a graph? But when you get good at using Adobe Photoshop’s Curves tool, you’ll be able to make very fine adjustments to color and contrast very quickly.
Luckily, it’s not as hard as it looks. Here are some ways to get started, and some hints for using CS3’s improved Curves interface. By the way, this is the one big gun that Adobe has continued to withhold from Elements in its full form, but you will find Curves in Lightroom.
Click here for tutorial steps.
More of Debbie Grossman’s Photoshop tutorials can be found in the Digital Toolbox archive.

BEFORE
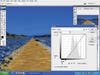
Curves-for-Contrast-Step-7-On-your-keyboard-tap

AFTER