Digital Toolbox: New Quick Fixes
Five easy ways to use the newest version of Adobe Photoshop Elements for fixing and sharing digital photos.

Adobe Photoshop Elements 5, the latest upgrade, is great for photographers who love digital, want to fix photos with minimum fuss, and are keen on sharing images. Check out these five new tools for better, faster improvements to your pictures and a cool way to showcase them.
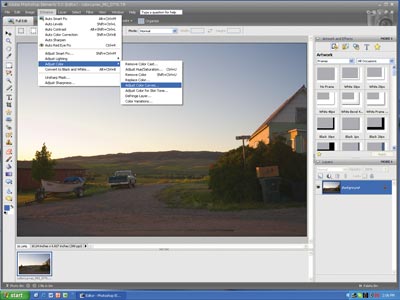
Color Curves
| Before | After |
| Quick Tip Tag, you’re it. Elements can help you to label the people who often appear in your pictures. In the organizer, go to Find > Find Faces for Tagging. Create and name tags, then drag them onto your friends to find them fast next time. Click here or on any of the images to launch a slideshow with larger images. |
Curves is the best method for adding and subtracting brightness or contrast, and for the first time a modified version of this big gun from Photoshop appears in Elements.
Find Color Curves under Enhance > Adjust Color > Adjust Color Curves. Click the triangle by Advanced Options to see them.
While you won’t be able to modify the Curve directly, you can adjust Brightness, Contrast, Highlights, and Shadows using the sliders. Watch what the Curve does, and you’ll not only get a great result, you’ll also learn how Curves work — in case you trade up to Photoshop, where they’re directly adjustable.
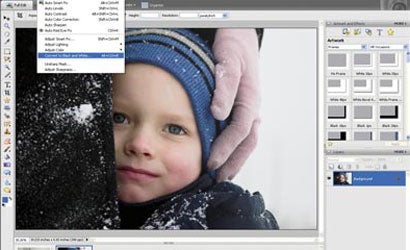
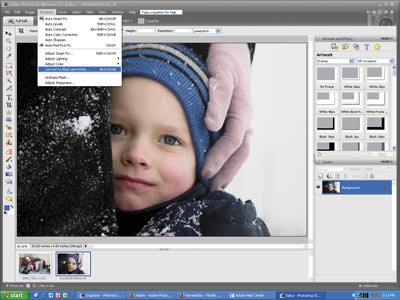
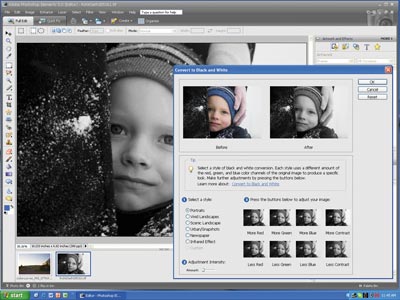
Convert to Black-and-White
| Before | After |
Simply desaturating or going grayscale can lead to bad black-and-white photos. The built-in converter lets you mix your image’s red, green, and blue channels to get a superior result.
Go to Enhance > Convert to black and white. To see what the program suggests, choose a style — we went for Portrait as a starting point. Then dial the Adjustment Intensity down to the lowest amount.
Add or subtract red, green, blue, or contrast by clicking on the thumbnail images. Experiment until you get a result you like, or reset to start over. To see how much of each channel Elements is adding, mouse over an image for the numbers.
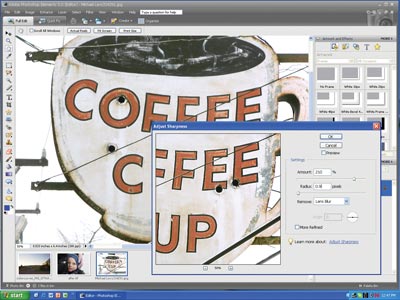
Adjust Sharpness
| Before | After |
The new Adjust Sharpness tool (under Enhance > Adjust Sharpness) lets you sharpen by removing lens blur — a much simpler and smoother sharpener than Unsharp Mask.
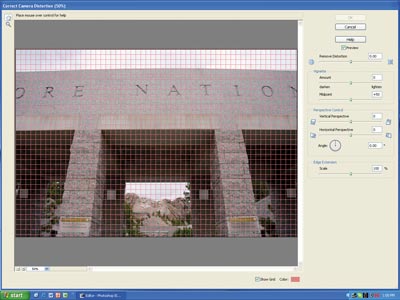
Correct Camera Distortion
| Before | After |
You no longer have to live with messed-up perspective or barrel and pincushion distortion in your pictures. Bend them back to normal under Filter > Correct Camera distortion.
Sharing is Caring
Photoshop Elements 5 has some new ways to share your pictures (and impress your friends and family) from within the included organizer.
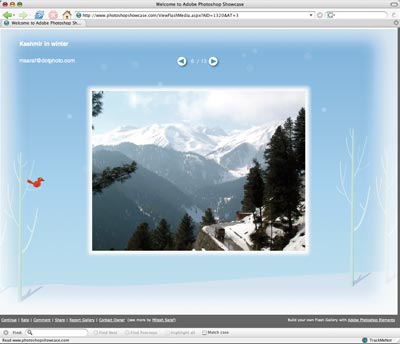
It’s always been annoying to crunch animated slideshows down to e-mailable sizes, and there’s never any telling whether Grandma will actually be able to open them. But most people know how to click on a web link, which is where the new, free, Adobe Photoshop Showcase comes in. You can use Element’s built-in tools to make Flash-animated galleries, and upload them for free hosting on Showcase. You can also mark your pictures, videos, and galleries as public or private — the only thing your fans have will have to do is click on a link to see them.


After

Before

Go-to-Enhance-Convert-to-black-and-white.-To-see
Add-or-subtract-red-green-blue-or-contrast-by-c

After

Before
Find-Color-Curves-under-Enhance-Adjust-Color-A

After

Before
You-no-longer-have-to-live-with-messed-up-perspect


After

Before
The-new-Adjust-Sharpness-tool-under-Enhance-Adj

Photoshop-Elements-5-has-some-new-ways-to-share-yo