All-Over-Skin-Smoothing-Step-2-Go-to-Filter-Bl
*Step 2*Go to Filter > Blur > Gaussian Blur. Set the radius to 50, and click OK.
All-Over-Skin-Smoothing-Step-3-Now-add-a-black-l
*Step 3*Now add a black layer mask to the Blur layer. Holding down the Alt key (Option on a Mac), click the Layer Mask button (circled).
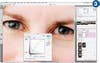
Bright-Eyes-This-trick-kills-two-birds-with-one-s
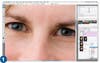
This trick kills two birds with one stone — it brightens the iris and whitens the whites of the eyes.*Step 1*Zoom in so you can’t see much except the eyes. Choose the Adjustment layer button from the Layers palette, and select Curves.
Bright-Eyes-Step-2-Hold-down-Ctrl-Command-on-a
*Step 2*Hold down Ctrl (Command on a Mac) and click on a bright part of the white of one of the eyes. Then use your keyboard’s up arrow key to raise that point on the curve.
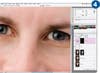
Bright-Eyes-Step-3-Now-hold-down-Ctrl-Command
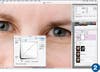
*Step 3*Now hold down Ctrl (Command) again, but this time click on a darker part of the iris. Use the down arrow to lower that point on the curve. Then click OK.
Bright-Eyes-Step-4-Since-we-made-an-adjustment-l
*Step 4*Since we made an adjustment layer, there’s already a mask. Fill it with black by making sure that black is your background color, and holding down Crtl (Command) + Delete.Now hit B to get a brush, and paint the eyes to reveal your adjustment.
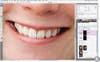
Pearly-Whites-Step-2-As-in-Bright-Eyes-step-4-f
*Step 2*As in Bright Eyes step 4, fill the layer mask with black, and use a brush to reveal your whitened teeth. If you brightened them too much in step 1, just lower the layer’s opacity.