Cheat Sheet: Add a Tripod Socket to Small Camera and more.
Stable Mate
We may earn revenue from the products available on this page and participate in affiliate programs. Learn more ›
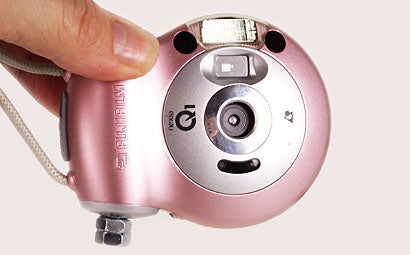
Mounting your camera on a tripod can be a great way to get sharper pictures. But what if your camera lacks a tripod socket? Fear not. This work-around will have you shooting sharp in no time. Beware: This works only on small, lightweight, inexpensive cameras that have relatively flat bases.
You will need: a 1 to 2-inch 1/4-20 bolt (i.e., a bolt that’s 1/4-inch wide, with 20 threads per inch); two flat-sided 1/4-20 nuts; a toothpick; a sheet of disposable cardboard; and 5-minute dry, general-purpose epoxy. (Check the epoxy label to ensure it will adhere metal to metal.)
Start by threading the two nuts onto the 1/4-20 bolt. Tighten them against each other until they rotate on the bolt as a unit. Using the toothpick, mix the epoxy on the cardboard sheet and dab it liberally onto the seam between the two nuts. (Don’t glue the nuts to the bolt; you’re only using the bolt to align them.) When the epoxy has dried, simply remove the nuts from the bolt and epoxy the pair onto a flat area on the base of your lightweight camera. When it’s dry, you’re done.
The best thing? You can glue tripod sockets onto just about anything that’s light enough (disposable cameras, for example). You can also glue one to a foam-core studio reflector, especially a small one used for tabletop product shooting, and then attach the reflector to a tripod to aim it with ease and precision.
Adapted from the Extreme Tech book, Hacking Digital Cameras (ISBN: 0764596519), published by John WIley & Sons. Used with Permission