How-to: Photograph the moon
The most beautiful photography subject 239,000 miles away.
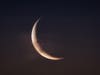
I spend a lot of time photographing the night sky, and apart from the Milky Way, one of my favorite celestial objects to photograph is The Moon. Our moon is Earth’s only natural satellite, and sits at an average distance of 239,000 miles from us. It orbits our Earth every 27.3 day, and the same side of The Moon always faces us due to its synchronous rotation with Earth. There are eight different phases of the moon during it’s 29.53 day monthly cycle, and the most popular phase to photograph is during a full moon.
So how do you go about photographing the moon? Well there are a number of things to consider when capturing a good moon shot, so I’ll take you through the methods I use and talk a little about the gear required as well.
It all begins with a plan and location
Planning is a big part of all photography, and shooting the moon is no exception. I always spend a lot of time planning my moon shots, and this first begins with the initial idea of the shoot. I may want a wide shot of the moon rising over a land or a city scape, or I may want a close up with the moon large in frame. Either way always I scout my location before the day of the shoot, and then work out what time and where the moon will be in the sky in relation to my shot composition.
Thankfully these days there are some great apps to help you plan your moon shots. Personally I use an app called PhotoPills, which can precisely calculate the timing and positioning of your moon shots, especially if you want to introduce a foreground object of interest into your composition. At this stage PhotoPills is only available on the iphone, but fear not, if you have an Android phone, then there is another great app that does a similar thing called The Photographers Ephemeris.
Lets talk about gear
A lot of people that I talk to think that I use a telescope to photograph my moon images, but this isn’t the case. I just use a regular DSLR camera and a super telephoto lens. These lenses can be super expensive – personally I use a 600mm with a 1.4x extender, but you don’t have to go out and spend that much money on a lens like this to take impressive moon photos.
A typical kit zoom lens around the 70-300mm mark will get you decent moon shots and also give you the versatility of shooting images of the moon that are wider. You could photograph the moon over a city skyline shot at 70mm, or get more of a close up shot with your lens set to 300mm. Sure the optics aren’t going to be as good as the more expensive prime telephoto lens, but you are still going to going to be able to get the shot.
Probably one of the most important pieces of equipment to use when photographing the moon, is a tripod. Since you are shooting with longer focal lengths, you need to keep your camera locked down as much as possible to prevent camera shake and get a sharp image, so to do that, a sturdy tripod is necessary.
As far as the camera body is concerned, you are probably already sorted there with your current DSLR. I prefer to use a cropped (APS-C sized) sensor when photographing the moon, as that will give me a little more reach with my focal length. For example, a 300mm lens on a crop sensor camera with a 1.6 crop factor, delivers images with the same field of view as a full framed sensor camera using a 480mm lens. In a way, it’s working to your advantage.
The Importance of composition
As with all forms of photography, a good composition is going to set your photos apart from others, so it’s important when you are scouting for your locations, that you find interesting angles and compositions that are going to differ from your every day photos of the moon.
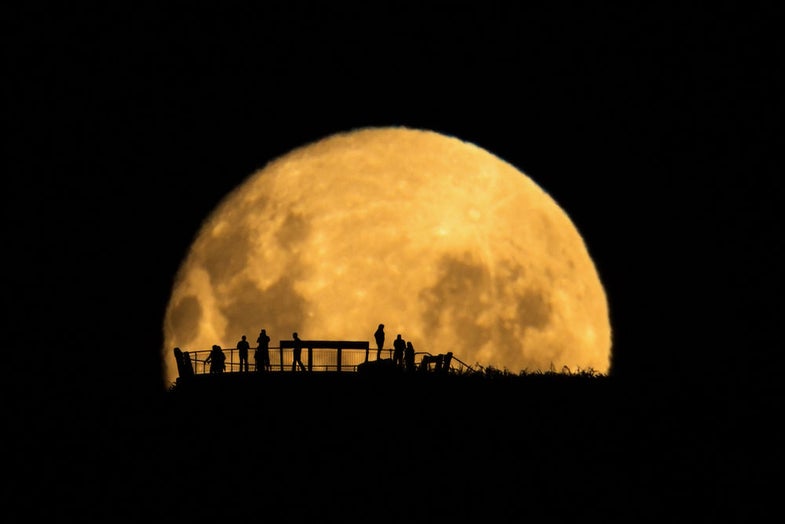
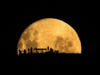
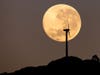
I always try to introduce an element of interest to my moon shots, even if I’m just photographing the moon against the night sky – clouds are great for this. Other elements could include cityscape’s, silhouettes, moon reflections on water, or even the International Space Station flying in front of the moon (I’m yet to get that shot!)
If you keep in mind the traditional composition rules, like the rule of thirds or leading lines etc. when working with some of these elements, then you are going to end up with a much more interesting moon photograph.
You’ll need so know about settings too
Probably the most common question I get asked about any of my photographs is what settings did I use. There is no real hard and fast rule about what settings to use for shooting the moon, and these will certainly vary depending on the time of day or night you are trying to capture the moon, and also the moon phase. The main thing here is most of the time you will want to be exposing for the moon itself and not the surrounds. This may not aways be the case, especially if you are shooting a wide shot with a city or landscape in frame just want the moon to be added interest.
So for now I am going to just cover the settings I use to shoot a full moon around 30 minutes after sunset as it’s rising. I also always shoot on manual, and it’s the best way to give you ultimate control over your moon images.
If you’ve ever stopped and actually watched a moonrise, you’ll notice that the moon does move fairly fast – it takes around 2.5 minutes from when you first see it until it totally clears the horizon, so to get a sharp image, shoot with a relatively fast shutter. I generally shoot around the 1/125 second mark. As for aperture, we are trying to get the detail on the moon as sharp as possible, so I very rarely shoot wide open and tend to settle on an aperture around f/9.0 As far as ISO is concerned, with the settings I’ve just mentioned, I go with a value around 400, but I’ve also pushed it to 800 so I could use a faster shutter speed.
Using live view is a fast and easy way to get your exposure of the moon correct. It will give you instant feedback on any changes you make to the settings on your camera.
As I’ve mentioned before, settings will vary greatly depending on the brightness of the moon and time of day/night, so it’s always good to experiment with your settings when shooting the moon.
Wait there’s more!
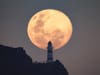
Wellington is one of the windiest cities in the world, and the Brooklyn wind turbine is Wellington’s first and also the oldest operating wind turbine in New Zealand. At 31 meters tall, it is easily seen from most parts of the city. Over the course of a year, the turbine generates the same amount of electricity as 80 homes use in the same period.
I’ve been photographing the moon for quite a few years now, and I’ve learnt a few things through trial and error, so I thought I’d share some more of these tips with you.
Focusing: Thankfully the moon is a bright object in the sky, so even at night, use your auto focus for focusing your camera on the moon.
Allow yourself plenty of time to set up for your shoot: It usually takes longer to set up for your moon shot than you think and I have been caught by this in the past and missed the shot. I generally allow myself 30 minutes set up time.
Use a shutter release and even mirror lock: Especially when using longer focal lengths. Just the vibration caused by clicking on the shutter button and the mirror flipping up can result in having a not so sharp image.
Photograph the moonrise a day before full moon: It’s a lot easier to expose for both the moon and landscape etc, as there will be enough light around just before sunset to give you a nice balanced shot.
Shoot when the moon is high in the sky: if you are after a shot of the moon with great sharp detail on it’s surface, you are best to wait until the moon is high in the sky. When the moon is low at moonrise and moonset, it is being distorted by atmospheric refraction, and even though you may be focused perfectly on the moon, the detail on the surface will look slightly blurry and out of focus.
Interesting Moon Photography Fact
The moon’s orientation and direction changes depending on where you are in the world. To a lot of you, my moon images may look upside down. That’s because they were shot in the southern hemisphere, and you may be use to seeing the moon from a northern hemisphere’s perspective. The moon also rises in a different direction – In the southern hemisphere it’s from right to left. Close to the equator, it’s pretty much straight up. And the further north you go into the northern hemisphere, it rises left to right.
Final word
I hope you’ve found this article on photographing the moon helpful – it is certainly a rewarding experience when you do pull off that epic moon shot, and much more satisfying than just adding a big moon to your photos in Photoshop…
If you’d like to read up about how I go about planning my big moon shots in more detail, feel free to check out my blog on it here
In the meantime remember to stop, look up and enjoy, and the best of luck with photographing The Moon!